to keep your guitar properly set up?
THIS IMPORTANT!

 If the neck needs a reset, (necks that aren’t bolt-ons, and the pocket
can’t simply be shimmed) that’s a fairly expensive fix! The neck will
need to be steamed off! That’s a lengthy process, requiring the
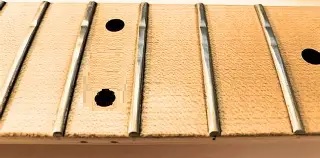
removal of a few frets, drilling some small holes through the fret slots.
Then many hours of steaming through the holes to loosen the glue
holding the neck in the pocket. Removing wood from the pocket, or
shimming the pocket. Regluing/resetting the neck. Followed by a
full setup! Including re-fretting the ones removed!
If the neck needs a reset, (necks that aren’t bolt-ons, and the pocket
can’t simply be shimmed) that’s a fairly expensive fix! The neck will
need to be steamed off! That’s a lengthy process, requiring the
removal of a few frets, drilling some small holes through the fret slots.
Then many hours of steaming through the holes to loosen the glue
holding the neck in the pocket. Removing wood from the pocket, or
shimming the pocket. Regluing/resetting the neck. Followed by a
full setup! Including re-fretting the ones removed!
 If the frets are badly worn, and need replacing, that’ll run between $250
and $350. Depending on the guitar. But frets last a LONG TIME if the guitar
hasn’t been abused! Fret material is a major cost factor. Nickel vs stainless-
steel! A high level, quality guitar could require a stainless-steel fret job that
could cost between $300 and $500! Partially because you wouldn’t take a
high end guitar to a lower end shop or beginner luthier for this level of work!
If the frets are badly worn, and need replacing, that’ll run between $250
and $350. Depending on the guitar. But frets last a LONG TIME if the guitar
hasn’t been abused! Fret material is a major cost factor. Nickel vs stainless-
steel! A high level, quality guitar could require a stainless-steel fret job that
could cost between $300 and $500! Partially because you wouldn’t take a
high end guitar to a lower end shop or beginner luthier for this level of work!
 Learning how to properly set up a guitar takes time and practice. But it
will save you a BUNDLE, once you buy the required tools! The tools will
only cost approximately what one good set up will cost you!
To be clear . . . I’m not suggesting that you take one of your best guitars,
follow my “guidelines” below. And start hacking away at your guitar! If
you are careless, yes, you can damage your guitar! But I AM suggesting
that if you plan to be a guitarist, if you want to better care for your guitar,
and if you want to save a LOT of money over the years, (especially if you
have more than one guitar!) you might want to learn the basics of proper
guitar maintenance and setups!
To be absolutely even more clear . . . If you dive in, and hack away, and you
screw up your guitar because you didn’t proceed with common, practical
common sense, didn’t use the proper tools, or just somehow misunderstood
something in this basic tutorial, that’s on you!
Learning how to properly set up a guitar takes time and practice. But it
will save you a BUNDLE, once you buy the required tools! The tools will
only cost approximately what one good set up will cost you!
To be clear . . . I’m not suggesting that you take one of your best guitars,
follow my “guidelines” below. And start hacking away at your guitar! If
you are careless, yes, you can damage your guitar! But I AM suggesting
that if you plan to be a guitarist, if you want to better care for your guitar,
and if you want to save a LOT of money over the years, (especially if you
have more than one guitar!) you might want to learn the basics of proper
guitar maintenance and setups!
To be absolutely even more clear . . . If you dive in, and hack away, and you
screw up your guitar because you didn’t proceed with common, practical
common sense, didn’t use the proper tools, or just somehow misunderstood
something in this basic tutorial, that’s on you!
 As long as you go slowly, make small adjustments at a time, and use the
proper tools, you shouldn’t have ANY issues! It’s not really that difficult!
And it’s well worth the effort to learn these skills!
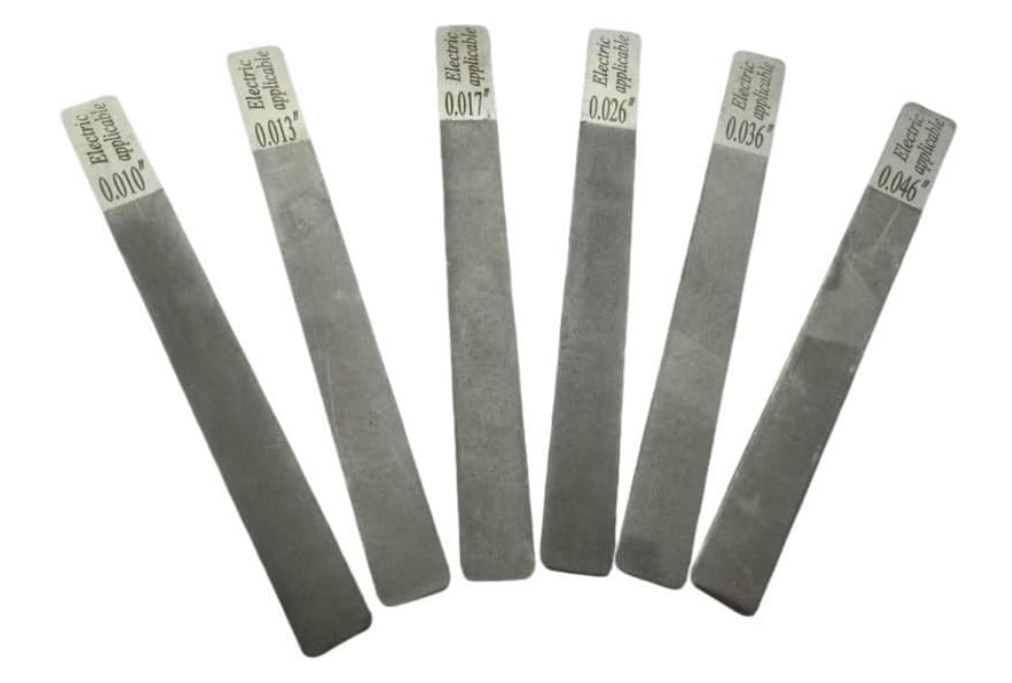
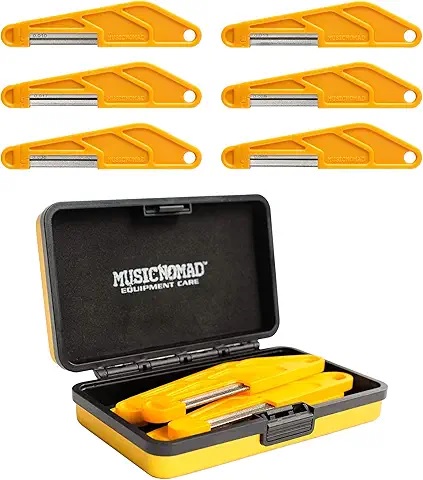
NOTE: By “proper tools”, I mean using the proper tool for each task! IE: A
good set of nut files will cost you $35 to $60. And that’s for a set of SIX!
A set is used for string gauge sets. IE: You need a nut file set of 6 files,
for a standard 1046 gauge set of strings. That file set will work for 0942
gauge strings as well. But not for .011s or larger! You’d need a set for say,
1152s to 1256s. A different set for acoustics! Etc.
As long as you go slowly, make small adjustments at a time, and use the
proper tools, you shouldn’t have ANY issues! It’s not really that difficult!
And it’s well worth the effort to learn these skills!
NOTE: By “proper tools”, I mean using the proper tool for each task! IE: A
good set of nut files will cost you $35 to $60. And that’s for a set of SIX!
A set is used for string gauge sets. IE: You need a nut file set of 6 files,
for a standard 1046 gauge set of strings. That file set will work for 0942
gauge strings as well. But not for .011s or larger! You’d need a set for say,
1152s to 1256s. A different set for acoustics! Etc.
 Diamond coated are great, last a LONG time! But are a bit expensive.
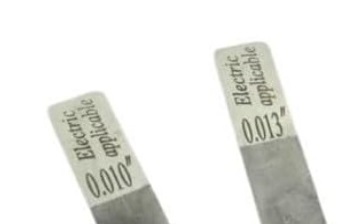
 If you’re filing the nut or saddle for a .010 string, but don’t have a .010
file, and use a .016 file, the slot will be too big for the string! It won’t
seat properly. It will slip and slide around in the slot. Tuning will be a
nightmare. And you will loose sustain! And probably break a lot of strings!
You need the right tool for the right job!
If you’re filing the nut or saddle for a .010 string, but don’t have a .010
file, and use a .016 file, the slot will be too big for the string! It won’t
seat properly. It will slip and slide around in the slot. Tuning will be a
nightmare. And you will loose sustain! And probably break a lot of strings!
You need the right tool for the right job!
 A good source for quality tools is musicnomadcare.com
I'm not a dealer, nor do I profit from you buying their tools and products.
But I personally recommend them.
One day down the road, you might start teaching! And if you become
really good at setting up guitars, you could make a good bit of extra
income providing the service to others in your community! Most players
have to SEARCH for someone to work on their guitars. Or have to rely on
big box stores to do the work. But guess what? Those stores often have
contact with skilled luthiers who do the work for them! YOU could become
that guy or gal!
But again, it’s up to you!
OK, let’s get started! A full setup usually requires 2 days! A couple hours
on the 1st day. Then some tweaking on day 2, after the wood “settles” from
the work done on the 1st day.
2 Day Process. Day 1: Get it close
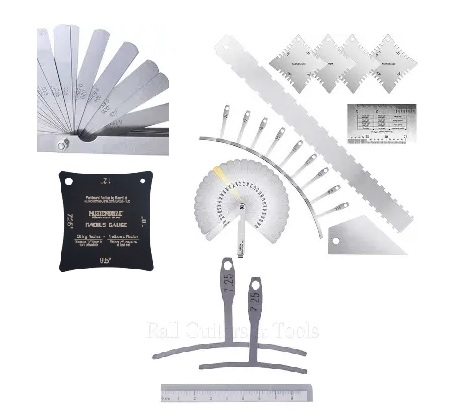
NOTE: All measurements are in inch, so no " is used. Use the appropriate
tool for each task! If you don’t have the correct tool, get it before you do
a setup! IE: If you need to file the nut slots and/or saddle slots (you almost
certainly will!) you’ll need a set of nut slot files! And it should be the right
set for your string gauge! IE: If you use 0942 or 1046 strings, you need
a set for those 2 gauges. One set will do both. If you use heavy strings,
like 1152’s or heavier, you need the set for heavy strings!
The slots need to be the right size! Within a few 1000ths of string size!
~
Remove all your strings – Loosen them, then use wire cutters. Quick!
A good source for quality tools is musicnomadcare.com
I'm not a dealer, nor do I profit from you buying their tools and products.
But I personally recommend them.
One day down the road, you might start teaching! And if you become
really good at setting up guitars, you could make a good bit of extra
income providing the service to others in your community! Most players
have to SEARCH for someone to work on their guitars. Or have to rely on
big box stores to do the work. But guess what? Those stores often have
contact with skilled luthiers who do the work for them! YOU could become
that guy or gal!
But again, it’s up to you!
OK, let’s get started! A full setup usually requires 2 days! A couple hours
on the 1st day. Then some tweaking on day 2, after the wood “settles” from
the work done on the 1st day.
2 Day Process. Day 1: Get it close
NOTE: All measurements are in inch, so no " is used. Use the appropriate
tool for each task! If you don’t have the correct tool, get it before you do
a setup! IE: If you need to file the nut slots and/or saddle slots (you almost
certainly will!) you’ll need a set of nut slot files! And it should be the right
set for your string gauge! IE: If you use 0942 or 1046 strings, you need
a set for those 2 gauges. One set will do both. If you use heavy strings,
like 1152’s or heavier, you need the set for heavy strings!
The slots need to be the right size! Within a few 1000ths of string size!
~
Remove all your strings – Loosen them, then use wire cutters. Quick!
 Measure and make a note of the fretboard radius at last fret.
 Tighten all screws, including the tuning machine bushings.
Clean and condition the fretboard. Clean the body and neck.
You should have a large, open, flat, safe place to do your setup. Large
enough for the guitar to lay flat, and space for tools. And you need
adequate lighting!
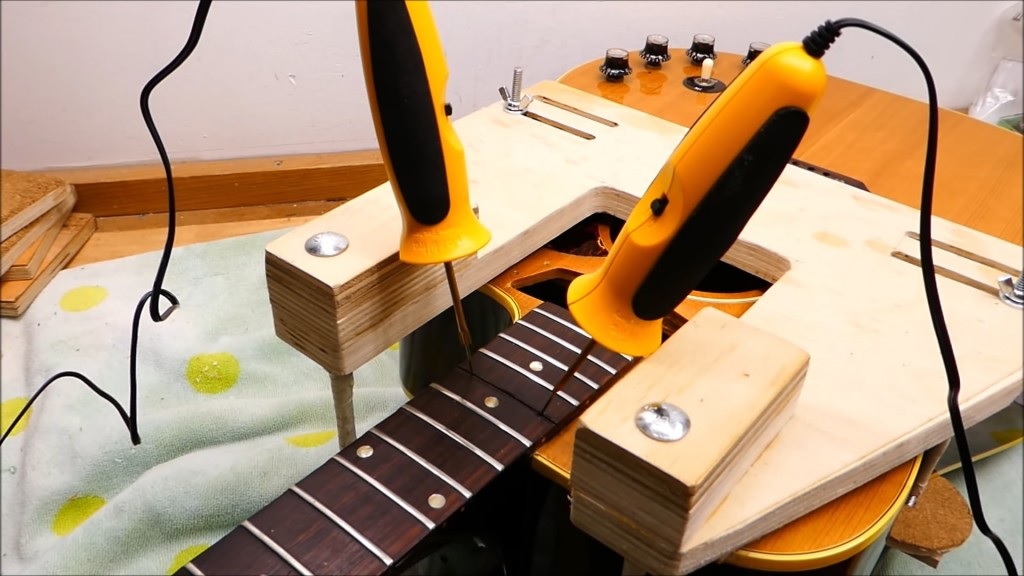
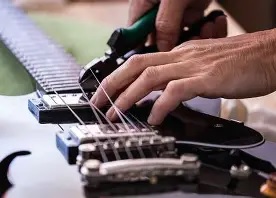
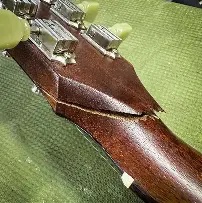
NOTE: Don't do this!
Tighten all screws, including the tuning machine bushings.
Clean and condition the fretboard. Clean the body and neck.
You should have a large, open, flat, safe place to do your setup. Large
enough for the guitar to lay flat, and space for tools. And you need
adequate lighting!
NOTE: Don't do this!
 Your guitar should be laying flat, body on the "table". Support the neck
just enough so the guitar doesn't move around. But don't bridge it like
in the picture! That puts excess stress on the neck. And if that neck
support is too close to the headstock, you could have a major break!
Your guitar should be laying flat, body on the "table". Support the neck
just enough so the guitar doesn't move around. But don't bridge it like
in the picture! That puts excess stress on the neck. And if that neck
support is too close to the headstock, you could have a major break!
 This is THE time to look for physical issues, anomalies that need corrected!
Raised frets? Binding coming loose? Stripped screws? Etc.
Replace with new strings - Tune
Lower your pickups to make sure that the magnetism from the pickup
doesn't interfere with the String's oscillation. (You’ll adjust them back
up later, as needed to match the changes in the setup!)
The Order
Truss Rod adjustment, Bridge radius, Action/string height, Nut slots,
Intonation, Pickup heights
Truss Rod
Capo 1st fret - guitar in playing position - press 12th fret -
Measure the gap between the 6th fret and the string.
This is THE time to look for physical issues, anomalies that need corrected!
Raised frets? Binding coming loose? Stripped screws? Etc.
Replace with new strings - Tune
Lower your pickups to make sure that the magnetism from the pickup
doesn't interfere with the String's oscillation. (You’ll adjust them back
up later, as needed to match the changes in the setup!)
The Order
Truss Rod adjustment, Bridge radius, Action/string height, Nut slots,
Intonation, Pickup heights
Truss Rod
Capo 1st fret - guitar in playing position - press 12th fret -
Measure the gap between the 6th fret and the string.
 Remove TR cover. Determine proper Allen wrench size. 4mm is common.
Big gap, too much relief - No gap, no relief - High in the middle, back bow
.006-.008 optimal. Depends on how aggressively you play.
.008-.010 for acoustic - .010-.012 for Classical
Keep the gauge parallel with the fret. If gauge touches the string, turn truss rod
counter clockwise to add relief. If there's a gap, clockwise to reduce the gap.
GO SLOWLY! A little at a time! ¼ turn is a LOT!
Remove TR cover. Determine proper Allen wrench size. 4mm is common.
Big gap, too much relief - No gap, no relief - High in the middle, back bow
.006-.008 optimal. Depends on how aggressively you play.
.008-.010 for acoustic - .010-.012 for Classical
Keep the gauge parallel with the fret. If gauge touches the string, turn truss rod
counter clockwise to add relief. If there's a gap, clockwise to reduce the gap.
GO SLOWLY! A little at a time! ¼ turn is a LOT!
 NOTE: Single vs double acting TRs: Single can only reduce relief. Double can
do both. Most modern guitars use a double action truss rod!
Do Not Force The Nut To Turn! If you cannot get the truss rod to move, take
it to a reliable, qualified guitar tech! Stripping the nut or forcing the
rod to move can do expensive to repair damage!
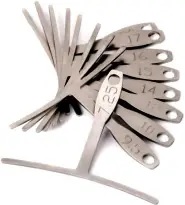
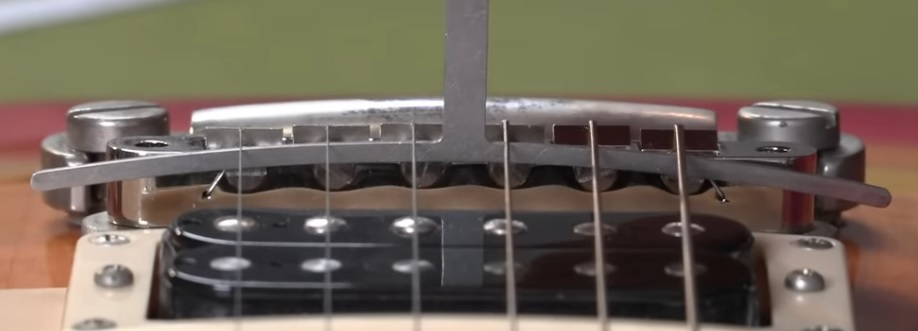
Bridge Radius
Use the radius gauge that matched your fretboard.
Position it UNDER the strings, or on top of the stringss, depending on
the type of radius gauge you're using. Place the gauge near the bridge
and look for any gaps between the gauge and strings.
With the gauge on the left, below, set the gauge on the strings. For
the gauge on the right, below, place the gauge under the strings, and
lift the gauge until it contacts the strings.
The gaps will be pretty small! Hold the guitar so you can look down
the strings. If you still can't see any gaps, pluck each string and
listen! If the string rings out, it's too low. If it buzzes, it's
almost touching the string! If it's dead, it's touching the string.
NOTE: Single vs double acting TRs: Single can only reduce relief. Double can
do both. Most modern guitars use a double action truss rod!
Do Not Force The Nut To Turn! If you cannot get the truss rod to move, take
it to a reliable, qualified guitar tech! Stripping the nut or forcing the
rod to move can do expensive to repair damage!
Bridge Radius
Use the radius gauge that matched your fretboard.
Position it UNDER the strings, or on top of the stringss, depending on
the type of radius gauge you're using. Place the gauge near the bridge
and look for any gaps between the gauge and strings.
With the gauge on the left, below, set the gauge on the strings. For
the gauge on the right, below, place the gauge under the strings, and
lift the gauge until it contacts the strings.
The gaps will be pretty small! Hold the guitar so you can look down
the strings. If you still can't see any gaps, pluck each string and
listen! If the string rings out, it's too low. If it buzzes, it's
almost touching the string! If it's dead, it's touching the string.
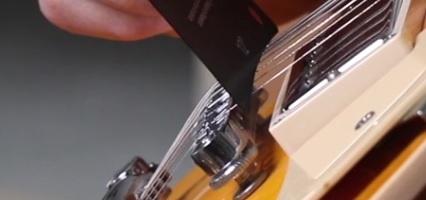
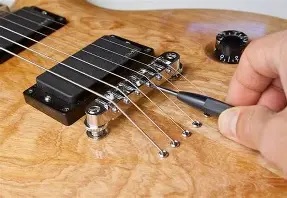
 If the bridge does not have saddle height adjustment, file the slots to get
the radius correct. Use a radius gauge! You need to file the slots on the
strings that touch the gauge, one at a time, until all strings are touching
the gauge. As in, you lower the strings that touch the gauge until each
string touches the gauge.
Don't be shocked if you need to lower 4 or 5 of the slots. It happens.
If you have only one slot that's too deep, one string not touching,
you need to file ALL of the others! Usually, it'll just be a few!
Do not continue until you get this! You put the gauge under the strings,
and then hold the gauge up so it's in contact with the strings. Or place the
gauge on top of the strings, and LIGHTLY hold it in place!
Some strings will be touching the gauge. Some strings will not. There will
be a gap between the string and the gauge. To reduce that gap, you need
to lower the strings that are higher. The ones touching the gauge!
Keep in mind, we're only talking about a very small amount! Most likely
there will only be a gap of .010 to .020. (A hair is about .007!) So
take a LITTLE BIT off at a time! A few light swipes with the file!
It's FAR BETTER to do this 3, 4 or 5 times, a little bit, check, then
a little more until it's correct, than to take off too much! If you do,
you'll need to re-file ALL of the slots because the one to took too much
off of will now be lower than the lowest one before you screwed it up!
GO SLOWLY! A LITTLE AT A TIME!
You can't put metal back on!
One saddle at a time. Take a little off. Recheck. You can
take a little off each saddle that's not touching, and recheck.
But I suggest doing one at a time.
If the bridge does not have saddle height adjustment, file the slots to get
the radius correct. Use a radius gauge! You need to file the slots on the
strings that touch the gauge, one at a time, until all strings are touching
the gauge. As in, you lower the strings that touch the gauge until each
string touches the gauge.
Don't be shocked if you need to lower 4 or 5 of the slots. It happens.
If you have only one slot that's too deep, one string not touching,
you need to file ALL of the others! Usually, it'll just be a few!
Do not continue until you get this! You put the gauge under the strings,
and then hold the gauge up so it's in contact with the strings. Or place the
gauge on top of the strings, and LIGHTLY hold it in place!
Some strings will be touching the gauge. Some strings will not. There will
be a gap between the string and the gauge. To reduce that gap, you need
to lower the strings that are higher. The ones touching the gauge!
Keep in mind, we're only talking about a very small amount! Most likely
there will only be a gap of .010 to .020. (A hair is about .007!) So
take a LITTLE BIT off at a time! A few light swipes with the file!
It's FAR BETTER to do this 3, 4 or 5 times, a little bit, check, then
a little more until it's correct, than to take off too much! If you do,
you'll need to re-file ALL of the slots because the one to took too much
off of will now be lower than the lowest one before you screwed it up!
GO SLOWLY! A LITTLE AT A TIME!
You can't put metal back on!
One saddle at a time. Take a little off. Recheck. You can
take a little off each saddle that's not touching, and recheck.
But I suggest doing one at a time.
If your guitar is factory fresh, or hasn’t been maintained, maybe never
actually ever set up, file ALL slots a TEENY BIT to remove any burrs, or
sharp edges. Just a couple light swipes! Then proceed.
USE THE PROPER FILE FOR THE SIZE OF THE SLOT/STRING! IE: Use a .010
file for .009 or .010 string slots! Not a .015 to .020! Slot size should be
within a FEW 1000ths larger of the string size!
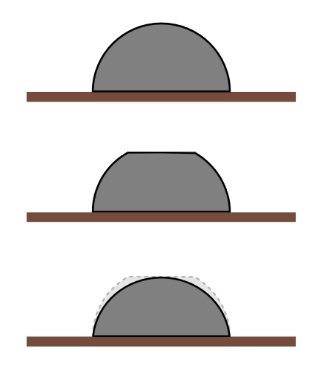
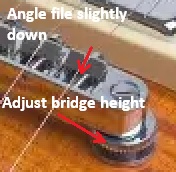
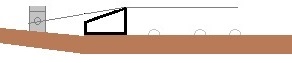
File the slot on a slight angle, leaning down toward the bridge. Picture is
exaggerated! If the angle is too steep, the saddle will be pointed, and the
landing surface for the string will be thin and sharp! Just a slight angle!
 It doesn't need to be perfect. But the closer you match the fretboard radius,
the more evenly your guitar will play! Your pick will more easily glide from
string to string!
Action
Now that the bridge radius is set, you'll need to set the action. The gap
between the strings and the top of the frets.
Capo 1st fret - guitar in playing position. Measure at 12th fret. E .060,
e .050 Relieve some string tension and adjust each side using the bridge
adjustment thumb screws.
Check playability. How's it feel? Adjust to taste, within reason! Bend
strings. Check for fret buzz on all strings, all frets. If you get any fret
buzz, check to see if there are any high frets. You might need some fret work.
If frets are level to each other, slightly raise the action to remove the buzz.
If you can't get it out with a SMALL action adjustment, go back and check
neck relief. Readjust truss rod if needed. A LITTLE extra relief is OK.
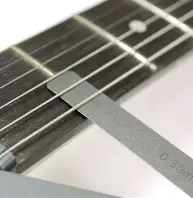
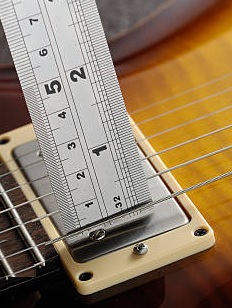
To check for high frets, you need a straight egde that covers at least 3 frets.
Hold the gauge against the 1st 3 frets. Does the gauge "rock"? Then move to
the 2nd, 3rd and 4th fret. Same thing. Continue up the neck until you've
checked all frets.
It doesn't need to be perfect. But the closer you match the fretboard radius,
the more evenly your guitar will play! Your pick will more easily glide from
string to string!
Action
Now that the bridge radius is set, you'll need to set the action. The gap
between the strings and the top of the frets.
Capo 1st fret - guitar in playing position. Measure at 12th fret. E .060,
e .050 Relieve some string tension and adjust each side using the bridge
adjustment thumb screws.
Check playability. How's it feel? Adjust to taste, within reason! Bend
strings. Check for fret buzz on all strings, all frets. If you get any fret
buzz, check to see if there are any high frets. You might need some fret work.
If frets are level to each other, slightly raise the action to remove the buzz.
If you can't get it out with a SMALL action adjustment, go back and check
neck relief. Readjust truss rod if needed. A LITTLE extra relief is OK.
To check for high frets, you need a straight egde that covers at least 3 frets.
Hold the gauge against the 1st 3 frets. Does the gauge "rock"? Then move to
the 2nd, 3rd and 4th fret. Same thing. Continue up the neck until you've
checked all frets.
 If you have a high fret, or more than one, or if your frets are worn and have
"dents" in them, that needs to be addressed. The adjustments in this tutorial
do not account for high or damaged frets! That's for a different tutorial!
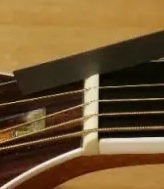
The NUT
If the nut slots are too deep, the strings will buzz when playing the first
few frets. If the slots are too shallow, the 1st few frets will be out of
tune! Especially the first and second frets!
You check nut slot depth by checking the gap on the 1st fret.
Shoot for about .020 on each string. This is the gap between the fret top
and string. As long as the string doesn’t buzz on the fret, if the slot is less
than .020, it’ll be OK. If it DOES buzz, you need to either shim up the nut
(and refile each one that’s above .020) or fill the offending slot and refile
the slot.
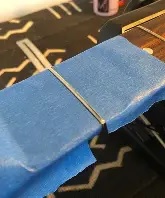
Protect your guitar! Before filing, with a hard, sharp file! Use Painter's
tape anywhere a tool could damage your guitar!
If you have a high fret, or more than one, or if your frets are worn and have
"dents" in them, that needs to be addressed. The adjustments in this tutorial
do not account for high or damaged frets! That's for a different tutorial!
The NUT
If the nut slots are too deep, the strings will buzz when playing the first
few frets. If the slots are too shallow, the 1st few frets will be out of
tune! Especially the first and second frets!
You check nut slot depth by checking the gap on the 1st fret.
Shoot for about .020 on each string. This is the gap between the fret top
and string. As long as the string doesn’t buzz on the fret, if the slot is less
than .020, it’ll be OK. If it DOES buzz, you need to either shim up the nut
(and refile each one that’s above .020) or fill the offending slot and refile
the slot.
Protect your guitar! Before filing, with a hard, sharp file! Use Painter's
tape anywhere a tool could damage your guitar!
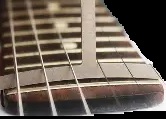
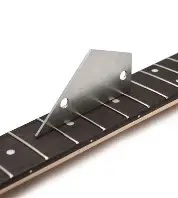
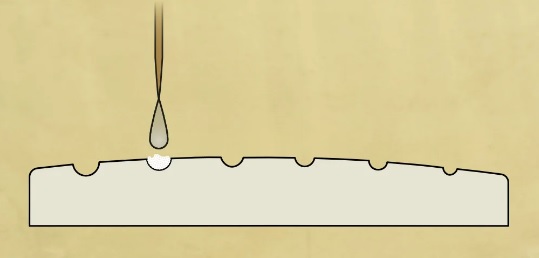
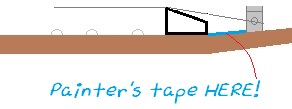 Be sure when you file the nut slots that you slightly angle the slot so it’s
higher at the active side of the nut. Angled down, slightly on the head-
stock side. Picture is exaggerated! The file picture is correct!
Be sure when you file the nut slots that you slightly angle the slot so it’s
higher at the active side of the nut. Angled down, slightly on the head-
stock side. Picture is exaggerated! The file picture is correct!
 Just as with the bridge, you can't put material back once you file it out! So,
go slowly. A few swipes at a time! If you file too much, if the slot is too
deep, you will need to shim the nut, or fill the slot, and re-file it.
You can fill a slot by filling it with baking soda, and adding a drop of
Super Glue! Be careful, and use painter's tape on both sides of the nut
to protect it from being damaged by the glue and baking soda.
Just as with the bridge, you can't put material back once you file it out! So,
go slowly. A few swipes at a time! If you file too much, if the slot is too
deep, you will need to shim the nut, or fill the slot, and re-file it.
You can fill a slot by filling it with baking soda, and adding a drop of
Super Glue! Be careful, and use painter's tape on both sides of the nut
to protect it from being damaged by the glue and baking soda.
 Just go one string at a time. Get it as close to .020 as you can. Then go on
to the next string.
Intonation
In playing position! Be in tune! 12th fret to start. Once 12 is good, check
17! The open string and 12th fret should be the same EXACT pitch! (An
octave higher!) If the 12th fret note is higher, the string is too short!
Adjust the saddle back, toward the bridge. If the 12th fret is lower, the
string is too long. Adjust the saddle so it’s closer to the nut!
Just go one string at a time. Get it as close to .020 as you can. Then go on
to the next string.
Intonation
In playing position! Be in tune! 12th fret to start. Once 12 is good, check
17! The open string and 12th fret should be the same EXACT pitch! (An
octave higher!) If the 12th fret note is higher, the string is too short!
Adjust the saddle back, toward the bridge. If the 12th fret is lower, the
string is too long. Adjust the saddle so it’s closer to the nut!
 Ideally, you should use a tuner, and play a harmonic on the 12th fret.
Compare the reading on the tuner with the string played open. If you have
trouble playing a harmonic on fret 12, then play the 12th fret note.
But don't press too hard! Only press hard enough to get a good note!
Pressing too hard can make the string go SHARP!
Be sure to mute the string before playing it open, or at the 12th fret.
Mute between notes to stop any vibration on the strings.
NOTE: Think bass guitar! A bass has a L O N G neck to accommodate LOWER
notes! LONG strings, LOW notes! So, if your 12th fret note is flat, too LOW,
shorten the string!
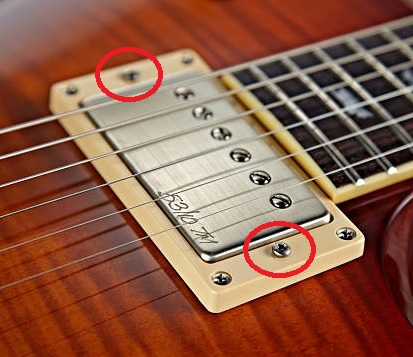
Pickup Height
Press the last fret. Neck .080 both sides to start. Bridge .060. As in,
set the neck pickup so it's approx. .08 from the strings when the last fret
is held down. You can use a capo to free up your hands. Both sides, at the
low E string and high e string, about the same to start!
Use a scale or feeler gauge.
Ideally, you should use a tuner, and play a harmonic on the 12th fret.
Compare the reading on the tuner with the string played open. If you have
trouble playing a harmonic on fret 12, then play the 12th fret note.
But don't press too hard! Only press hard enough to get a good note!
Pressing too hard can make the string go SHARP!
Be sure to mute the string before playing it open, or at the 12th fret.
Mute between notes to stop any vibration on the strings.
NOTE: Think bass guitar! A bass has a L O N G neck to accommodate LOWER
notes! LONG strings, LOW notes! So, if your 12th fret note is flat, too LOW,
shorten the string!
Pickup Height
Press the last fret. Neck .080 both sides to start. Bridge .060. As in,
set the neck pickup so it's approx. .08 from the strings when the last fret
is held down. You can use a capo to free up your hands. Both sides, at the
low E string and high e string, about the same to start!
Use a scale or feeler gauge.
 Set the bridge pickup to about .06, both sides, to start! Remove the capo.
It's time to plug'r in! Get as clean a tone as you can from your amp.
Balance each pickup by ear so all strings have the same volume. Also, match
the pickups together so either they are the same volume, or if preferred, one
a bit louder if you use one pup for solos and fills.
Both pickups might sound OK after your rough adjustment. But you should
take the time to optimize your pickup heights! One at a time!
Start with the neck pickup. Adjust it closer to the strings, a small move
at a time! Continue moving both sides up, until you hear the sweet spot!
If you get the pickup too close to the string, the magnetic pull of the
pickup will pull the string out of tune! So watch your tuner!
Set the bridge pickup to about .06, both sides, to start! Remove the capo.
It's time to plug'r in! Get as clean a tone as you can from your amp.
Balance each pickup by ear so all strings have the same volume. Also, match
the pickups together so either they are the same volume, or if preferred, one
a bit louder if you use one pup for solos and fills.
Both pickups might sound OK after your rough adjustment. But you should
take the time to optimize your pickup heights! One at a time!
Start with the neck pickup. Adjust it closer to the strings, a small move
at a time! Continue moving both sides up, until you hear the sweet spot!
If you get the pickup too close to the string, the magnetic pull of the
pickup will pull the string out of tune! So watch your tuner!
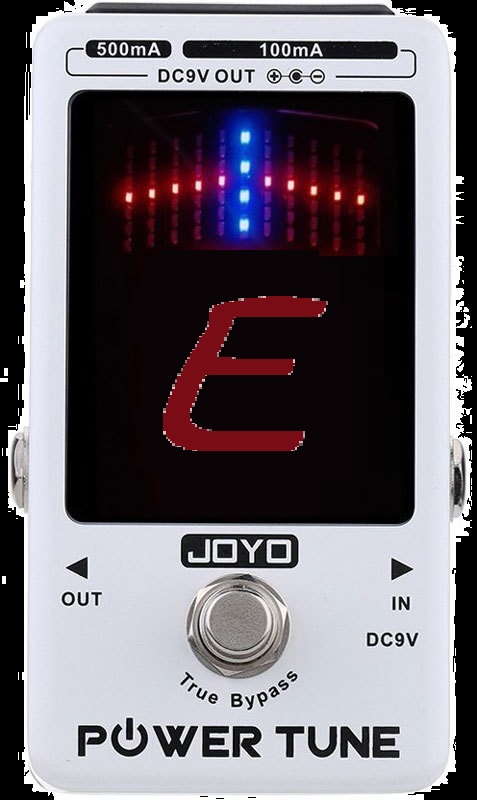 NOTE: This tuner also powers up to 8 pedals! 6 9v 100mA and 2 9v 500mA
and each power port is totally isolated.
Depending on the "strength" of the magnets, .08 might already be too
close to the strings. If you get buzz, or the string doesn't vibrate
cleanly and give you a solid, good tone, back it off!
If you start getting string buzz, you're WAY too close to the string. Back
if off slowly. Basically, keep adjusting the pickup until it sounds the best!
And make sure all strings are the same volume! Adjust this to taste! You
might prefer having your high strings a bit louder than the lower strings.
Just be sure you don't get too bright! And be sure you still hear the low
E string when you strum chords. It's a bit trial and error.
Then move to the bridge pickup and do it the same way. Except you also need
to be sure it's the same volume as your neck pickup. Again, depending on
your preference. You might want the bridge pickup a bit louder than the neck.
In this case, once you have the bridge pickup dialed in, compare it to
the neck pickup. If you want the bridge pickup to be a little louder
than the neck, lower the neck pickup a SMALL amount until you get the
balance you want.
You should also check the middle pickup position, and see how they "blend".
You might need to make a small adjustment to one or the other pickups. If
the sound is too bright, back off the bridge pickup. Or, if it's to low, or
sounds muddy, back off the neck pickup. Or try raising the bridge pickup.
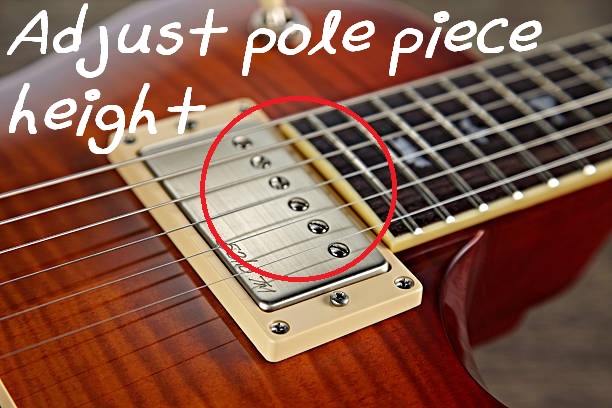
If you have a string that's louder than the others, lower the pole piece
slightly until it's balances with the others. Vice versa if it's too quiet.
NOTE: This tuner also powers up to 8 pedals! 6 9v 100mA and 2 9v 500mA
and each power port is totally isolated.
Depending on the "strength" of the magnets, .08 might already be too
close to the strings. If you get buzz, or the string doesn't vibrate
cleanly and give you a solid, good tone, back it off!
If you start getting string buzz, you're WAY too close to the string. Back
if off slowly. Basically, keep adjusting the pickup until it sounds the best!
And make sure all strings are the same volume! Adjust this to taste! You
might prefer having your high strings a bit louder than the lower strings.
Just be sure you don't get too bright! And be sure you still hear the low
E string when you strum chords. It's a bit trial and error.
Then move to the bridge pickup and do it the same way. Except you also need
to be sure it's the same volume as your neck pickup. Again, depending on
your preference. You might want the bridge pickup a bit louder than the neck.
In this case, once you have the bridge pickup dialed in, compare it to
the neck pickup. If you want the bridge pickup to be a little louder
than the neck, lower the neck pickup a SMALL amount until you get the
balance you want.
You should also check the middle pickup position, and see how they "blend".
You might need to make a small adjustment to one or the other pickups. If
the sound is too bright, back off the bridge pickup. Or, if it's to low, or
sounds muddy, back off the neck pickup. Or try raising the bridge pickup.
If you have a string that's louder than the others, lower the pole piece
slightly until it's balances with the others. Vice versa if it's too quiet.
 This should take a while! Maybe 10-15 minutes. Keep going back and forth,
tweaking, until you get the tone you want from each pickup, and with both
pickups together.
Replace truss rod cover. Fine tune. DONE! (For Day 1!)
~
Day 2: Fine tune the Setup
Go over each step. You might need to readjust the truss rod after it settled
for a day. If you do, you will need to go over the entire setup again! Don't
skip this part! If you did a lot of adjusting to get the setup right, you'll
need to do more tweaking on day 2! But you'll only need small adjustments!
If not, if the truss rod doesn't need adjusting, you're probably good to
go, after checking intonation!
If you check the full setup every time you change strings, your guitar will
STAY set up! And when it needs a tweak, it will be just that. A minor tweak!
The biggest changes to your guitar occur during seasonal changes.
Especially winter into spring, and fall into winter.
Also, it’s not unusual for an older guitar, even one you’ve been
maintaining for a long time, to “suddenly” need a super setup! Wood
moves. Parts shift. Holes get larger. Sometimes the neck moves!
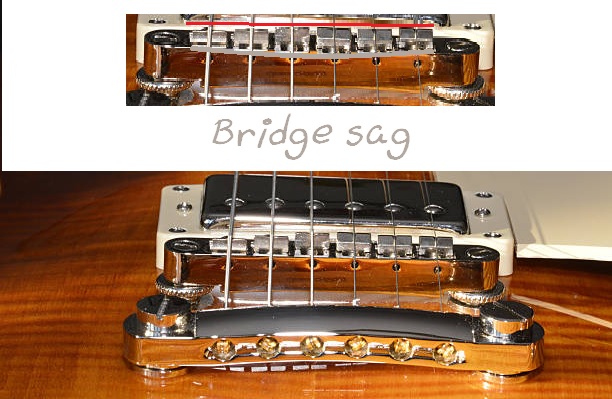
Tune-o-matic bridges have a tendency to "sag" after a while! You can correct
this by resetting the radius of the saddles. It might require buying new
saddles. But once it sags noticeably, you should consider buying a new bridge.
This should take a while! Maybe 10-15 minutes. Keep going back and forth,
tweaking, until you get the tone you want from each pickup, and with both
pickups together.
Replace truss rod cover. Fine tune. DONE! (For Day 1!)
~
Day 2: Fine tune the Setup
Go over each step. You might need to readjust the truss rod after it settled
for a day. If you do, you will need to go over the entire setup again! Don't
skip this part! If you did a lot of adjusting to get the setup right, you'll
need to do more tweaking on day 2! But you'll only need small adjustments!
If not, if the truss rod doesn't need adjusting, you're probably good to
go, after checking intonation!
If you check the full setup every time you change strings, your guitar will
STAY set up! And when it needs a tweak, it will be just that. A minor tweak!
The biggest changes to your guitar occur during seasonal changes.
Especially winter into spring, and fall into winter.
Also, it’s not unusual for an older guitar, even one you’ve been
maintaining for a long time, to “suddenly” need a super setup! Wood
moves. Parts shift. Holes get larger. Sometimes the neck moves!
Tune-o-matic bridges have a tendency to "sag" after a while! You can correct
this by resetting the radius of the saddles. It might require buying new
saddles. But once it sags noticeably, you should consider buying a new bridge.
 Albeit, it would probably be ideal to take it to a luthier for this setup, it’s
not really much more involved than a simple setup. It could involve a neck
pocket shim. Not a big deal! But that's for bolt on necks.
But it could also require a NECK RESET! And you won’t want to do this
yourself unless you have special tools, including a steamer!
Here's a link to the one page PDF. Click to open in your browser.
You can print it out from there, and save it to your PC. Or RIGHT
click, and Save Link As . . .
Click Here
There ya have it! As always, stay safe! Wayne
Albeit, it would probably be ideal to take it to a luthier for this setup, it’s
not really much more involved than a simple setup. It could involve a neck
pocket shim. Not a big deal! But that's for bolt on necks.
But it could also require a NECK RESET! And you won’t want to do this
yourself unless you have special tools, including a steamer!
Here's a link to the one page PDF. Click to open in your browser.
You can print it out from there, and save it to your PC. Or RIGHT
click, and Save Link As . . .
Click Here
There ya have it! As always, stay safe! Wayne
Visit the MidKar website! Please help keep us online with a small donation! This site is free for all. The tutorials, workshops. 43,813 MIDI, KAR & BIAB backing tracks files, 23 BIAB User Styles. A FREE SoundFont, Timbres of Heaven. Free MIDI players and editor! The fees for a site this large (Nearly 280 pages with over 50K files) is pretty high, as you can imagine. Please consider making a small donation to help keep us online. It would help so much! Thanks! Wayne PS: I pay for the site and all hosting, security and domain related expenses out of pocket. Donations appreciated. Please click the link below.