IF YOU ARE "RETURNING" TO THIS WORKSHOP . . . YOU CAN SKIP THE INTRO TEXT . . . CLICK HERE
Barre Chords 101 ~ What you need to get them down!
~~~~~~~~~~~~~~~~~~~~~~~~
NOTE: If this first part looks, or seems like an "AD" to you,
keep this in mind . . .
My tutorials and workshops are FREE! The ONLY thing I'm trying
to sell you on is the importance of continuing to learn!
~~~~~~~~~~~~~~~~~~~~~~~~
Before even starting to work on this workshop, please take a few minutes
to read the linked tutorial.
Thumb Mechanics - Extending Your Reach
Most of your problems with ANYTHING on guitar, are the result of not properly
placing your thumb where it belongs! Because of the mechanics of how the
thumb, and hand, in general, works . . . your thumb placement VARIES!
Yes! You need to MOVE your thumb to different positions while playing!
And most people don't know that! This "mostly graphics", short tutorial
will explain it all, and show you the correct thumb and hand positions
to use for all styles of playing!
If you have ANY problems with hand pain, or issues with your stretch . . .
Please check out this short tutorial before moving on! It'll help you
with everything you're trying to do on guitar!

Do YOU know where YOUR thumbs are right now?
Go there right now! It's a quik read. It's OK, I'll wait . . .
~~~~~~~~~~~~~~~~~~~~~~~~
Welcome back!
Barre Chords ~ 101 to 104: Getting Started, and MORE!
Barre Chords ~ A to Z ! We'll cover it ALL!
Well, at least to G! Ha!!!
All you need to get started, and get "Good"!

But . . . You Gotta Wanna!
To Go From Start To Finish . . .
You Gotta . . .
Finish What You Start!
Let's get started!
~~~~~~~~~~~~~~~~~~~~~~~~~~~~~~~~
The Intro!
The 1st time you work through this workshop, it'll take longer to get through
because you're reading, and learning "the routine". The 2nd time through, you
can just click the link at the very TOP of this page! It'll jump you right
to the actual exercises and Learn'em tracks, skipping all the INTRO text!
So, THIS time through will take a while! But it'll be worth it! Trust me!
Learn'em Tracks
There is a series of Learn'em tracks and DRILLS tracks. You work on the
Learn'em tracks first. They are very slow! This is to develop accuracy,
and hand and finger strength, while you're developing muscle memory.
The DRILLS tracks are cool! Each track starts at a slow tempo, and plays a
pattern, a note phrase, or a chord pattern. Then it repats the pattern several
times, each repeat increases in tempo. And it's a workout!
It is virually impossible for you to work this workshop and not dramatically
improve in a pretty short amount of time! It all depends on YOU! If you DO IT!
If you put in the time, and do each section as instructed, you will see
noticeable improvement within DAYS! Not months - not years!
WORKING the workshop means doing ALL of the exercises! Don't skip any!
And . . . DO THEM IN ORDER!
We're concentrating on 4 barre chord shapes in this workshop. Once you get through this
workshop, you won't have trouble playing any of them again! Trust me on this!
After the 1st few exercises, it'll get easier. They're all done the same
way, basically. And there will be less text instructions. Stick with me!
In just a bit, we're going to go step by step. And I promise you . . .
You can do this! Once we break it all down into small details, little steps,
and once I teach you the tricks! (We'll work on the Building Blocks!)
So, what exactly is a barre chord? And why would you use them? Far better
questions would be . . . WHEN do you use barre chords? And when DON'T you?
You might have heard before that learning your triads is crutial
to becoming a proficient guitarist. And I agree! Triads, 3 note chords
opens up a lot of doors. But learning barre chords OPENS MORE!
There are 100s of chords that can be played on a guitar. Actually,
there are THOUSANDS! Depending on the source, the number of
playable chords on a guitar range from 2,341 to 4,083!
That probably sounds daunting! But remember this . . . Most chords
are either moveable, or can be "barred" and played in many positions
across the fretboard. Moved to each fret. And the name of the chord
changes on each fret.
So, doesn't it make sense to learn some of these moveable chords?
Sure it does! Just as it makes sense to learn some barre chord shapes!
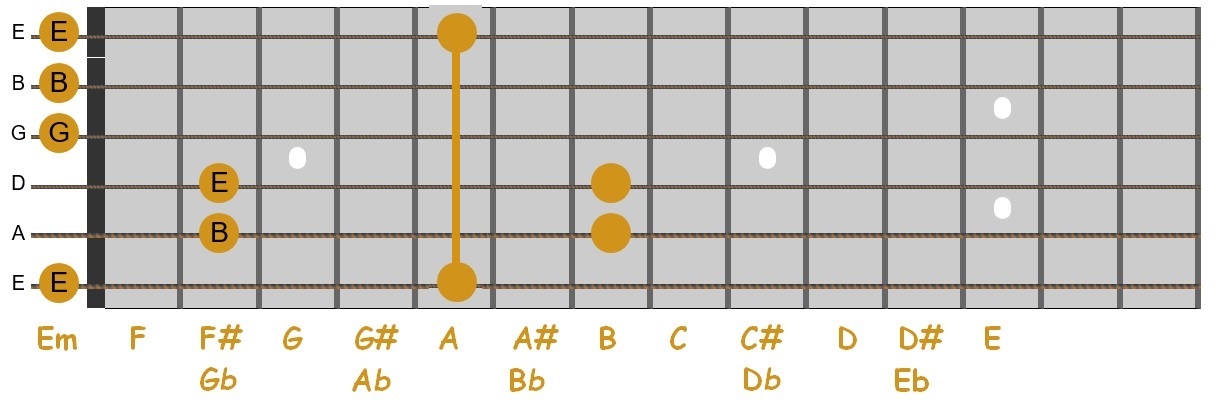
Learn one barre shape, say, Em, and you can now play . . .
EVERY MINOR CHORD!

If you slide that Open Em up 5 frets, you have an Am! Your first finger
becomes a "capo"! So ALL of the notes moved up 5 frets, or semi-tones.
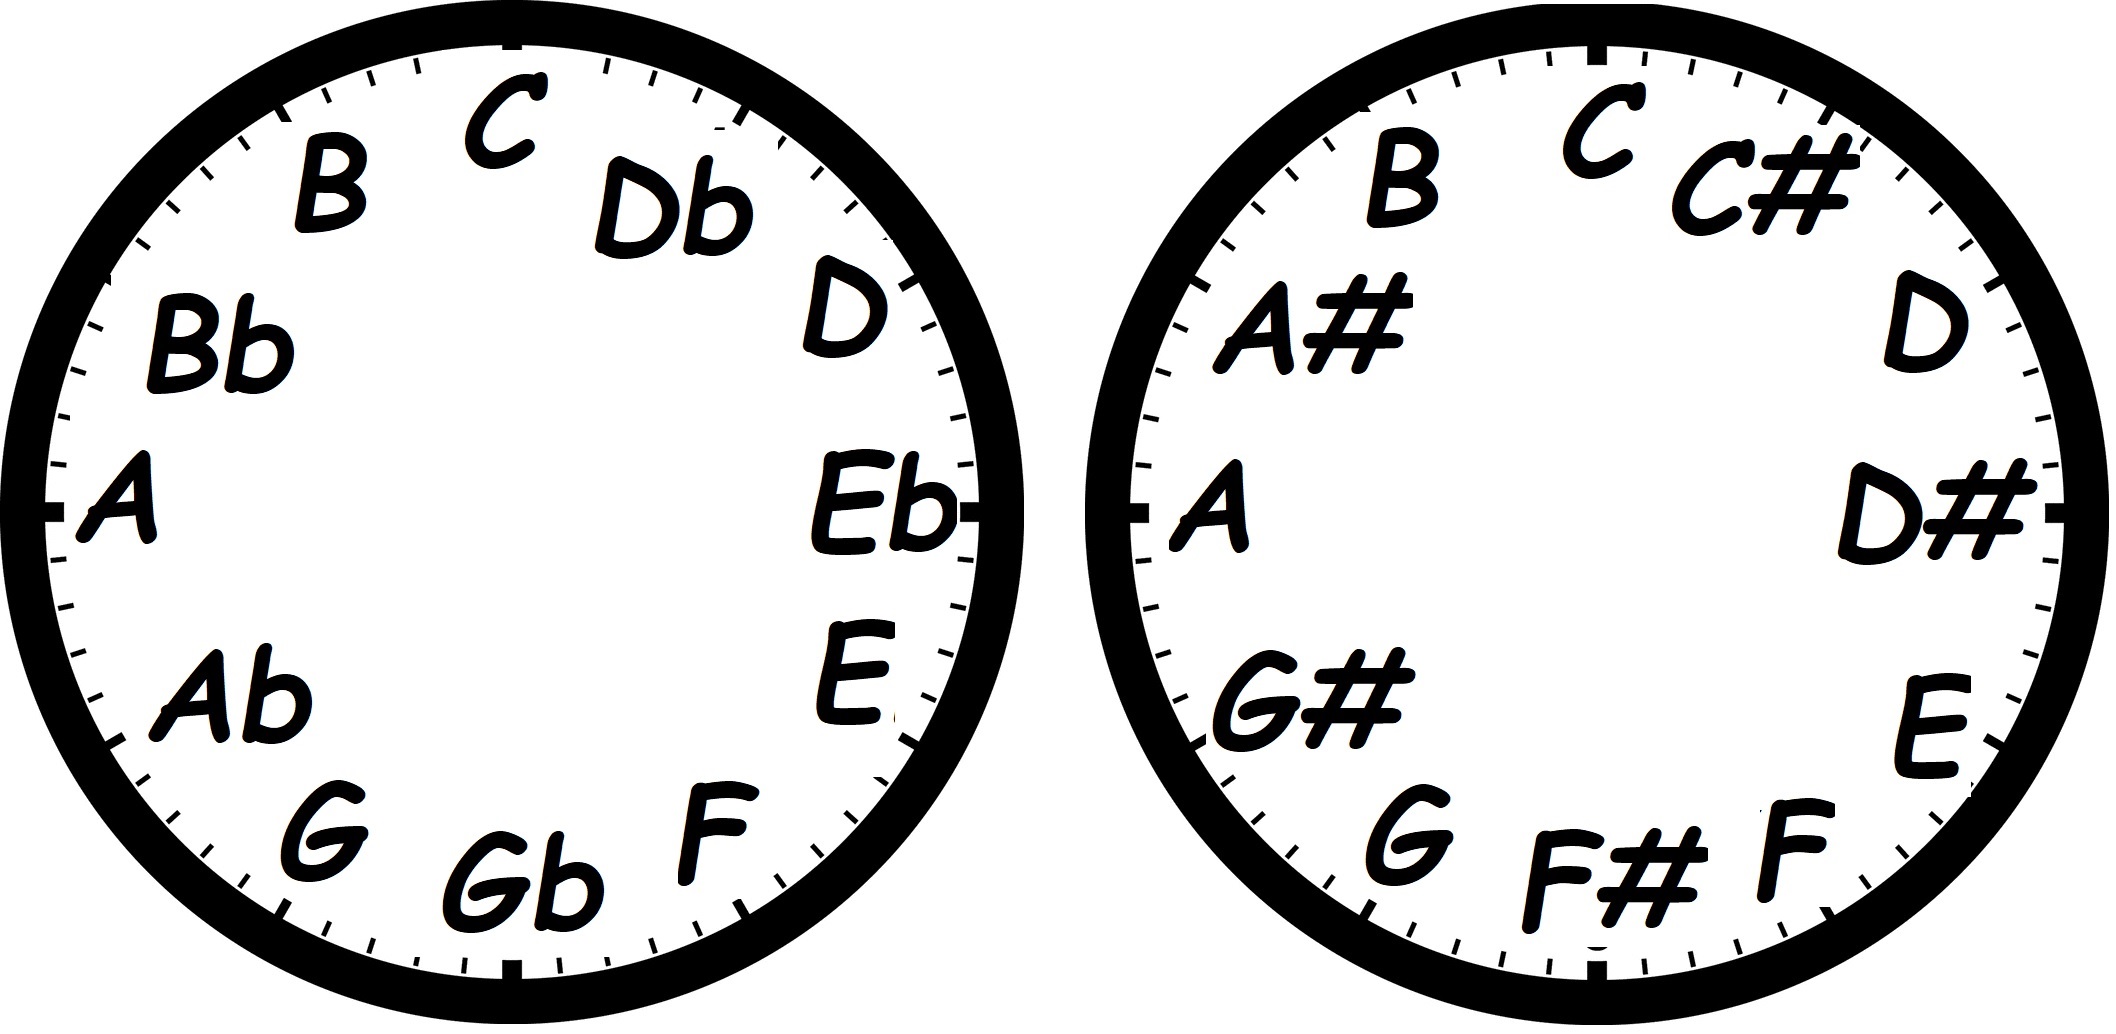
One absolute MUST, if you want to develop any level of proficiency, is
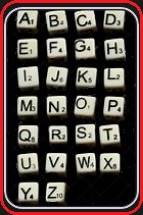
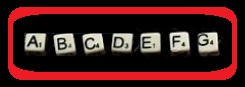
to learn to SAY the Chromatic Scale. It's only 7 notes! A B C D E F G.
Some notes have a sharp (#) or flat (b) in between them.
These sharps and flats are the black keys on a keyboard. They each
share 2 names. IE: Pick a black key. It can be called a sharp OR
flat, depending on the key you're in. So the note higher/above A
could be called A#. That same note is also one note lower/before B.
So it could be called Bb. Enough on this for now. But I suggest
you read and say the Chromatic Scale several times a day until you
get it down pat!
If you haven't learned even the basics of Music Theory as it applies to
guitar, I suggest spending some time every day, or at least before each
practice session, and read part of my Theory 101 tutorial. A bit at a time.
You can find it here, in the main directory. Scroll down to . . .
All Instruments - Click Here
Wayne's Corner Tutorials & Workshops Directory Index Page
Tutorials & Workshops Directory Index Page
You can start the scale from ANY note in the scale. It's a continuous loop!

But here's why I said above that barre chords open more doors than just
learning triads . . . When you play barre chords, you ARE playing triads!
Albeit, plus a couple extra notes when you want to play them!
When you play a barre chord, the main, important part of the chord is
the "middle" part. The TRIAD!
As you'll soon see, all we do to make ANY barre chord, is take an open
chord shape you most likely already know, and move it up the fretboard
to make other chords!
Confused? Well, STOP IT! You KNOW if you take any note, and move it to
a different fret, that the note changes! Right! Play an A note. Move it
up one fret, and it "sounds" higher. Because . . . IT'S NOT AN A NOW!
It's an A#! (Or Bb, depending on the key you're in!)
So, doesn't it make sense that if you played an Am, then moved it up
one fret, that it would become an A#m? (Or Bbm!)
Another BIG reason for learning barre chords is that they sound "different"
depending on the fret you're on. Play an open Am, then play Am using one
barre form on fret 5, and it sounds different! Beacuse, for one thing,
the notes will be in a different order!
Play a regular, open Am. Then, play an open Em. The notes are different, right?
So it stands to reason that using the E form (or Em form in this case)
moved up 5 frets, would be an Am. And the notes are in a different order!
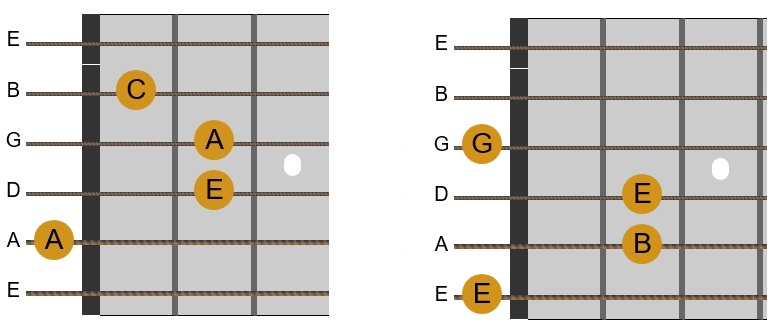
Open Am is played mainly on the top 4 strings. (And 5th open). Em is
played mainly on the bottom 4 strings (or ALL strings!). So there will be
a difference in the "sound, in the timbre. Here's some examples . . .
Open Am Open Em ~ Barred Am Barred Em 2x
Open G Barred G ~ Open Gm Barred Gm
Open C Barred C ~ Open Cm Barred Cm
Open A Barred A ~ Open Am Barred Am
Open E Barred E ~ Open Em Barred Em
OK, let's start making some barre chords . . . the RIGHT WAY!
I have to make an assumption before we start. I'm going to assume your
guitar is properly set up. If it hasn't been set up within the last 6
months, I suggest taking it to a qualified tech and get it done! Your
guitar should be properly set up 2 times a year, MINIMUM! And trust me,
it will be a LOT easier to play after it's set up!
If you're an acoustic player, I have a suggestion. Get a set of
Elixir 10-47 NANOWEB Coated Acoustic Guitar Strings, 80/20 Bronze
But if your guitar is in need of a proper setup, changing to these
strings could could bring the bad out! You might get a buzz or two.
Best thing to do is take it in, tell them to set it up with the Elixir
stings above. You might need to get a new nut. But fret nuts are cheap.
and are wear items. Good chance you could use a new nut anyway!
Later, if you decide to go back to heavier strings, the nut can be
re-cut/filed for the larger gages.
Also, these strings are more expensive than typical acoustic strings.
BUT they last 2 1/2 to 4 times LONGER than regular strings! They're
easier to play. And sound GREAT! They're the only strings I use on
my acoustics!
OK, moving on . . . Step 1
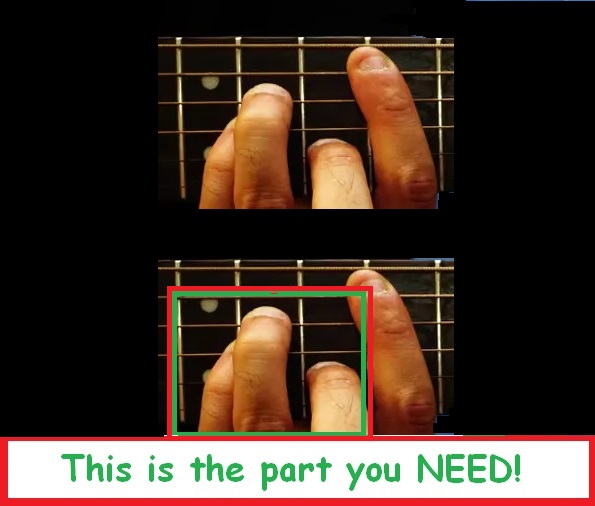
Here's the first thing I want you to do. I want you
to place your 1st finger across all of the strings on the 5th fret.
(2nd dot) Use the SOFT, fleshy part of your finger. Bar it across the
strings. Not hard, but firmly.
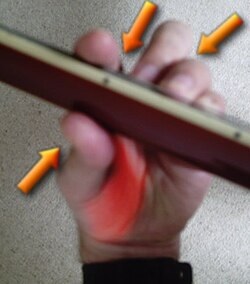
This is critical! Your thumb must be behind the neck! Approx, in the
middle. And right behind your first finger. Making a clamp. You
CANNOT play barre chords using a Blues/Rock grip!
Now pick each string from the 6th, up to the 1st. One at a time. Most
likely they will all sound dull, maybe even muted. That's OK . . . for NOW!
This is the sound you're shooting for!
Now, do it again, but this time really press you finger down solid! Pick
each string again. Are the notes clearer? Probably. But tht's the WRONG
way to play barre chords! Take your finger off the strings and look at
it. Do you see those 6 DENTS in your finger. There shouldn't be ANY!
This is the 1st reason why you haven't been ale to play barres in the past!
The soft part of your finger is . . . SOFT! It's too far from the bone
to be able to properly press a string to the fretboard. So here's what
you do!
Put your 1st finger on the 5th fret again. Just lightly. It's probably
straight. Is it? OK, do this. Roll your wrist slightly toward the head stock.
As you do, you'll see your finger will naturally bend a bit. PERFECT! When
your finger bends, and is slightly curved, the BONE in your finger will be
pressing on the strings, instead of your finger PADS!
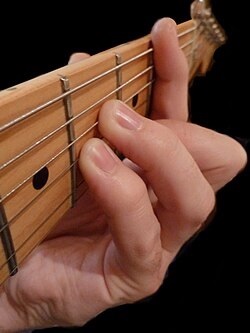
Now press your finger a bit harder on the strings. Play the notes again. Can
you hear a difference. Even a small improvement is PROGRESS! Remember this
position! Finger bend, wrist slightly rolled.
Another advantage of the bent finger . . . The "barre" only needs to fully
hold down the strings that aren't played by the chord! As in, the top and
bottom strings! So you don't NEED your entire finger pressing firmly! You
won't have much trouble holding the other strings down. You're pretty used
to making chords using your finger tips already. And here's ANOTHER thing
to know . . .
Those middle strings, the actual "chord" part, are what REALLY matters!
If they ring clearly, and the high and low strings are muted, it's not
all that important . . . for NOW! Plus . . .
When you're playing a song solo, maybe singing, too . . . you want your
chords to sound FULL! Right? But if you're playing along with another
instrument, you don't want to be playing exactly the same thing as the other
instrument! You want a tonal difference!
THIS IS WHERE BARRE CHORDS SHINE!
Because you can get multiple sounds, tones, by playing barre chords over
their chords! You can just hit the higher strings and get a higher tone!
Plus, the whole chord is higher than the open chord! So it will be
clearly heard. And blend beautifully with others playing open chords!
Let's say your buddy is playing his acoustic along with you, and he hits
an open Em. You can play a barred Em! 7th fret, using the Am (5th string
root) form! And the two will sound great together! And not as boring to
anyone listening . . . including yourself!
Open Em, 7th fret Em ~ Then arpeggiated together
Hear how full the sound is when both forms are played together.
When I'm giging with my band, I want my guitar to cut through the mix! I
want others to hear my guitar part. But not because I turned up louder than
everyone else! It's COMMON to play barre chords, and NOT hit all of the
strings. In a performance, or jam scenario, there's a bass player handling
the low end. You don't need to be strumming the low E string!
Usually, just playing the top 4 strings is all you need! Remember this!
You don't always need to play the entire 6 strings of your barre chords!
In fact, you'll generally sound better if you don't!
OK, let's move on! Step 2
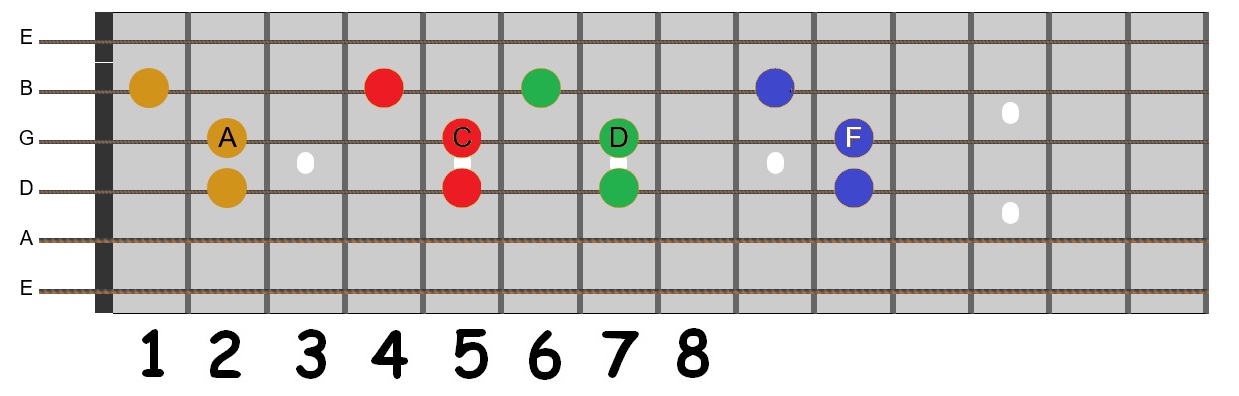
We're only going to focus on 4 chord shapes in this workshop. E major,
E minor, A major and A minor. All chords I'm sure you have down pat!
So, what we do is make the chords you already know, but with different
fingers. If you were one of my students, this would be a piece of cake.
Because I teach my students to learn each chord using different fingers
from the get-go! But I have it all planned out. It's going to be work.
But fun work!
One really cool bonus from working this particular workshop is that you're
going to develop a lot of hand and finger strength, AND wrist and forearm
strength!
IF . . . if you could play E, Em, A and Am using fingers 2 3 4 instead of 1 2 3,
75% of the challenge would not exist! But my gut says that's not the case. SO . . .
~~~~~~~~~~~~~~~~~~~~~~~~~~~~~~~~
This is where you'll jump to when you click the TOP upper link that says
SKIP THE INTRO TEXT.
It's all Hands-On from here on out!
Time to WORK! EX 1
Exercise 1 will be a bit tough at first. No question. But we start here because
it's one of the 2 main building blocks we need to structure barre chords. So
stiff upper lip and all that rot! Just do this a short time at first. You
don't need to play the entire track. Just stop when it gets too fast.
The first few times you work this workshop, just do this one until it gets
too fast, ONCE! After your 3rd time, 3rd practice session doing these, you
go as far as you can without messing up, Then . . . STOP. Start the track
again from the beginning. Do this 3 times. Each session. Each time you'll
get farther into it. Within a reasonably short time, you'll be able to
get through it to the end.
The chords are EASY! E ''' Am ''' E ''' Em ''' E ''' A ''' % But, you
play them with fingers 2 3 & 4! It won't help 2% if you don't use 2 3 & 4!
Here you go! Strap on. It's all work from here on out! You can jump to here
each session!
E ''' Am ''' E ''' Em ''' E ''' A 2 3 4 %
~~~~~~~~~~~~~~~~~~~~
Way to go! You're on your way to success now!
On to Ex 2!
This is going to be fun! Plus it's something you can use anytime, not just
for barre chords! And for you Boomers (Like me!) you might even recognize
the tune! Albeit, it's not the same, but similar!
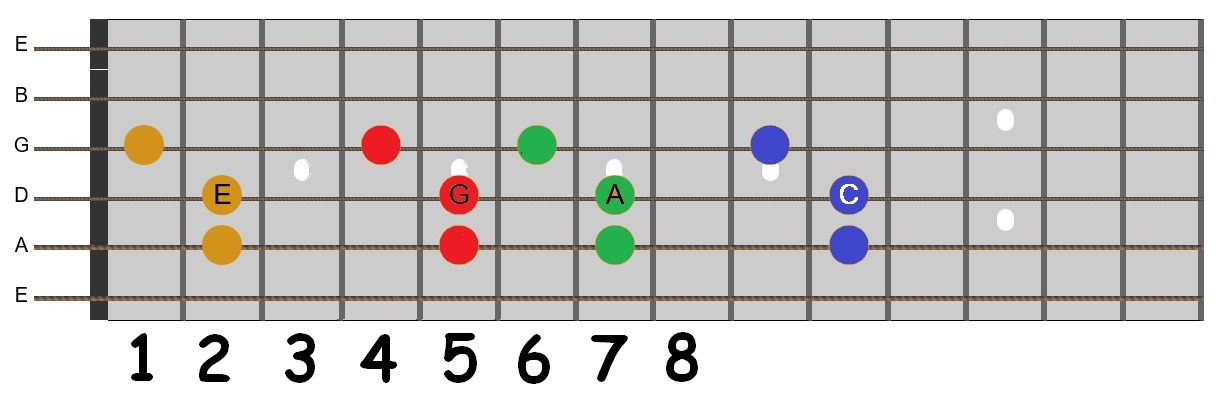
EX 2: Play a regular Open E chord. And play it in the 4 positions shown in
the picture below. E Open, move it up 3 frets, then 2 more, then 3 more.
Strum ALL of the strings.
Here's a hint: Move the E up 3, 1st finger will be the next fret after the
1st DOT. Up 2 more, 1st finger right after the 2nd DOT. Up 3 more, SKIP A DOT,
1st finger ON the next DOT! (Not "ON" the "DOT", in the fret WITH the DOT!)
Cadence: a sequence of notes or chords
The count/cadence: 1234 E234 G234 A234 C234 3 TIMES
E234 Em234 E234 Em234 E234 1 2 3 4 (Repeat 4 more times)
EACH ITERATION INCREASES IN TEMPO.
5 TIMES TOTAL. ~ NO BARRES YET!
MILES E.MP3 ~ NO BARRES YET!
Cool, huh! OK, now play it again! But this time make the Open E
using fingers 2 3 4! Move it the same way! Only use fingers 2 3 4!
~~~~~~~~~~~~~~~~~~~~
On to Ex 3!
One quick note: Your first several times doing these, try to make them sound
good. But don't panic if they sound MUTED! THAT'S OK for now! You'll sound
better each time you run through the workshop! The first few times are tough.
I get that. Don't sweat it! Right now you're building STRENGTH!
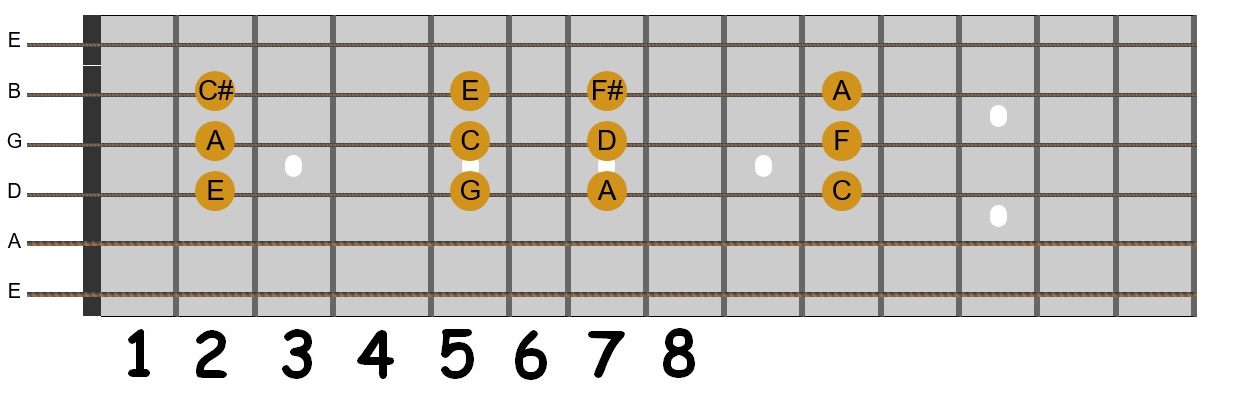
OK, EX 3 is similar to EX2. Except using A instead of E. You do it
the same way.
Try to mute the 6th string with your thumb, and then strum all of the strings!
THIS TIME, use the REGULAR 3-finger A major chord!
1234 A234 C234 D234 F234 3 TIMES
A234 Am234 A234 Am234 A234 1 2 3 4 (Repeat 4 more times)
MILES A.MP3
GOOD JOB! Now . . . Play it again! But THIS TIME . . .
Use fingers 2 3 & 4! Play it again! (And get STRONG!)
GREAT! OK, ONE MORE TIME! This time . . .
DON'T USE THE 3-FINGER FORM FOR A!
Use your FIRST finger as a bar!
The 1st high E string will probably be muted. That's OK!
1234 A234 C234 D234 F234 3 TIMES
A234 Am234 A234 Am234 A234 1 2 3 4 (Repeat 4 more times)
MILES A.MP3
And one more time. Play it again!
This time, use finger 3 as the bar, and play it again!
And yeah, this one's a bit harder! Just do the best you can.
You WILL get this! It just takes time, and REPETITION!
MILES A.MP3
And one final time, I promise! But this one might be easier!
This time, use finger 4 as the bar, and play it again!
It's common to use your 3rd finger "on top of" your 4th finger to add
strength. Give it a try!
Some people prefer using their 4th finger for this barre form. I do!
In time, you need to use both 3 and 4 because you can add extra
embelishments, extra notes using finger 4
MILES A.MP3
~~~~~~~~~~~~~~~~~~~~
SWEET! On to Ex 4!
This is just like the above. But playing Am. Play a regular Open Am.
MILES Am.MP3
Play it again. This time, use fingers 2 3 & 4 to make the open Am!
MILES Am.MP3
~~~~~~~~~~~~~~~~~~~~
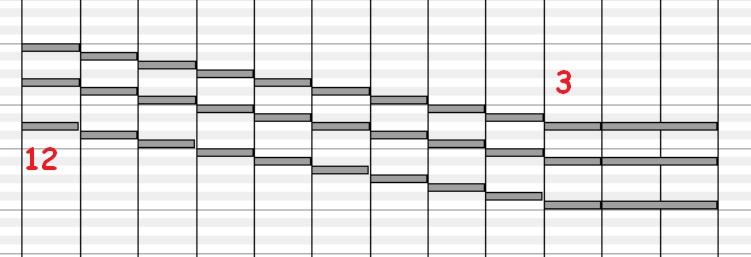
And now . . . we BARRE! On to Ex 5!
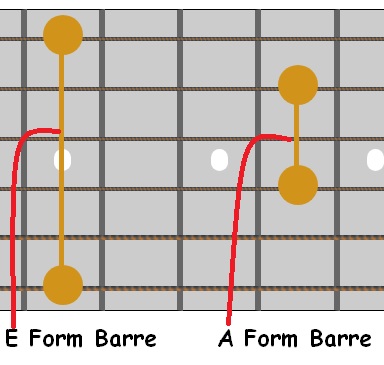
The Double Barre Form . . .
EX 5 is a 1st finger barre exercise. Remember to roll
your wrist a bit, with a slightly bent finger!
1st finger across all strings on the 5th fret.
We will arpeggiate the chord. Play each note.
Starting with the low E string, and play UP. Play the
6 notes, then strum!
It's gonna sound a little "off" because playing
all the strings in one fret is a weird chord!
This chord could be called a C6\9\A (C 6\9 over A).
Another possible name is Am11. The name is subjective.
1234 A D G C E A Am11 234 1 2 3 4 THEN . . .
Move up 1 fret, fret 6, and repeat. Continue up to the
12th fret the same way. THEN . . .
Strum the chord, one time, from the 12th fret, down to
the 1st fret. Then hit the 1st fret again.
iT LOOKS LIKE THIS . . .

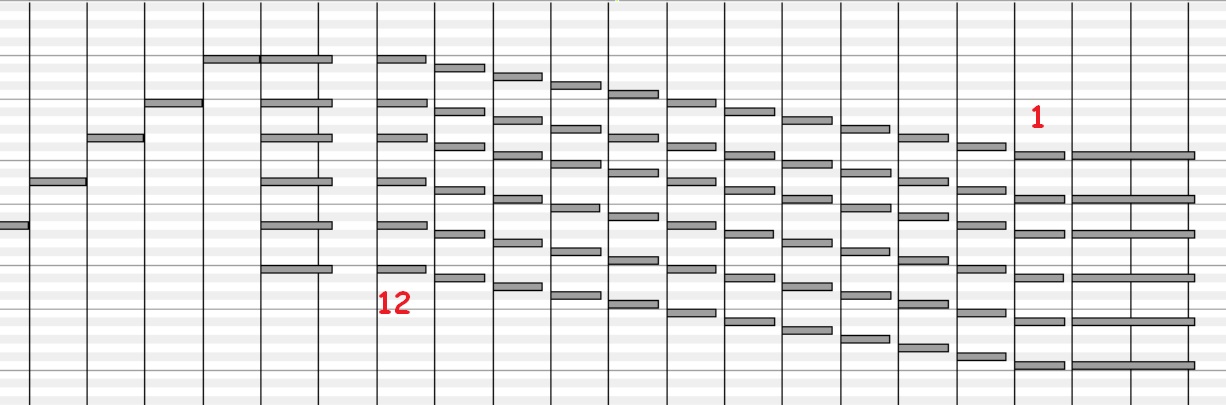
1234 A D G C E A Am11 234 1 2 3 4 Then UP 1 fret - %
1 FINGER BARRE E.MP3
~~~~~~~~~~~~~~~~~~~~
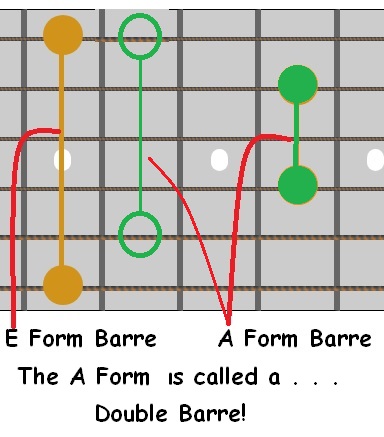
A SHAPE BARRE! On to Ex 6!
Do this one twice! Once with finger 1, then with finger 3.

Starting on fret 5, play up to fret 12.
Play the 3 notes up, then back down. Then strum just the 3 strings.
Then move up one fret, repeat. Continue up to the 12th fret.
Then strum down to fret 3 as above.
FINGER 1 BARRE A.MP3
Play it again . . .
FINGER 3 BARRE A.MP3
~~~~~~~~~~~~~~~~~~~~
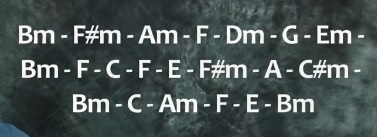
Putting it all together! On to Ex 7! The Finale!!!
E Em A Am FORM

OK, this is actually a very cool exercise! Remember back in EX 1 when you
played open chords using fingers 2 3 & 4? E ''' Am ''' E ''' Em ''' E ''' A ''' %
Well, we'll use those same chords, same order, but utilize the barre so we
can play those chords all the way up the neck, playing EVERY major and minor
chord TWICE! Using TWO barre forms for each chord!
~~~~~~~~~~~~~~~~~~~~
THIS IS YOU'RE END GAME TARGET!
Being able to play ANY major or minor chord in TWO forms allows you to
play over the entire fretboard, but also . . .
. . . allows you to play MORE CHORDS in the SAME AREA of the fretboard!
EX: You can go to ANY fret. Barre it. And play 2 different major chords,
AND two different minor chords! Without moving! On the 5th fret, for
example, you can play an A major, A minor, D major or D minor!
NOTE: You can play many OTHER major and minor chords on that 5th fret using
other chord shapes. Like barring a C chord. But that's for a different lesson!
Two important things to remember . . .
1). Right now you're building hand, finger, wrist and forearm STRENGTH! Once
you get even just reasonably good at all of these exercises, EVERYTHING . . .
~~~~~~~~~~~~~~~~~~~~
EVERYTHING ... YOU ... PLAY ... ON ... GUITAR ... WILL ... BE ... BETTER!
2). You shouldn't even need a #2 after you understand the power behimd #1!!!
But I'll tell you anyway. Your progress will be exponential! That means your
progress, the rate of increase, will becoming more and more rapid!
You might only improve 5% the 2nd or 3rd time you do this workshop. But
because you're improving several things at a time, the rate of increse will
GROW! Because you learn each chord a bit more each time you play it. Because
you start remembering the routines of each exercise, and look at the screen
less and less each time you come back! And because your fingers, hands,
wrists, and forearms are getting stronger every time you come back!
And because . . . you are developing MUSCLE MEMORY!
BUT HERE'S THE IMPORTANT THING TO REMEMBER . . .
YOU control the rate of increase!
The time span between practice sessions, doing these exercises is what will
determine whether your rate of increase goes up by 1%, 2% or 3% per session,
or . . . 5%, 10% or 25% per session!
When you get through the next exercise, once you can make it through up to
the 12th fret, once you can make the chords fairly cleanly, sound "pretty
good", this is all going to be SO WORTH THE EFFORT!
I guarantee you, there's gonna be a time when you're going to realize that if
you had put MORE effort into this workshop than you did - regardless of how
much you DID put it - you'd be much farther along than you are! It's kinda
like, not knowing something, but not knowing that you don't know it! You won't
realize it until you get to a certain point.
~~~~~~~~~~~~~~~~~~~~
OK, let's get EX 7 going!
Start by playing Open E Am E Em E A E. Just like before. But this time, you
play it only one time, USING FINGERS 2 3 & 4!. THEN MOVE THE WHOLE
PATTERN UP ONE FRET, add finger 1 for the barre! AND REPEAT.
F Bbm F Fm F Bb F. Same pattern, all the way up to fret 12.
Wrist rolled, finger slightly bent. BINGO!
E Am E Em E A E
~~~~~~~~~~~~~~~~~~~~~~~~~~~~~~~
Way . . . To . . . Go . . . !!!
OK, sit back a minute and think this over. Was it worth the time? Did
you learn anything you think you can use? Will it be fun? And one more
thing . . . Can you play Barre Chords better than before you WORKED this?
If the answer is YES to any of these questions, then please do 3 things.
1). Drop me an email. Or PM me on Facebook. Let me know what results you got!
2). DO THIS ALL AGAIN! But this time, it's gonna be WAY easier and faster!
Because you can skip over most of the text! Next time you come back to the
workshop, click the link at the very top of the page!
It looks like this . . .

3). Once you have a good handle on this workshop, and can play EX 7 reasonably
well, you don't need to work on strength so much. It's time to develop accuracy!
There is a Barre Chords Master Class Workshop you should consider working now.
You'll breeze through a lot of the first parts. But that workshop isn't like
this one. It focuses on playing each chord form WELL! There is a series of
really cool progressions, many are "songs". The drills are designed to build
accuracy! Where these exercises are designed to build strength.
Once you get through EX 7 fairly well, I suggest working the Master Class!
Barre Chords Master Class Workshop
Please feel welcome to contact me any time you have questions, or to
suggest a workshop topic! And comments are always welcome!
Email me any time! ~/~
Wayne on Facebook
WORKING a workshop means doing it every day for 60 to 90 days. Or 60
to 90 practice sessions. You can do SOME every day. Start where you left off.
Or buckle down and do the whole workshop EVERY DAY for 2 to 3 months! You'll
be amazed at how much better you play guitar!
There are MANY workshops on the Wayne's Corner site! I hope you work a
bunch of them! There are also a bunch of tutorials! You can read them as
time permits! Check them out here . . .
Tutorials & Workshops Directory Index Page
Back to the Tutorials Directory Index Page
5-Position Pentatonic MASTER CLASS Workshop

5-Position Pentatonic MASTER CLASS Workshop
Hope you found this interesting. If you did, please feel welcome
to drop me a line. Email me, or drop me a PM on Facebook!
Email me any time! ~/~
Wayne on Facebook
My Band Website
Check out my Support Group
Musicians & Performers Learning Group
My main Backing Tracks Support Website with over 43,813
free bacing tracks! SoundFont, MIDI editors and players and
more! All distributed for free! MidKar
![]()
Visit my MIDI ~ KAR ~ Backing Tracks Website
Please help keep us online with a small donation!
This site is free for all. The tutorials, workshops. 43,813 MIDI, KAR &
BIAB backing tracks files, 23 BIAB User Styles. A FREE SoundFont,
Timbres of Heaven. Free MIDI players and editor!
The fees for a site this large (Nearly 200 pages with over 50K files)
is pretty high, as you can imagine.
Please consider making a small donation to help keep us online. It
would help so much! Thanks! Wayne
PS: I pay for the site and all hosting, security and domain related
expenses out of pocket. Donations appreciated. Please click the link below.