
And I speak from experience! I was playing rhythm guitar in a
gigging band 2 weeks after getting my first guitar! As in,
getting paid to play!
If you've been here before, and are working the workshop, click here
to skip right to the actual workshop. If it's your first time here,
you should read this ONCE! It's not that long!
NOTE: This is a special workshop I put together for those who
have been playing a LONG time, but aren't where they hoped
they'd be by now!
You don't improve because you're doing it wrong!
It's also a JUMP START for beginners!
It's specifically for players who are older. Us seniors! And for
players who have a handicap. Something physically holding you back.
Maybe it's just motivation. Or maybe . . . Maybe you didn't know
where to look for the answer, the solution!
This workshop is also for those who just don't know where to go,
don't know how to get out of the rut. Don't know what things you
really need to do so you can start actually seeing daily improvements!
Good chance your're teaching yourself. And you've come to realize you
never actually knew HOW to practice! What WORKS! (You already
know what DOESN'T work!)
While working this workshop, there will be MANY times when you'll
realize you've been doing something that has held you back! Or
haven't done something that's holding you back! And it's gonna be
a mind blower!
No wonder I haven't progressed!
Here's How It Works . . .
Permutations, and repetition!
Already read How It Works? Click here
to jump right to Part 1-1!
The MAGIC is in the TRACKS!
Each track starts slow! And progressively gets faster until it becomes
a challenge for even seasoned players!
You work on a track until it gets too fast for you to play accurately! Then
STOP! Don't practice SLOPPY! If you do, the only thing you'll get good at
is playing sloppy!
Do a little (or a lot) each day (or so - up to you!) and each time you
come back and work the exercises, you'll progress farther into each track!
There are over 150 practice and drill tracks in this workshop! Downloadable!
Practice online, or offline. It's up to you!
There is also a downloadable tracks progress check list so you always know
where you left off! The Excel sheet is best! The Word DOC works fine as
well. The TXT version is more difficult to follows. But if you can't open
Excel or Word, it'll do.
xlsx Excel vesion ~ docx Word vesion ~ txt Notepad version Part 1-2 covers Am combinations with a lot of other chords. Many
exercises are really cool, and fun! Part 2 will expand on Part 1, and will
include more flat and sharp chords and keys. This section will have you
playing a TON of songs in a really short amount of time!
BTW . . . When I say you'll be playing songs, I mean you'l be playing
them WELL! Because . . .
More importantly, it will force you to improve EVERYTHING you play!
You will literally start playing everything you do now . . . better!
Articulation, hand and finger strength, speed changing chords, all improved!
Part 1-3 gets into slightly more difficult chords and chord combinations.
Once you get through this section, I can't think of a song you won't be
able to play! This section also includes chord progressions used in most
of the songs you want to play! In fact, as you work on them, you're start
"hearing songs" in your head!
YOU CANNOT WORK THIS WORKSHOP
AND NOT IMPROVE DAILY!
Permutations! Master the key of G! This section is SO powerful!
For a few reasons!
~ Seasoned Players ~
It's a killer warm up for seasoned players. But it's no cake walk!
Very few will be able to complete even the 1st "Fast" track without
messing up! But that's why you're here, right!
You start on the slow track for all exercises! You'll get through
them after probably a few sessions. When you can play the whole
track without messing up, skip the slow track for that exercise
from then, on! Mark the check list so you know to skip it!
Do this every session! And don't skip around! Do them in order!
Do each one 3 to 5 times! Start the track. Play till you mess up.
STOP! Start the track over! After a few times, go to the next one!
~ Beginners ~
The slow track is ideal for beginners! But it'll be a tough one for
your fist half a dozen practice sessions. Stick with it. It's gonna
knock 1 1/2 to 3 YEARS off your learning curve! In 90 days, you'll
be farther ahead, and play better than people learning on their own
do in 3 to 4 years, or LONGER!
Permutations and repetitions! That's the key! The majority of all
songs stick with one key. Some have a melody that has a note or
two not in the key. And those notes require a different chord,
also not found in the key. But they are the exceptions.
Pretty much, if you master just one key, then learn the trick
of how to easily transpose a song into that key, then you can
play almost any song ever written!
Check out the Transposing tutorial if you have trouble transposing!
"Transposing Keys ~ It's not as hard as you think. I make it EZPZ !"
Go there now. Bookmark it to come back to!
There's also some science involved in my teaching method. I won't go
into it here. But once you work on the following exercises for even a
short time, you're gonna see some marvelous and wonderous results!
Stick with me on this and see what happens! Work Part 1-1 for your 1st few
practice sessions before moving on! It might take a few sessions, but do
ALL of the exercises a few times each. Do what you can each session. Then,
once you have a solid handle on this section,. use it as your warm up each
session before starting Part 1-2!
Play G using fingers 2 3 4, NOT 1 2 3!
G'''' Am''' %
~
G''' C''' %
~
G''' C7''' %
~
G''' D''' %
~
G''' D7''' %
~
G''' Em''' %
~
Bm''' Am''' %
TIP: Bm is an Am, up 2 frets! Play Am using fingers 2, 3 & 4.
Then slide it up 2 frets, put your 1st finger on the 1st string.
This is a moveable chord! Up 1 more fret, Cm! Another, C#m
~
Bm''' C''' %
~
Bm''' C7''' %
~
Bm''' D''' %
~
Bm''' D7''' %
~
Bm''' Em''' %
~
Bm''' F#dim7''' %
~
Bm''' G''' %
~
F#dim7''' Am''' %
~
F#dim7''' C''' %
~
F#dim7''' C7''' %
~
F#dim7''' D''' %
~
F#dim7''' D7''' %
~
F#dim7''' Em''' %
~
F#dim7''' G''' %
~
G Major Chord Scale V1
G''' Am''' G''' Bm''' G''' C'D' G''' Em''' G''' F#dim7''' %
~
G Major Chord Scale V2
G''' Am''' Bm''' C''' D''' Em'F#dim7' G''' C''' D''' G''' %
Start playing F by barring the top 3 high strings! (Unless you're
using a full barre!) Playing all 3 high strings has a couple BIG
advantages! For one, it's easier to hold down the 2 top strings!
More finger strength! Plus, going to the minor form is WAY easier!
You simply lift off your 2nd finger! You're already holding down
the 1st fret on the 3rd string!
~
So you can go from F to Fm to F to Fmaj7, 3 chords, by simply . . .
lifting off a finger!
If you enjoy the whole thing, spread the word! Got a question?
Got an idea for a workshop or tutorial? Let me know! Email me,
PM me on Facebook, or join my learning forum, I Just Wanna
Play The Darn Thing!
Have at it! Wayne
Hope you find this interesting. If you do, please feel welcome
to drop me a line. Email me, or drop me a PM on Facebook!
Email me any time! ~/~ Wayne on Facebook
* Back to the main Tutorials & Workshops Index Page *
My Band Website
Check out my Musician's & Performer's Learning Support Group
Visit my Support Group, I Just Wanna Play The Darn Thing!
My main Backing Tracks Support Website with over 45,100
free bacing tracks! SoundFont, MIDI editors and players and
more! 270+ PAGES! All distributed for free!
Please help keep us online with a small donation!
This site is free for all. The tutorials, workshops. 45,100+ MIDI, KAR &
BIAB backing tracks files, 23 BIAB User Styles. A FREE SoundFont,
Timbres of Heaven. Free MIDI players and editor!
The fees for a site this large (270+ pages with over 50K files)
is pretty high, as you can imagine.
Please consider making a small donation to help keep us online. It While youre working this workshop, I will personally answer any
questions you have. Or help where needed.
Join my I Just Wanna Play The Darn Thing forum! I post updates to
the group when I add to the site. And offer help to anyone trying to get
better at playing guitar, harp, keys, bass, or music theory.
Musician's & Performer's Learning Support Group
Visit my Support Group
Here is a PROMISE from me, to you . . . If you just follow what I show you here,
for just 90 days, you'll be about 2 to 3 YEARS farther ahead of where you are
right now. And . . .
You'll double, triple, maybe even QUADRUPLE the number of songs you can play!
90 days, not 2 years. First ya gotta read! By now, you know how I teach
in a tutorial. Exactly how I teach students lessons live! It’s important to
understand the WHY, not only the WHAT! AND THE HOW!
Here lies the problem. Why it's taking you years to play maybe a couple
dozen "songs" on guitar. The problem is, you're practice sessions only
consist of . . . learning songs. What you should be learning is . . .
How To Play Guitar!
Once you can play guitar, you can play ALL songs!
I know many of you are self taught. That's a tough road to travel.
And I can tell you, right now, from decades of teaching, that you
are learning wrong! More specifically, you are practicing wrong!
We're going to fix that!
And you will start to see dramatic improvements
DAILY! Not monthly!
While youre working this workshop, I will personally answer any
questions you have. Or help where needed.
Join my I Just Wanna Play The Darn Thing forum! I post updates to
the group when I add to the site. And offer help to anyone trying to get
better at playing guitar, harp, keys, bass, or music theory.
Musician's & Performer's Learning Support Group
Visit my Support Group
Here is a PROMISE from me, to you . . . If you just follow what I show you here,
for just 90 days, you'll be about 2 to 3 YEARS farther ahead of where you are
right now. And . . .
You'll double, triple, maybe even QUADRUPLE the number of songs you can play!
90 days, not 2 years. First ya gotta read! By now, you know how I teach
in a tutorial. Exactly how I teach students lessons live! It’s important to
understand the WHY, not only the WHAT! AND THE HOW!
Here lies the problem. Why it's taking you years to play maybe a couple
dozen "songs" on guitar. The problem is, you're practice sessions only
consist of . . . learning songs. What you should be learning is . . .
How To Play Guitar!
Once you can play guitar, you can play ALL songs!
I know many of you are self taught. That's a tough road to travel.
And I can tell you, right now, from decades of teaching, that you
are learning wrong! More specifically, you are practicing wrong!
We're going to fix that!
And you will start to see dramatic improvements
DAILY! Not monthly!
Left click to download.
This workshop is not about "lessons"! It's DRILLS! And CORRECTIONS!
There are "TIPS" with many of the audio workout tracks. Correcting
the most common mistakes most players make without realizing it!
Do you wanna see instant improvements? Learn about doing THIS!
 There are 3 sections to Part 1. (Part 2 is the next step, on a
different webpage.)
The entire workshop is designed for both the beginner, and the more advanced
players. Easy enough for someone just getting started. And will take them a
LONG ways! Yet a challenge for even advanced players! Each exercise has 2
practice tracks. The 1st is slow. But the 2nd one will challenge you, how
ever long you've been playing, and will get you past where you are now.
Trust me on this! And isn't that why you're here now anyway!
To get gooder n gooder!?!
Part 1-1 G! It's a warm up, but leads to greatness! If you're a beginner, this
one section alone will have you playing 100s of songs withing DAYS! Not
years! Assuming you work on this workshop a little every day! 100s of
songs! DAYS! Or a few weeks, if you practice less often.
If you've been playing for years, and not where you wanna be, this one section
will give you the solution you've been looking for! Because it teaches you how
to practice! It will correct a BUNCH of stuff you've been doing wrong for years!
Putting it as clearly as I can . . . Beginners will learn FAST! And seasoned
players will see dramatic improvements within a few DAYS! And the improvements
will continue as long as you WORK this workshop! DAILY IMPROVEMENTS!
There are 3 sections to Part 1. (Part 2 is the next step, on a
different webpage.)
The entire workshop is designed for both the beginner, and the more advanced
players. Easy enough for someone just getting started. And will take them a
LONG ways! Yet a challenge for even advanced players! Each exercise has 2
practice tracks. The 1st is slow. But the 2nd one will challenge you, how
ever long you've been playing, and will get you past where you are now.
Trust me on this! And isn't that why you're here now anyway!
To get gooder n gooder!?!
Part 1-1 G! It's a warm up, but leads to greatness! If you're a beginner, this
one section alone will have you playing 100s of songs withing DAYS! Not
years! Assuming you work on this workshop a little every day! 100s of
songs! DAYS! Or a few weeks, if you practice less often.
If you've been playing for years, and not where you wanna be, this one section
will give you the solution you've been looking for! Because it teaches you how
to practice! It will correct a BUNCH of stuff you've been doing wrong for years!
Putting it as clearly as I can . . . Beginners will learn FAST! And seasoned
players will see dramatic improvements within a few DAYS! And the improvements
will continue as long as you WORK this workshop! DAILY IMPROVEMENTS!
And people will notice!
Part 1-2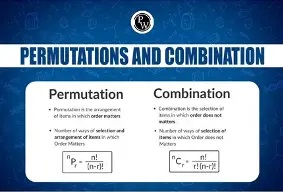
Part 1-2 More Permutations! You play dozens of chords, paired up with Am!
BTW, after the 1st exercise below, there will be very little text!
Am (Am''' C''' Am''' C''') etc.
Each chord below is paired with Am.
2 work files for each listed below.
Learn'm: Slow to quick. Drill'm: Quick to Fast
Asus2 ~ Asus4 ~ C ~ Cmaj7 ~ C7 ~ D ~ Dmaj7 D7 ~ Dm
E ~ E7 ~ Em ~ F ~ Fmaj7 ~ Fm ~ G ~ G5 ~ G7 ~ Gm
Let's start with something FUN . . . and USEFUL!
(Hey, you said you wanna play and sound better!)
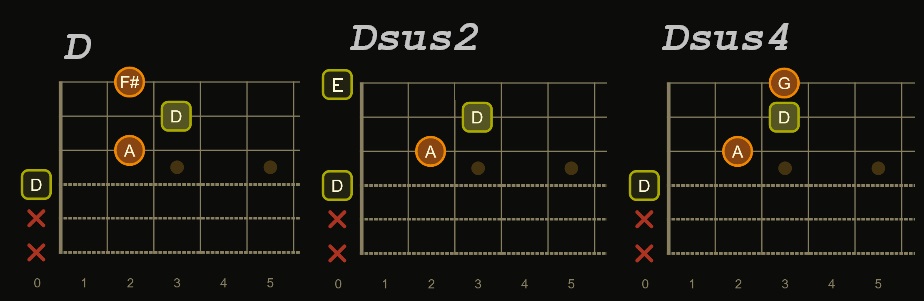
Let's play some SUS chords! Sus, suspended chords are cool!
Sound really cool, and are really easy to play, generally!
You hear them all the time in evey genre of music. Here's a
few big hit intros that use them. It's a pretty poor track.
But it's just for some examples.
Asus2''' Am''' Asus4'''' %
More Permutations! You play dozens of chords, paired up with Am!
BTW, after the 1st exercise below, there will be very little text!
Am (Am''' C''' Am''' C''') etc.
Each chord below is paired with Am.
2 work files for each listed below.
Learn'm: Slow to quick. Drill'm: Quick to Fast
Asus2 ~ Asus4 ~ C ~ Cmaj7 ~ C7 ~ D ~ Dmaj7 D7 ~ Dm
E ~ E7 ~ Em ~ F ~ Fmaj7 ~ Fm ~ G ~ G5 ~ G7 ~ Gm
Let's start with something FUN . . . and USEFUL!
(Hey, you said you wanna play and sound better!)
Let's play some SUS chords! Sus, suspended chords are cool!
Sound really cool, and are really easy to play, generally!
You hear them all the time in evey genre of music. Here's a
few big hit intros that use them. It's a pretty poor track.
But it's just for some examples.
Asus2''' Am''' Asus4'''' %
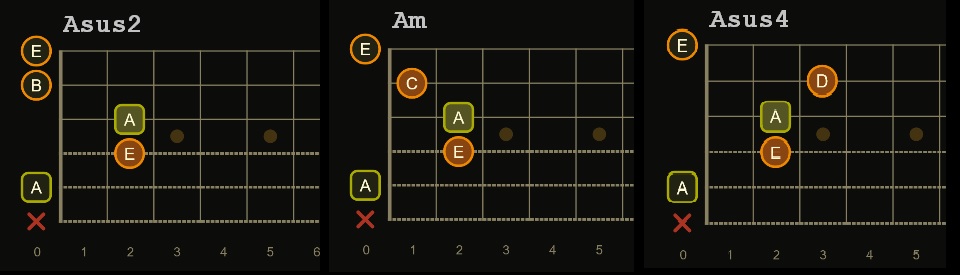 For those who aren't yet familiar with Sus chords, here's an example
of what changes in the chords. Adding notes to a chord is embellishment.
You can add "melodies", and/or harmonies just playing Sus chords with the
songs you "kinda" play now! Below, I call the embellishments, melodies!
NOTE: Sus chords are neither major nor minor, but are embellishments to both
majors and minors! Usually played before and/or after a major or minor chord!
You can create melodies playing them together!
Play the example. It plays a double phrase 5 times. 1st is only the
"melody". 2nd is adding a high harmony to the melody note. As in, playing
2 strings at once. 3rd is adding a lower harmony to the melody. As in,
playing a different string with the melody. 5th plays them together.
The red bars are the notes that change chord to chord.
For those who aren't yet familiar with Sus chords, here's an example
of what changes in the chords. Adding notes to a chord is embellishment.
You can add "melodies", and/or harmonies just playing Sus chords with the
songs you "kinda" play now! Below, I call the embellishments, melodies!
NOTE: Sus chords are neither major nor minor, but are embellishments to both
majors and minors! Usually played before and/or after a major or minor chord!
You can create melodies playing them together!
Play the example. It plays a double phrase 5 times. 1st is only the
"melody". 2nd is adding a high harmony to the melody note. As in, playing
2 strings at once. 3rd is adding a lower harmony to the melody. As in,
playing a different string with the melody. 5th plays them together.
The red bars are the notes that change chord to chord.
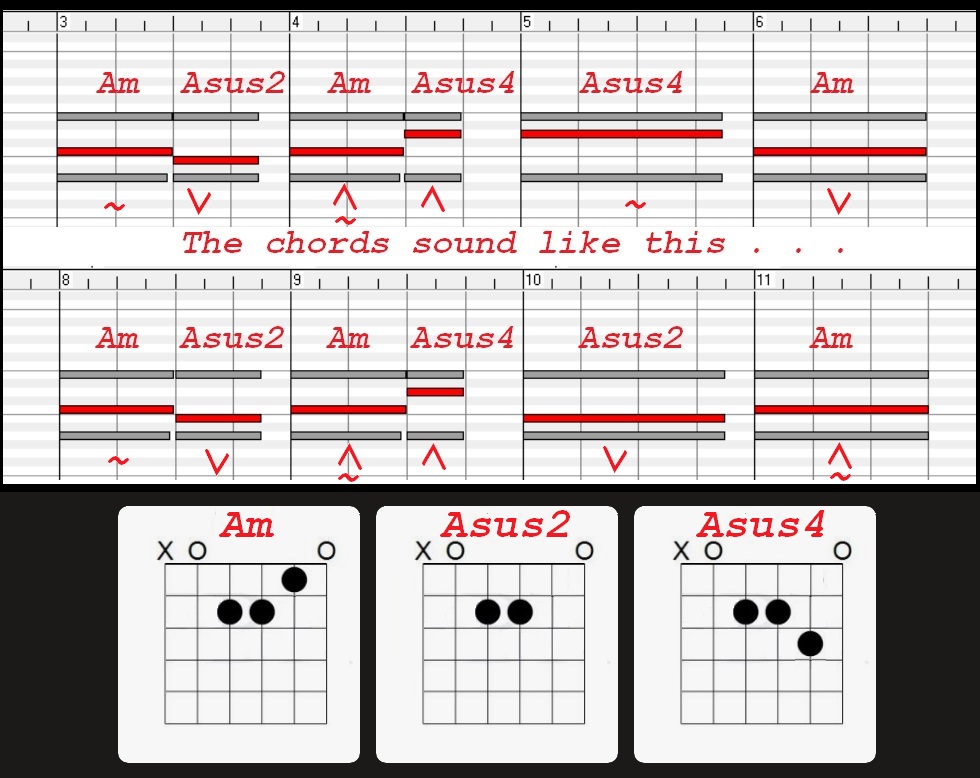 Play the track below and watch the red bars as you listen.
Stay on the Slow track until you can get through it to the end
without messing up! It could take several practice sessions!
THEN . . . you just work on the Fast track!
I shouldn't need to say this, but I will. These tracks are mostly
around a minute long. You stop when you mess up, and start the
track again. Do this 3 or 4 times. (Or more if you want!) Then
move on to the next one. Work hard on just a few every day, or
work a little on many each day. Either way is OK!
OK, strap on. It's time to get to work!
No more talking. Let's do this!
Am' Asus2' Am' Asus4' Asus4''' Am'''
1234
Am' Asus2' Am' Asus4' Asus2''' Am''' %
Slow/Quick
Play the track below and watch the red bars as you listen.
Stay on the Slow track until you can get through it to the end
without messing up! It could take several practice sessions!
THEN . . . you just work on the Fast track!
I shouldn't need to say this, but I will. These tracks are mostly
around a minute long. You stop when you mess up, and start the
track again. Do this 3 or 4 times. (Or more if you want!) Then
move on to the next one. Work hard on just a few every day, or
work a little on many each day. Either way is OK!
OK, strap on. It's time to get to work!
No more talking. Let's do this!
Am' Asus2' Am' Asus4' Asus4''' Am'''
1234
Am' Asus2' Am' Asus4' Asus2''' Am''' %
Slow/Quick  Quick/Fast!
 Another variation
~
Am''' C''' %
TIP! Going from Am to C, keep your 1st and 2nd fingers PLANTED!
Only move your 3rd finger! Same with C to Am!
~
Am''' Cmaj7''' %
Another variation
~
Am''' C''' %
TIP! Going from Am to C, keep your 1st and 2nd fingers PLANTED!
Only move your 3rd finger! Same with C to Am!
~
Am''' Cmaj7''' %
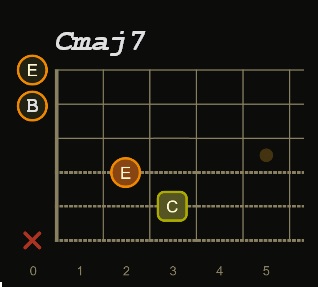 TIP! Play open C, lift off your 1st finger! Cmaj7 Going from Am to
Cmaj7, keep your 2nd finger PLANTED! Same with Cmaj7 to Am!
~
Am''' C''' Am''' C7''' 1234 C''' Am''' C7''' Am''' %
TIP! Play open C, lift off your 1st finger! Cmaj7 Going from Am to
Cmaj7, keep your 2nd finger PLANTED! Same with Cmaj7 to Am!
~
Am''' C''' Am''' C7''' 1234 C''' Am''' C7''' Am''' %
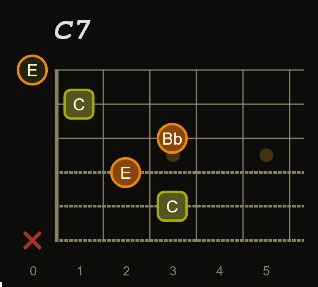 TIP! Play open C. Put your 4th finger on the 3rd string. C7 This
is also a moveable chord. Up a fret, C#7/Db7. Up one more, D7.
~
Am''' D''' %
~
Am''' Dmaj7''' %
TIP! Play open C. Put your 4th finger on the 3rd string. C7 This
is also a moveable chord. Up a fret, C#7/Db7. Up one more, D7.
~
Am''' D''' %
~
Am''' Dmaj7''' %
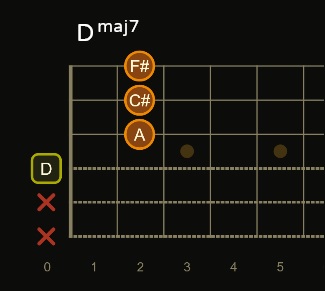 TIP! You can barre this with 1 finger. From Am, keep your
middle fingers together. Move them together up a string and
put your 4th finger on the 1st string.
TIP! You can barre this with 1 finger. From Am, keep your
middle fingers together. Move them together up a string and
put your 4th finger on the 1st string.
 ~
Am''' D7''' %
Tip! Keep your 1st finger PLANTED. From Am to D7, only
move fingers 2 & 3, to both sides of finger one!!
~
Am''' Dm''' %
TIP! Move fingers 1 & 2 together!
~
Am''' E''' %
Tip! This is an EASY chord change! Keep all 3 fingers together
and move them as a "group", up to, and down to the next chord!
~
Am''' E7''' %
~
Am''' Em''' %
~
~
Am''' D7''' %
Tip! Keep your 1st finger PLANTED. From Am to D7, only
move fingers 2 & 3, to both sides of finger one!!
~
Am''' Dm''' %
TIP! Move fingers 1 & 2 together!
~
Am''' E''' %
Tip! This is an EASY chord change! Keep all 3 fingers together
and move them as a "group", up to, and down to the next chord!
~
Am''' E7''' %
~
Am''' Em''' %
~
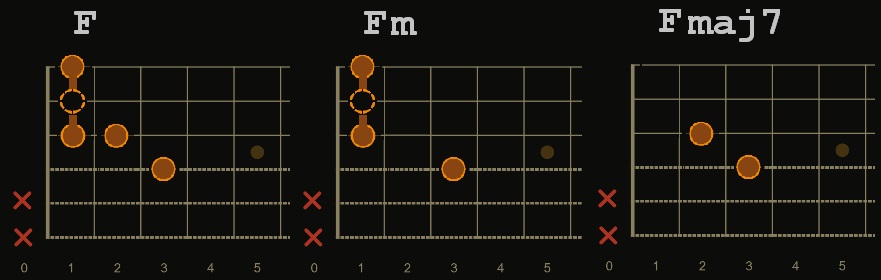 Keep in mind, this F form is MOVABLE! Move it up a fret, it's F#! Play Fm,
move it up 1 fret, F#m! Having the 1st fret barred is a HUGE advantage!
You strum only the top 4 strings!
If you have ANY problems playing an F chord, let's end it NOW!
F''' Fm''' %
~
F''' Fmaj7''' %
~
F''' Fm''' F''' Fmaj7''' %
More on this one below, but let's get you playing G correctly!
You use fingers 1 2 3 sometimes. And 2 3 4 other times! Playing
G with fingers 2 3 4 makes it super easy to go from G to C to
F to G!!! Keep fingers 2 and 3 together! Move them together!
Fingers 2 & 3 stay together, MOVE together going from G to C to F etc!
ONE MOTION! Not TWO! Move 2 fingers at the same time!
Keep in mind, this F form is MOVABLE! Move it up a fret, it's F#! Play Fm,
move it up 1 fret, F#m! Having the 1st fret barred is a HUGE advantage!
You strum only the top 4 strings!
If you have ANY problems playing an F chord, let's end it NOW!
F''' Fm''' %
~
F''' Fmaj7''' %
~
F''' Fm''' F''' Fmaj7''' %
More on this one below, but let's get you playing G correctly!
You use fingers 1 2 3 sometimes. And 2 3 4 other times! Playing
G with fingers 2 3 4 makes it super easy to go from G to C to
F to G!!! Keep fingers 2 and 3 together! Move them together!
Fingers 2 & 3 stay together, MOVE together going from G to C to F etc!
ONE MOTION! Not TWO! Move 2 fingers at the same time!
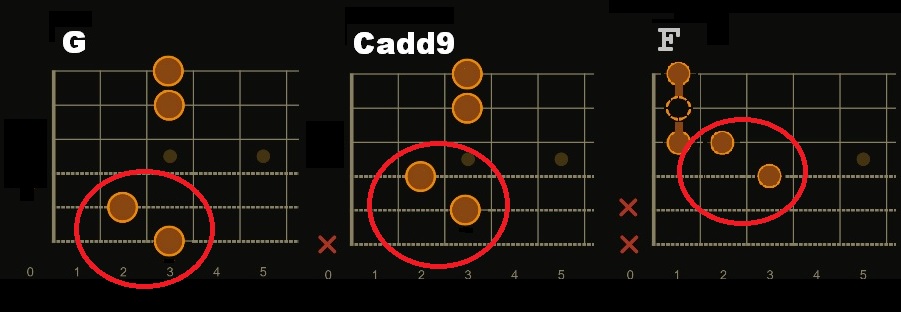 G''' C''' F''' G 234 G''' C''' F''' G''' %
~
F''' G''' %
Tip! Play G using fingers 2 3 4! NOT 1 2 3! Less motion!
MOVE FINGERS 2 & 3 TOGETHER! If you only play G using
1 2 3, then G7 becomes a whole new chord! Playing G with 2 3 4,
going to G7, YOU SIMPLY PUT DOWN A FINGER!
G''' G7''' G''' G7''' %
Tip! Play G using fingers 2 3 4!
~
Fm''' G''' %
~
Fm''' Gm''' %
~
Am''' F''' %
~
Am''' Fmaj7''' %
~
Am''' Fm''' %
~
OK, let's move that sucker! Let's play Am''' G''' F''' E' E7'
This is an Andalusian Cadence. Also called a i–VII–VI–V progression.
Start on the 5th fret. Play the Fm form, it's now an Am! Keep your
1st finger barred! Slide it down to the 3rd fret, major form, G. Just
slide it down, and add your 2nd finger! Then down to the 1st fret,
major form, F. Then play an Open E' E7'!
G''' C''' F''' G 234 G''' C''' F''' G''' %
~
F''' G''' %
Tip! Play G using fingers 2 3 4! NOT 1 2 3! Less motion!
MOVE FINGERS 2 & 3 TOGETHER! If you only play G using
1 2 3, then G7 becomes a whole new chord! Playing G with 2 3 4,
going to G7, YOU SIMPLY PUT DOWN A FINGER!
G''' G7''' G''' G7''' %
Tip! Play G using fingers 2 3 4!
~
Fm''' G''' %
~
Fm''' Gm''' %
~
Am''' F''' %
~
Am''' Fmaj7''' %
~
Am''' Fm''' %
~
OK, let's move that sucker! Let's play Am''' G''' F''' E' E7'
This is an Andalusian Cadence. Also called a i–VII–VI–V progression.
Start on the 5th fret. Play the Fm form, it's now an Am! Keep your
1st finger barred! Slide it down to the 3rd fret, major form, G. Just
slide it down, and add your 2nd finger! Then down to the 1st fret,
major form, F. Then play an Open E' E7'!
 DO ALL 3 each practice session!
Am''' Am''' G''' G''' F''' F''' E''' E7''' %
Am''' G''' F''' E' E7' %
Am' G' F' E E7 %
~
Am''' G''' %
~
Am''' G7''' %
~
Am''' G5''' %
~
One more before we move on to Part 1-3. Finger Sets!
OK, you're here to become a better guitarist. You want to be
a better player. Like some of the people you admire. Then you
need to do the things they did to get there! Things you
haven't done before, in ways you didn't do them before!
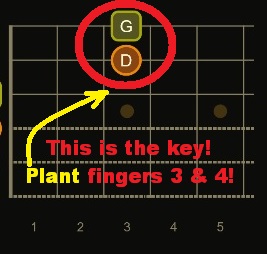
You need to be able to play chords using fingers 1 2 3 AND 2 3 4!
You use the appropriate set, depending on what chord you're going
to next, AND what chord you're coming from!
The reason is simple. If you can minimize the amount of
motion between chord changes, your speed will increase!
Using fingers 1 2 3 for a G major works OK for some chord changes.
But if you play it that way now, give 2 3 4 a try! See how little
your hand shape changes going from G to C. See how easy it is to
go from G to G7!
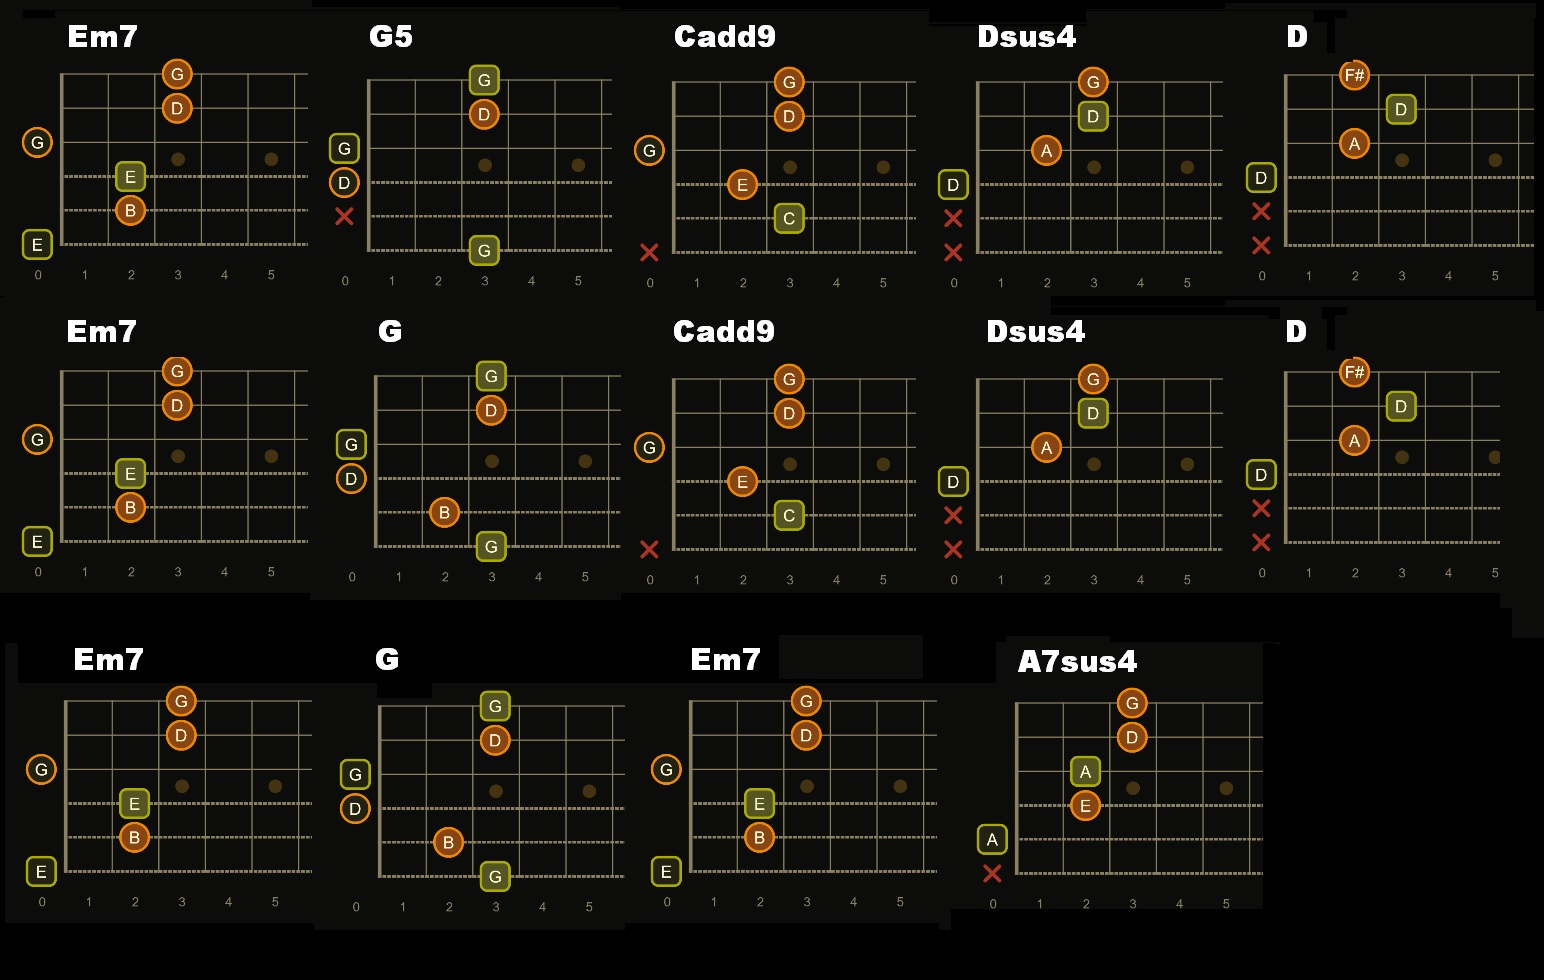
Sometimes it's far better to use 1 2 3! Going from a full Em7, to
G5, to Cadd9 then to D is much more practical using 1 2 3. Em7 to
A7sus4 is really cool! And these progressions are really easy!
DO ALL 3 each practice session!
Am''' Am''' G''' G''' F''' F''' E''' E7''' %
Am''' G''' F''' E' E7' %
Am' G' F' E E7 %
~
Am''' G''' %
~
Am''' G7''' %
~
Am''' G5''' %
~
One more before we move on to Part 1-3. Finger Sets!
OK, you're here to become a better guitarist. You want to be
a better player. Like some of the people you admire. Then you
need to do the things they did to get there! Things you
haven't done before, in ways you didn't do them before!
You need to be able to play chords using fingers 1 2 3 AND 2 3 4!
You use the appropriate set, depending on what chord you're going
to next, AND what chord you're coming from!
The reason is simple. If you can minimize the amount of
motion between chord changes, your speed will increase!
Using fingers 1 2 3 for a G major works OK for some chord changes.
But if you play it that way now, give 2 3 4 a try! See how little
your hand shape changes going from G to C. See how easy it is to
go from G to G7!
Sometimes it's far better to use 1 2 3! Going from a full Em7, to
G5, to Cadd9 then to D is much more practical using 1 2 3. Em7 to
A7sus4 is really cool! And these progressions are really easy!
 PLUS . . . if you have ANY issues with barre chords, this will help a TON!
There are chord shapes that you can bar! Basically, any chord can be
movable. You just need to add a note, or a bar in front of it.
You probably already move open C7. And depending on the fret, you don't
strum the high or low E. You already bar open E and Em. Probably A and
Am, too. Getting used to playing your open chords using 2 3 4 makes it
EASY to bar them when you need to!
We're only going to work on a few in this workshop. But use what you
learn here! And see how your speed increases!
Play each chord below using fingers 1 2 3 then 2 3 4, alternating!
A to A
Am to Am
C to C
D to D
E to E
G to G
Play Em using fingers 1 2, 2 3, 3 4 then 2 3 %
Em to Em
PLUS . . . if you have ANY issues with barre chords, this will help a TON!
There are chord shapes that you can bar! Basically, any chord can be
movable. You just need to add a note, or a bar in front of it.
You probably already move open C7. And depending on the fret, you don't
strum the high or low E. You already bar open E and Em. Probably A and
Am, too. Getting used to playing your open chords using 2 3 4 makes it
EASY to bar them when you need to!
We're only going to work on a few in this workshop. But use what you
learn here! And see how your speed increases!
Play each chord below using fingers 1 2 3 then 2 3 4, alternating!
A to A
Am to Am
C to C
D to D
E to E
G to G
Play Em using fingers 1 2, 2 3, 3 4 then 2 3 %
Em to Em
Part 1-3 Am''' Bm''' %
Slow/Quick
Am''' Bm''' %
Slow/Quick 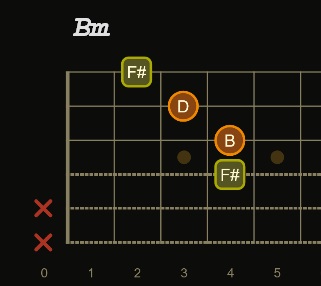 Quick/Fast!
TIP: Bm is an Am, up 2 frets! Play Am using fingers 2, 3 & 4.
Then slide it up 2 frets, put your 1st finger on the 1st string.
This is a moveable chord! Up 1 more fret, Cm! Another, C#m
~
Bbm''' Cm''' %
~
Bm''' C#m''' %
~
A Asus2 A Asus4 Dsus4 Esus4 V1.MP3
~
A Asus2 A Asus4 Dsus4 Esus4 V2.MP3
~
Am Asus2 Am sus4 Ds4 Es4 V1
~
Am Asus2 Am Asus4 Ds4 Es4 V2
~
D Dsus4 Cadd9 G5 V1
~
D Dsus4 Cadd9 G5 V2
~
Dsus4 Cadd9 G5 V1
~
Dsus4 Cadd9 G5 V2
~
E B7
~
E''' E7''' B7''' E' E7' E''' %
~
E7 B7
~
Em7 G5 Em7 A7sus4
~
G Gm
~
G5 Cadd9
~
G5 Em7 Cadd9 Dsus4 D
Quick/Fast!
TIP: Bm is an Am, up 2 frets! Play Am using fingers 2, 3 & 4.
Then slide it up 2 frets, put your 1st finger on the 1st string.
This is a moveable chord! Up 1 more fret, Cm! Another, C#m
~
Bbm''' Cm''' %
~
Bm''' C#m''' %
~
A Asus2 A Asus4 Dsus4 Esus4 V1.MP3
~
A Asus2 A Asus4 Dsus4 Esus4 V2.MP3
~
Am Asus2 Am sus4 Ds4 Es4 V1
~
Am Asus2 Am Asus4 Ds4 Es4 V2
~
D Dsus4 Cadd9 G5 V1
~
D Dsus4 Cadd9 G5 V2
~
Dsus4 Cadd9 G5 V1
~
Dsus4 Cadd9 G5 V2
~
E B7
~
E''' E7''' B7''' E' E7' E''' %
~
E7 B7
~
Em7 G5 Em7 A7sus4
~
G Gm
~
G5 Cadd9
~
G5 Em7 Cadd9 Dsus4 D

Visit my
midkar website!
would help so much! Thanks! Wayne
PS: I pay for the site and all hosting, security and domain related
expenses out of pocket. Donations appreciated. Please click the link below.
You do not need a PayPal Acct to make a donation!