
Welcome!
And welcome to . . .
Sequencing 101: Phase 3, Part 1
Hands-On lesson: Shaping Your Sound (PC or Mac)
Editors used:
Anvil Studio, PowerTracks Pro Audio,
Acoustica Mixcraft, Mac GarageBand
Phase 3, Part 1: Working with Events. Shaping your sound.
Nitty-Gritty editing that makes the difference between
"Blah" and . . . "YEAH!"
After this info-packed tutorial, we're going to start editing our JBG MIDI, in Part 2.
This tutorial could go one of two ways . . . Very long and tedious, but loaded
with tons of stuff. Or not so long, filled with some great tips that will get you
thinking, and figuring out how to get "your sound" on your own.
The problem is, this is a HUGE topic! With probably a dozen topics interwoven.
I could do an entire tutorial just on effects like Reverb, Chorus, Tremolo, etc..
So what I'm going to do in this tutorial is explain what EVENTS are, and how to use
them. With a few tips here and there on the different events I'm discussing. Enough
so you can figure out how to use them with a little trial and error. Then there will
be a Part 2 that pulls it together, then goes a bit deeper. Along with some audio!
I'm convinced this is a better approach because you'll need to learn for yourself
how much is enough, how much is too little, and how much is too much . . .
on your own! Each MIDI you make will be different. And will require a different
amount of these effects. But you're going to know how to get each one 'just right'
for each MIDI you make, or edit, into a masterpiece!
BTW, when I talk about effects, I mean more than 'guitar stomp box' effects like
reverb and chorus. There are many different types of EVENTS, only a few being
'effects' in the usual sense.
Before we get started, let me give you this one invaluable piece of advice. And
then let me contradict that piece of advice 100%! HA!
Generally speaking, when it comes to working with effects, LESS IS MORE! And the
contradiction . . . Sometimes you just gotta cranks it up!
Each effect adds additional dynamics to other effects you already have in your effects
chain. For instance, if you have some chorus and tremolo on a track, then add
reverb, a little will go a LONG WAY! Because . . .
1). Reverb (like all effects) adds 'gain' to your mix. So your volume will be a bit louder.
Enough to affect your mix? Maybe. 2). Even though the track became a little louder,
is also became considerably harder to 'hear' or understand in the mix.
Some facts about reverb: It's way cool. Sounds awesome. It adds gain to the track.
Too much is WAY worse than too little. And Reverb destroys saturation! It can make
your sound literally drop straight to the ground, about 10 feet in front of the stage!
Let's say your kick drum is OK, kinda sorta. You can hear it in the mix. Not as loud as
you'd like. But for now, it'll be OK. Then you add reverb to your drum mix. (Ugggh!
Maybe not so good of an idea!) All of a sudden your kick is GONE! HUH! Yeah, but
we'll cover that later in this tutorial.
So this tutorial is going to be more about your actual mix than anything else.
While going over things that affect the mix, we'll cover just about anything you'll
need to know to get started working with EVENTS.
So how do you shape your BLAH MIDIs into pieces of fine art? Two things you need
to do are: 1). Get each and every track EXACTLY how you want it! And 2). Make
sure each and every track is mixed, blended, with all of the other tracks PERFECTLY!
Make sure not only is each tracks heard in the mix, but also, heard in the mix
EVERYWHERE in the mix. Every measure!
THAT is probably just as important as having each track sound great by itself!
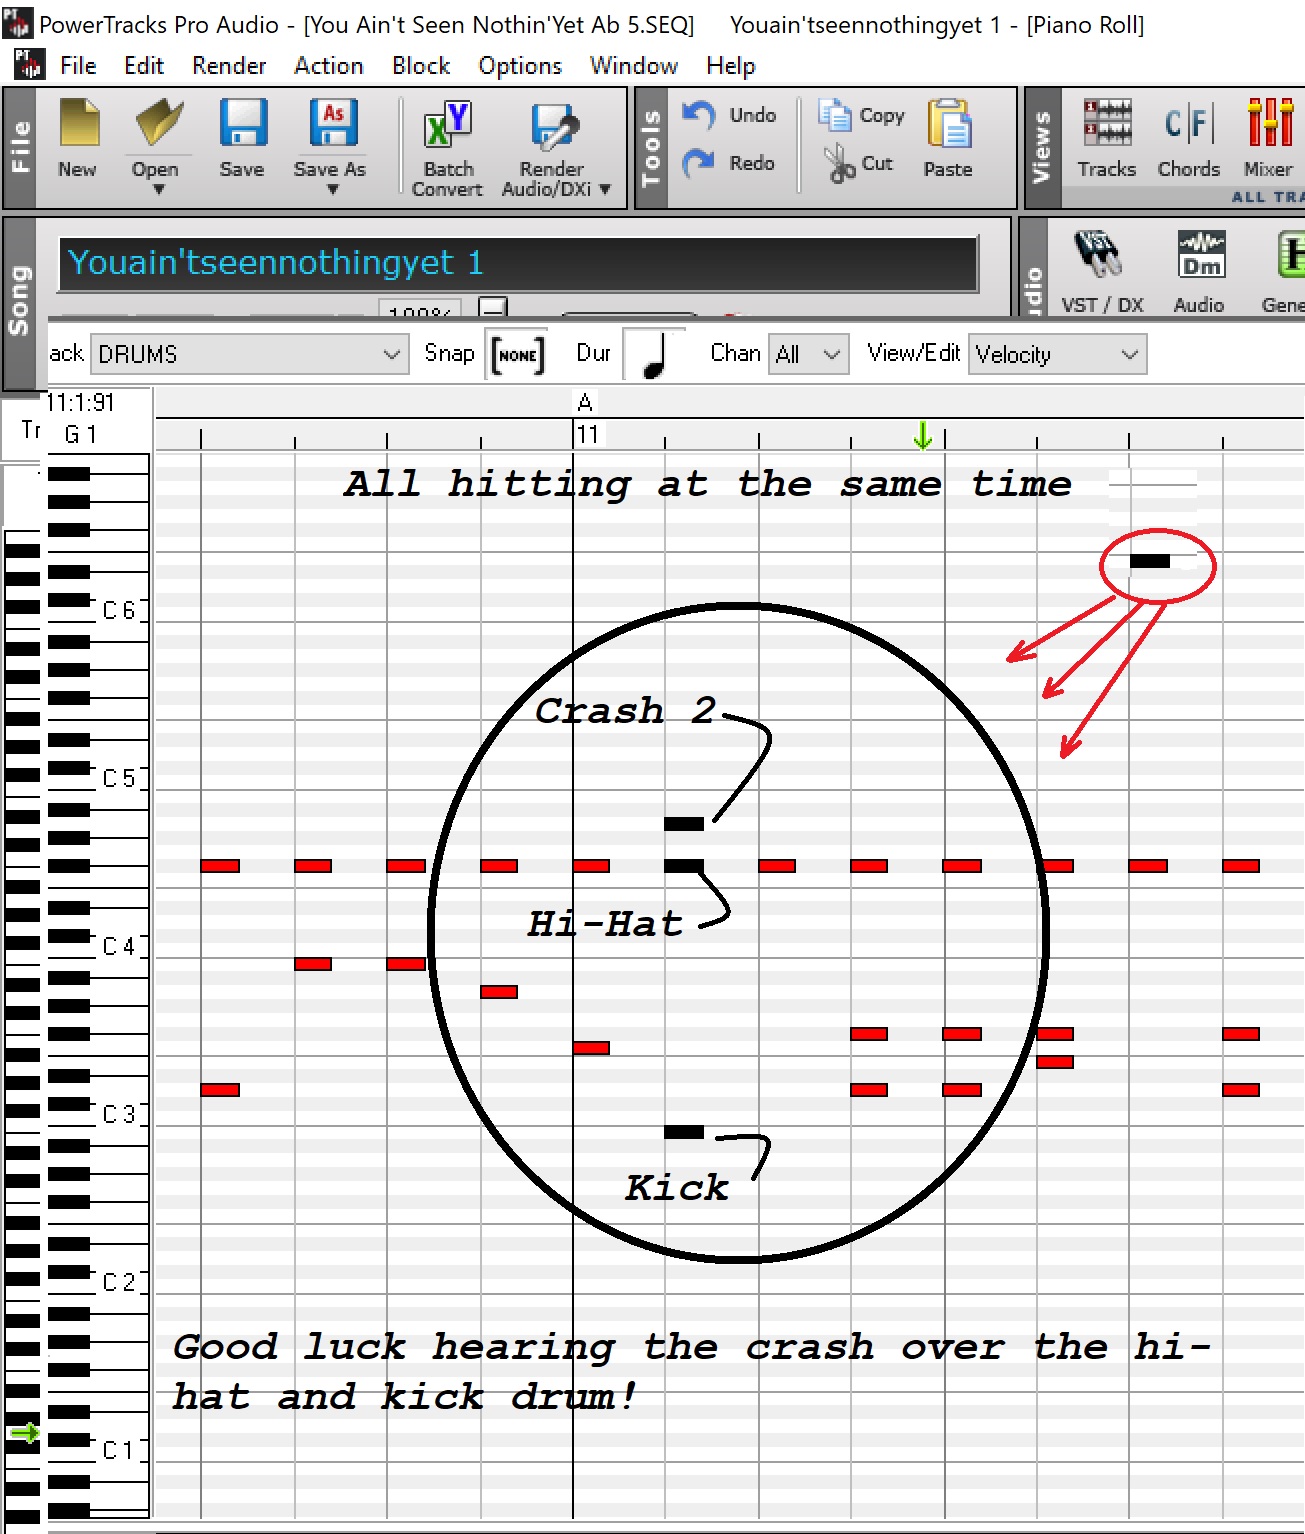
Listen to just the drum track(s). Can you hear every drum and instrument played?
Can you clearly hear the kick and the snare? Are the high-hats covered up? Do the crashes
get lost behind a kick or worse, do you have other cymbals playing over top of your crash?
That's a NO NO! When you have a crash, make sure (if editing someone else's MIDI) that
there isn't a high-hat or ride hitting at the same time as your crash. Delete them! Maybe
even delete the kick if you want the crash really distinct, and not so loud you break windows!
OK, so if you can hear ALL drums in the drum track perfectly, that's just STEP 1. Also, Step 2, do
they ALL sound good? Or do you not like the sound of the kick drum? It's loud enough. But it
sounds boxy, or muffled. So try a different kick! YES there are 2 or more in most editors. Some
have half a dozen, or more!
This is where you stop reading this tutorial. Jump into your MIDI editor, and FIND YOUR KICK DRUMS!
This is a hands-on tutorial. It should take you days to get through it. Not 25 minutes!
If you have times when you have trouble getting your kick to sound good in different
mixes, go now . . . and find out where to get MORE KICK CHOICES!
This will get you started . . . Let's start with Anvil Studio. (Yup, basic MIDI has 2 kick drums,
so any editor will have at least 2!)
OK, just like never editing the original MIDI file in case you need to go back to it, you
shouldn't edit your tracks either. Especially if you're editing someone else's MIDI.
Copy the track, and edit the copy.
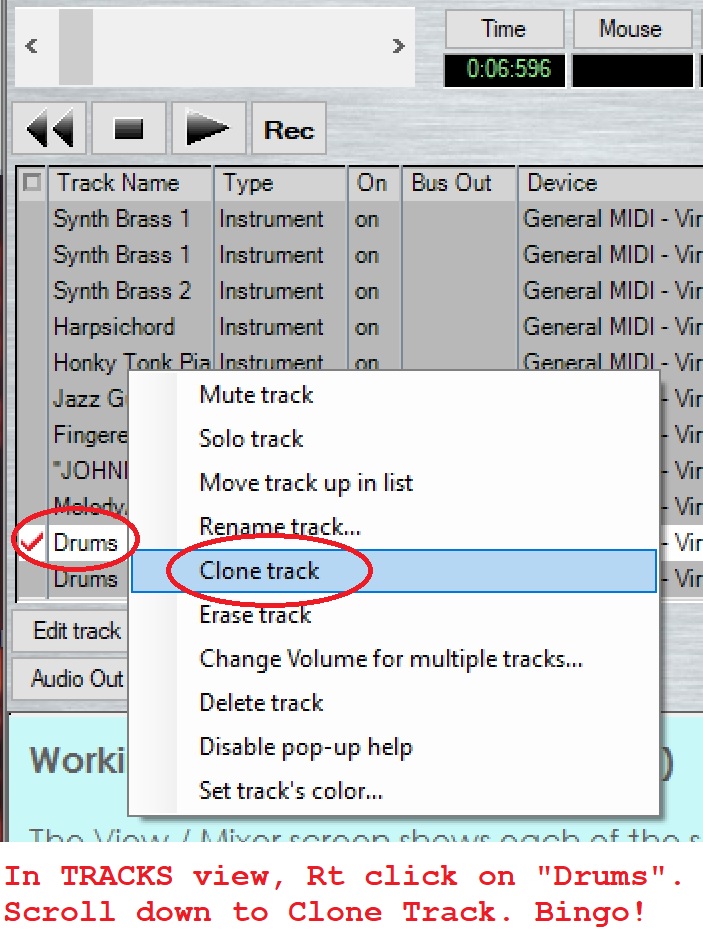
If the edit works out great, just delete the original. But then again, if you do mess up
the track, and have exceeded the 'undo' limit, (not all that likely) you can always get
the track from the original and import it into your new MIDI file. More on importing later.
I suggest changing 'instrument' to 'rhythm' as I showed you in the previous tutorial.
Then it's a simple click and pick. You now have 2 Drum tracks. There are a number of ways to
change the kick drum from the one in your MIDI now. One way is to use the Piano Roll and
change it there. In Piano Roll, select the instrument you want to edit. (See blue drop menu)
Then in the left column, select the 'note' you want to change. When you select it, another
window will pop up allowing you to change some parameters, including the pitch of the note.
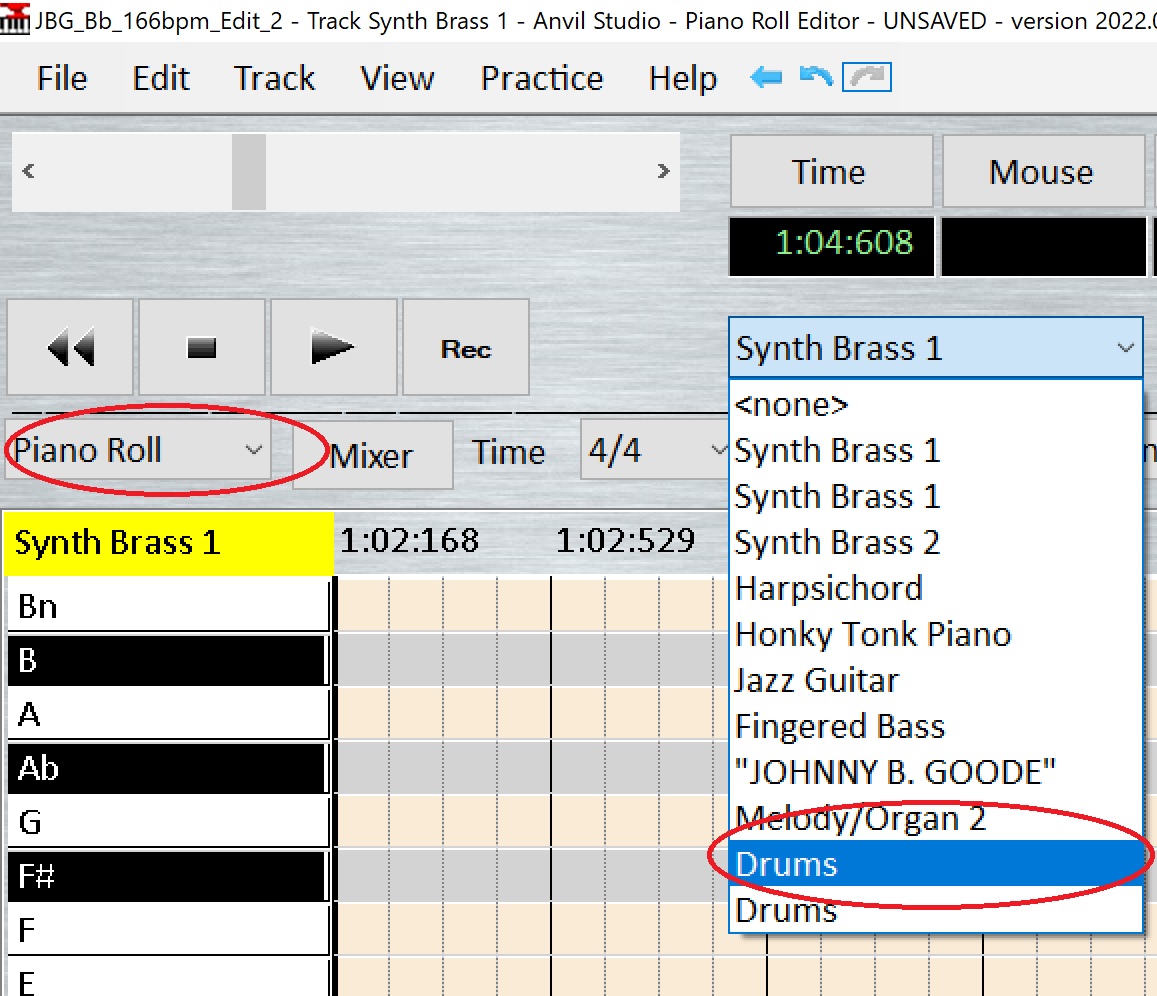
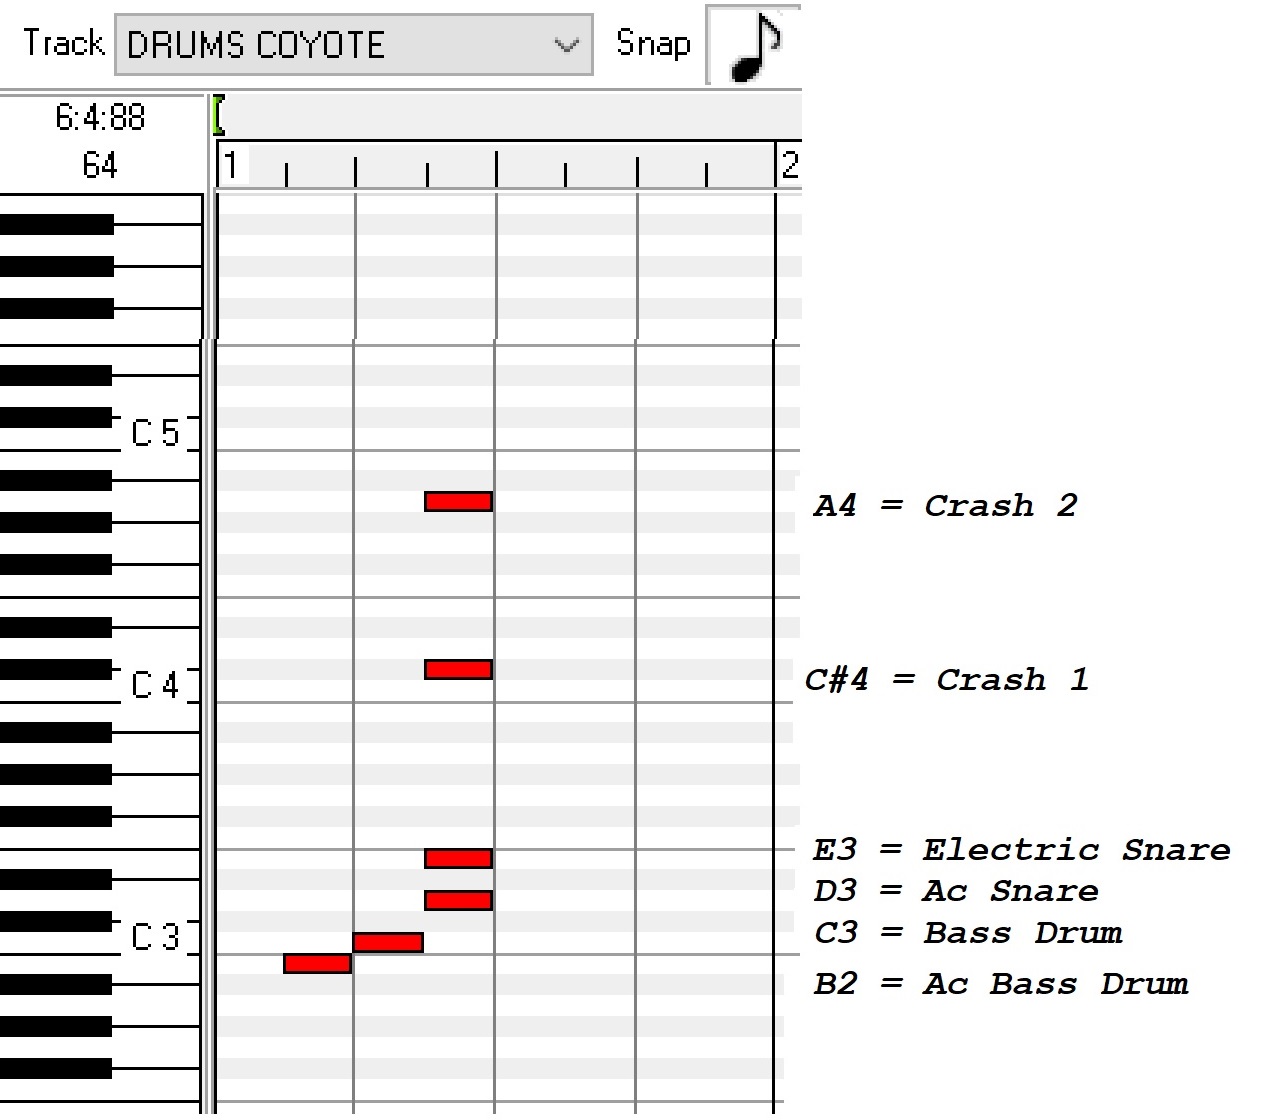
Here it would be necessary to know what the notes are for each specific drum instrument.
Here is a quick shot of just a few 'must have' drums. 2 cymbals, 2 snares and 2 kick drums.
Later when we go over drum editing I'll provide a full list.
Most editors are similar. In AS you had to click and pick, then get a drop menu, select
again, etc. Kinda busy for my liking, but not difficult. Just busy. In PT and RB (above)
you simply click on a note in the left column and the selected notes (or note range if you
click/drag select more than one drum) will be highlighted. You can then just drag them
where you want. (Hold SHIFT while you drag)
MC and Garage Band work almost the same way as PT.
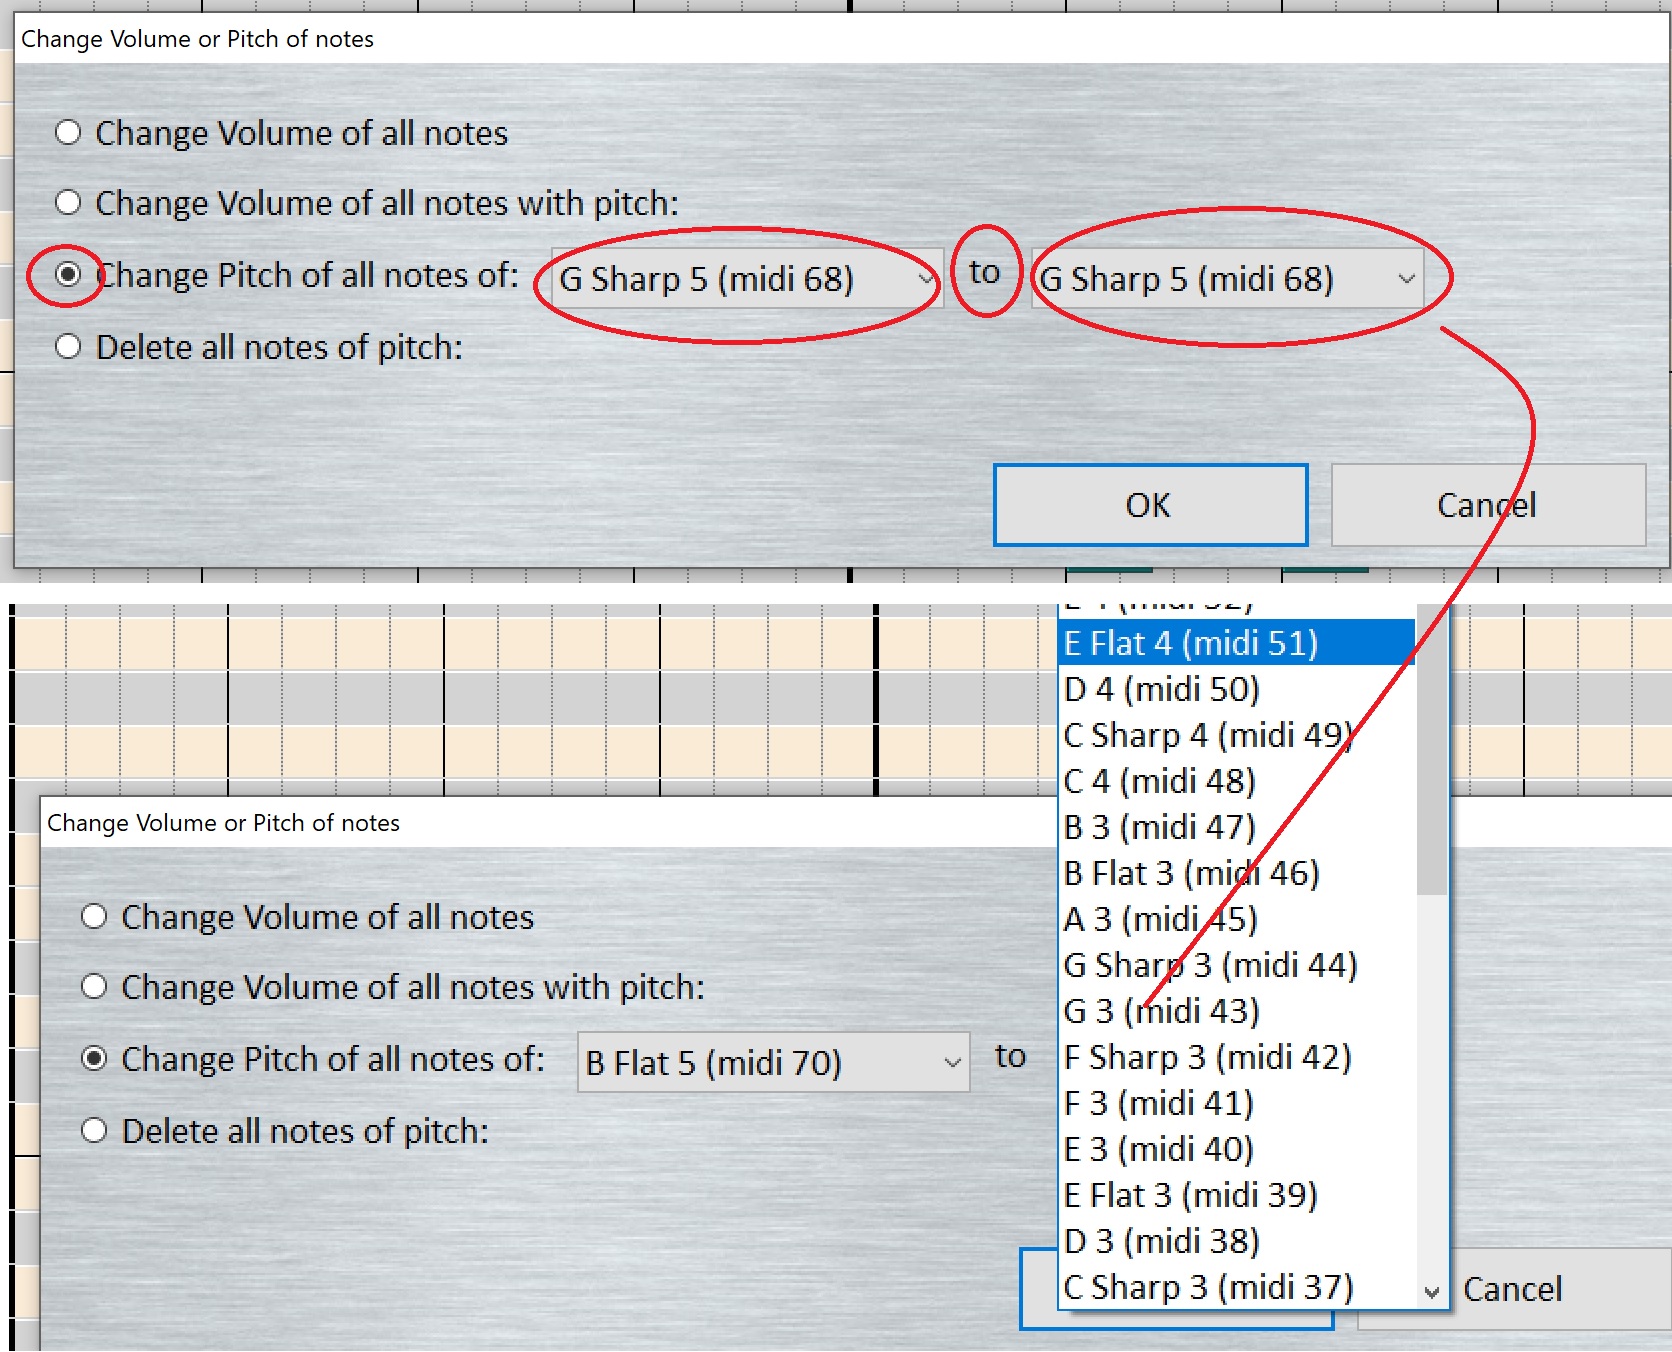
SO . . . what you would do RE kick drums is see which one the MIDI has. Change it to the other
kick. B2 to C3, or vice versa.
Here's something cool. You can use BOTH! You could copy the drum track. Delete everything
except the kick. Change it to the other kick. So one track has C3, the other B2. So you have THREE
options. C3, B2 or BOTH! 3 different sounds!
OR . . . Instead of copying the whole track (duplicaing or cloning track) you can also just copy the
kick, open a new rack. Now paste the kick into the track.
OR . . . you can also just add the 2nd kick to the drum track and have both kicks on one track.
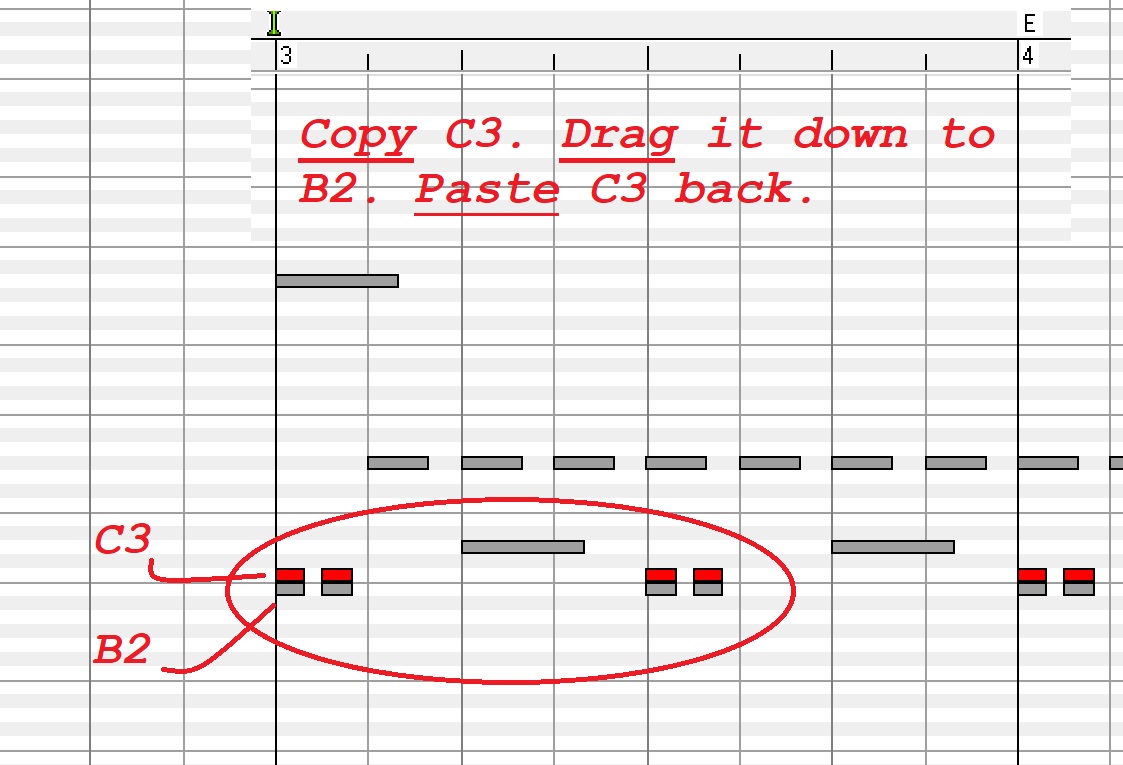
You would pick (highlight) the whole kick track. Click "copy". Drag the kick track to the "other" kick,
Then paste the original back where it was. EX: Highlight the kick that's on B2. Copy. Drage the kick
up to C3. Now paste B2 back.
But wait! There's MORE! Want 3 more options? Using PT as an example, have 2 separate drum
tracks. Let's say Timbres Of Heaven is your primary synth (SoundFont). Change one of the 2
tracks to a different synth. Like Coyote. (Your secondary synth) Both drum tracks will sound
very different from each other.
NOW . . . split the kick tracks like you did in the previous example. You can now have 3 kick
options (C3, B2, BOTH!) with your secondary synth! AND . . .
You can also mix and match all 6 combinations until you find the kick sound you're looking
for! Like maybe TOH C3 with Coyote B2 sounds PERFECT!
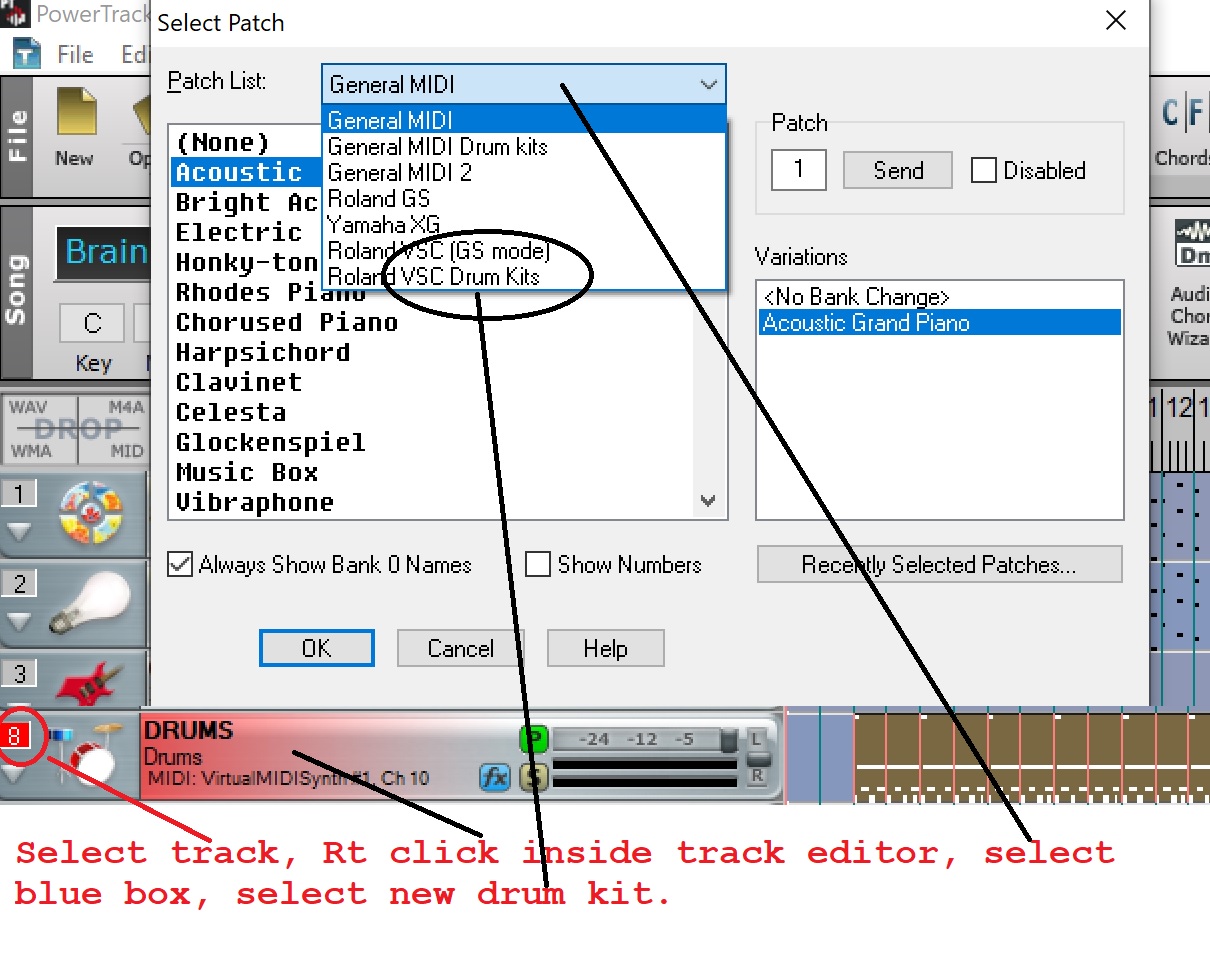
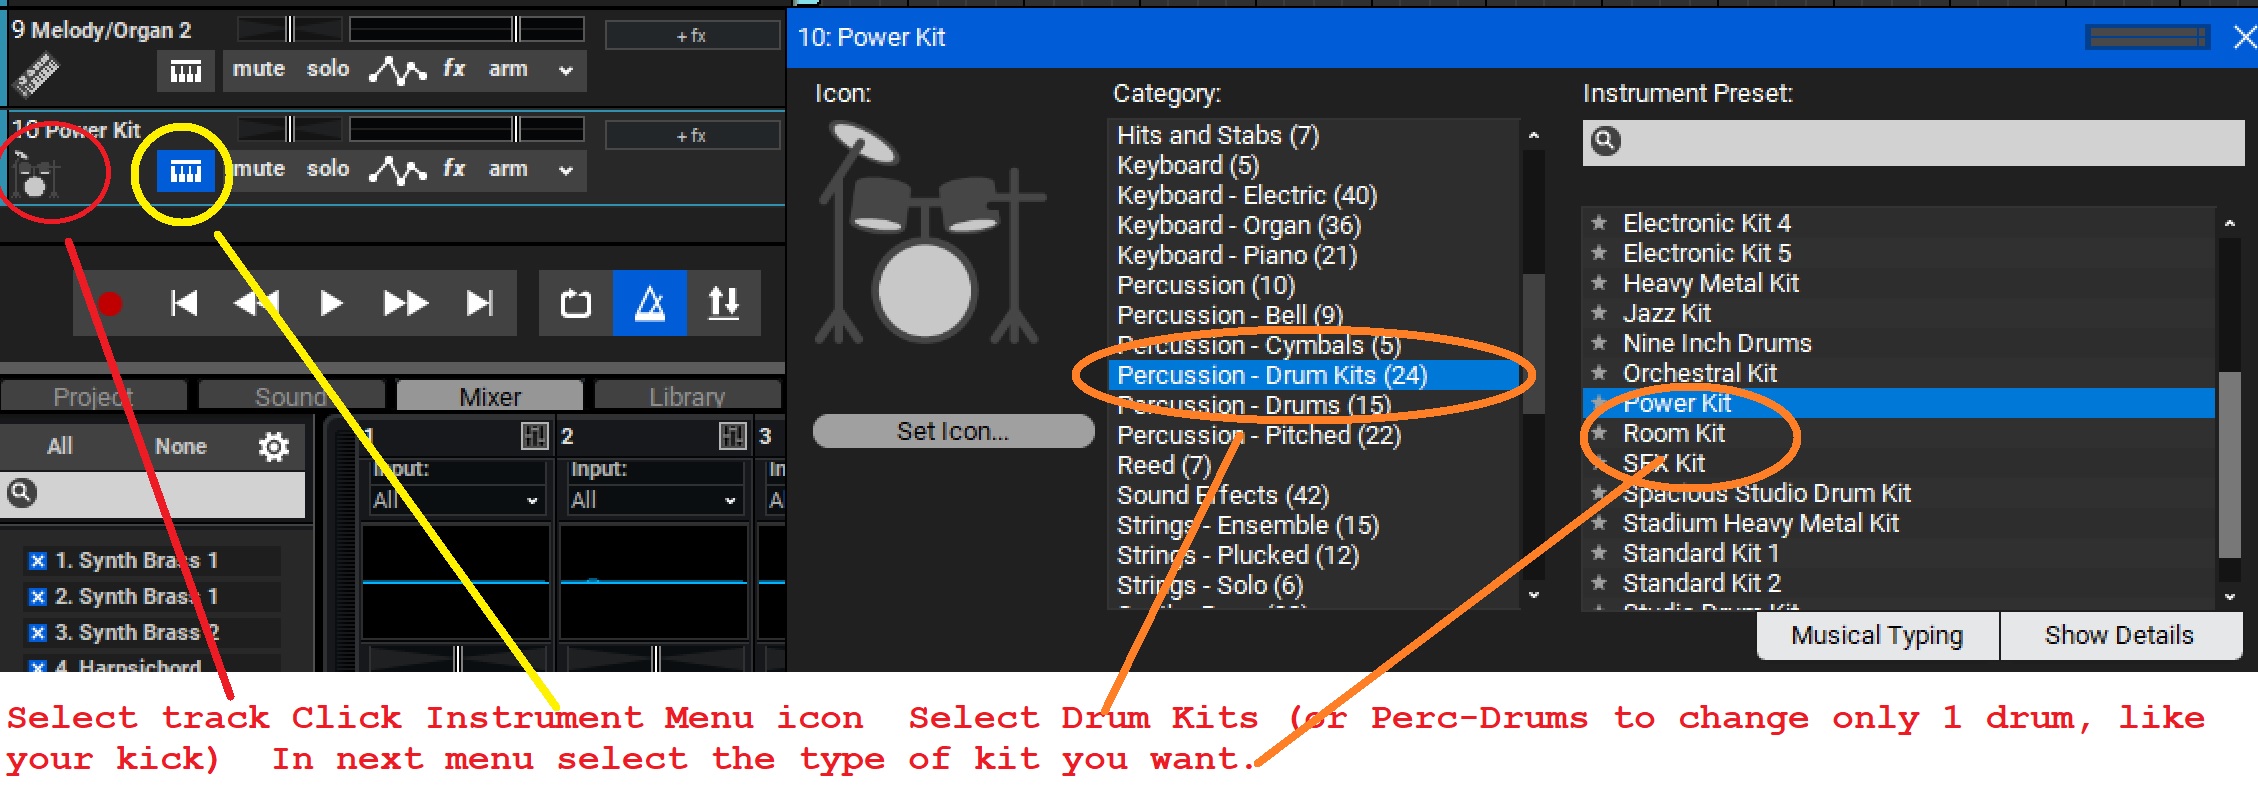
And another group of options . . . You can even change the entire drum KIT! PT, RB and MC
have tons of different kits! So in our 'finding the right kick sound' search, we can make a kick
track, and try assigning different kits to it. Each kit will have its own kick sound. Then, as above,
you can mix and match all of the different kick sounds.
PowerTracks and Real Band
Mixcraft
If you can't find the right kick sound now . . . you're too fussy! LOL
I should memtion that there are some options using GarageBand. But it's not as
straight forward as the PC software.
In Garageband, there are two types of kits available: acoustic and electronic. Acoustic
kits show a realistic-looking set of drums while electronic kits show a grid of drum pads.
The first step in using keyboard drums is deciding which kit you'd like to use.
You can tap the name of the kit at the top of the screen, then tap the kit you want
to play. You can also swipe left or right to change to the previous or next kit.
Once you've chosen your kit, it's time to start recording your drum patterns!
To do this, you have to hit the red button and start playing/recording. As you
play, Garageband will record each note so that when you're done playing, all your
notes will be recorded into one track. Yeah, you gotta tap the keyboard, learn
what keys are what drums. Then play your drums and record them. UGGHH!
I'll also note that you can split drums out into multiple tracks with GB. But I don't
remember how to do that. I'll cover it more when I do the Drum Editing Tutorial
sometime between next week . . . and December 2048 . . . as time permits! LOL
To be clear, most, if not all of the other programs I've included in this tutorial can do
the same thing. Probramming with a grid, using your keyboard to "tap", or tap on
the pix of the drum kit. It's an option, besides having actual kits to choose.
"So why do I need to make so many different bass drum sounds?"
For the same reason you're going to want to get more snare sounds. More tom sounds!
Because you're most likely a cover band. And I would think you'd like to sound as much
like the band you're covering as you possibly can!
Our band, for example, covers around 80 different artists/300+ songs). So let's just consider a few of
our songs. White Room, Clapton/Cream ~ 25 or 6 to 4, Chicago ~ Come Together, The Beatles
Boot Scootin' Boogie, Brooks & Dunn ~ Africa, Toto ~ Soul Sacrifie, Santana ~ You Keep Me Hangin'
On, Vanilla Fudge ~ Half a dozen songs by The Who and more than a dozen by the Rolling Stones. Can
you see why I'd want to use a large variety of drum kits? Ginger Baker (Cream), Ringo (If I gotta tell you,
you shouldn't be gigging!) Keith Moon (The Who), Danny Seraphine (Chicago), Carmine Appice (VF)
Trey Gray (B&D). And certainly Charlie Watts! These are not only hugely different drummers in style,
but in the kits they used as well. And any band's sound is hugely shaped by their drummer's style, AND
. . . their KIT!
And if you're not a cover band, if you do all originals, I would think you'd be hugely focused on getting
every instrument to sound exactly how you want it, for YOUR songs!
And drum kits are only the beginning. Pianos and organs have a lot of different options. I mean, grand
piano vs. Fender Rhodes! Farfisa Italian organs vs. a Hammond B3! Bass guitars! Fender basses are all
unique. Do you want a Fender Fretless, Precision, or Jazz bass? Compare that to how a Rickenbacker
bass sounds! HUGE difference. And the list of guitar options is endless! Sadly, MIDI has not done as
well with duplicating guitar sounds. But you can get pretty close. Like MIDI gives you a choice for electric
gutar. "A" choice! Strat, Tele, Les Paul, SG, Guild, Ricky, all wrapped up in one choice: electric guitar!
OK, you do have 3 choices. Jazz, Clean and muted. But you need to work to get your guitar tracks to sound
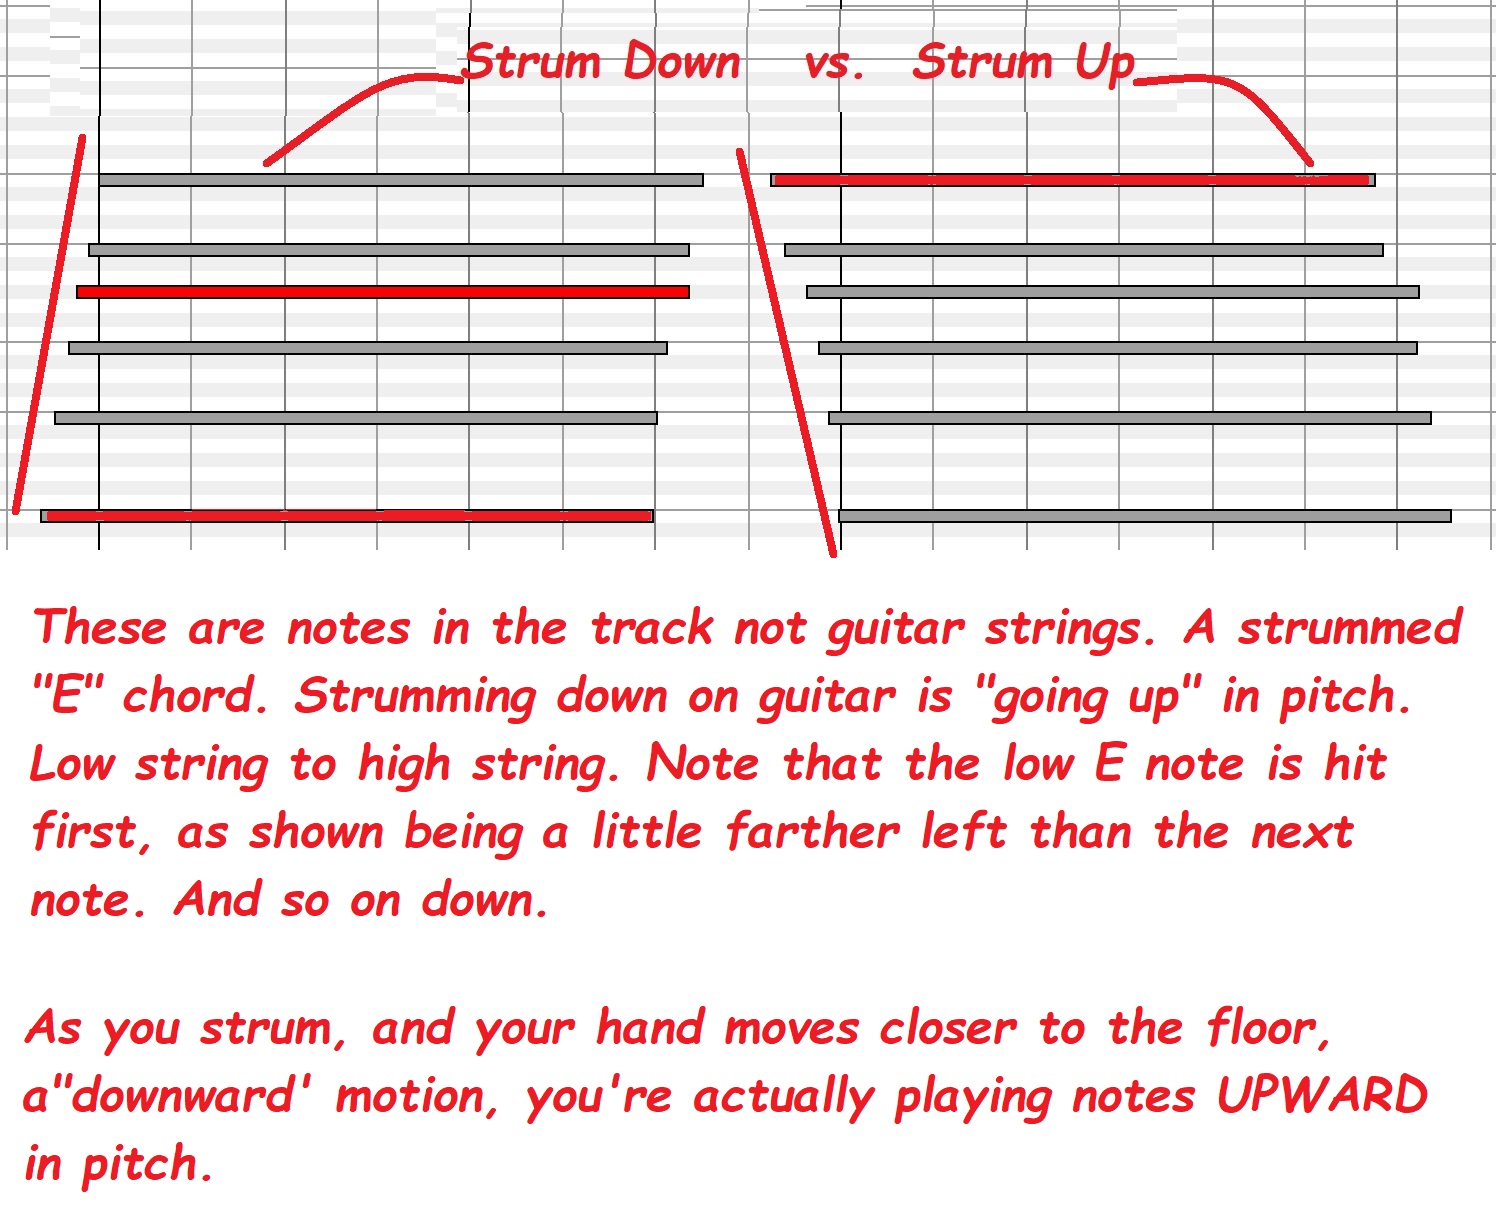
decent. Hey, just a qick note. When you edit or make a guitar track, keep in mind it's physically impossible
for someone to strum a chord, and hit all strings at the same time! Maybe on a "HIT", you get pretty close.
But even on a hit, you can'y possibly hit all strings at once. So when you make your chords, you should
figure out if it's an up strum, or a down strum, then adjust (slightly) how the strings are "hit". This will add
a TON of "realizm" to your guitar tracks sound!
Strum down, you hit low string first, and vice versa
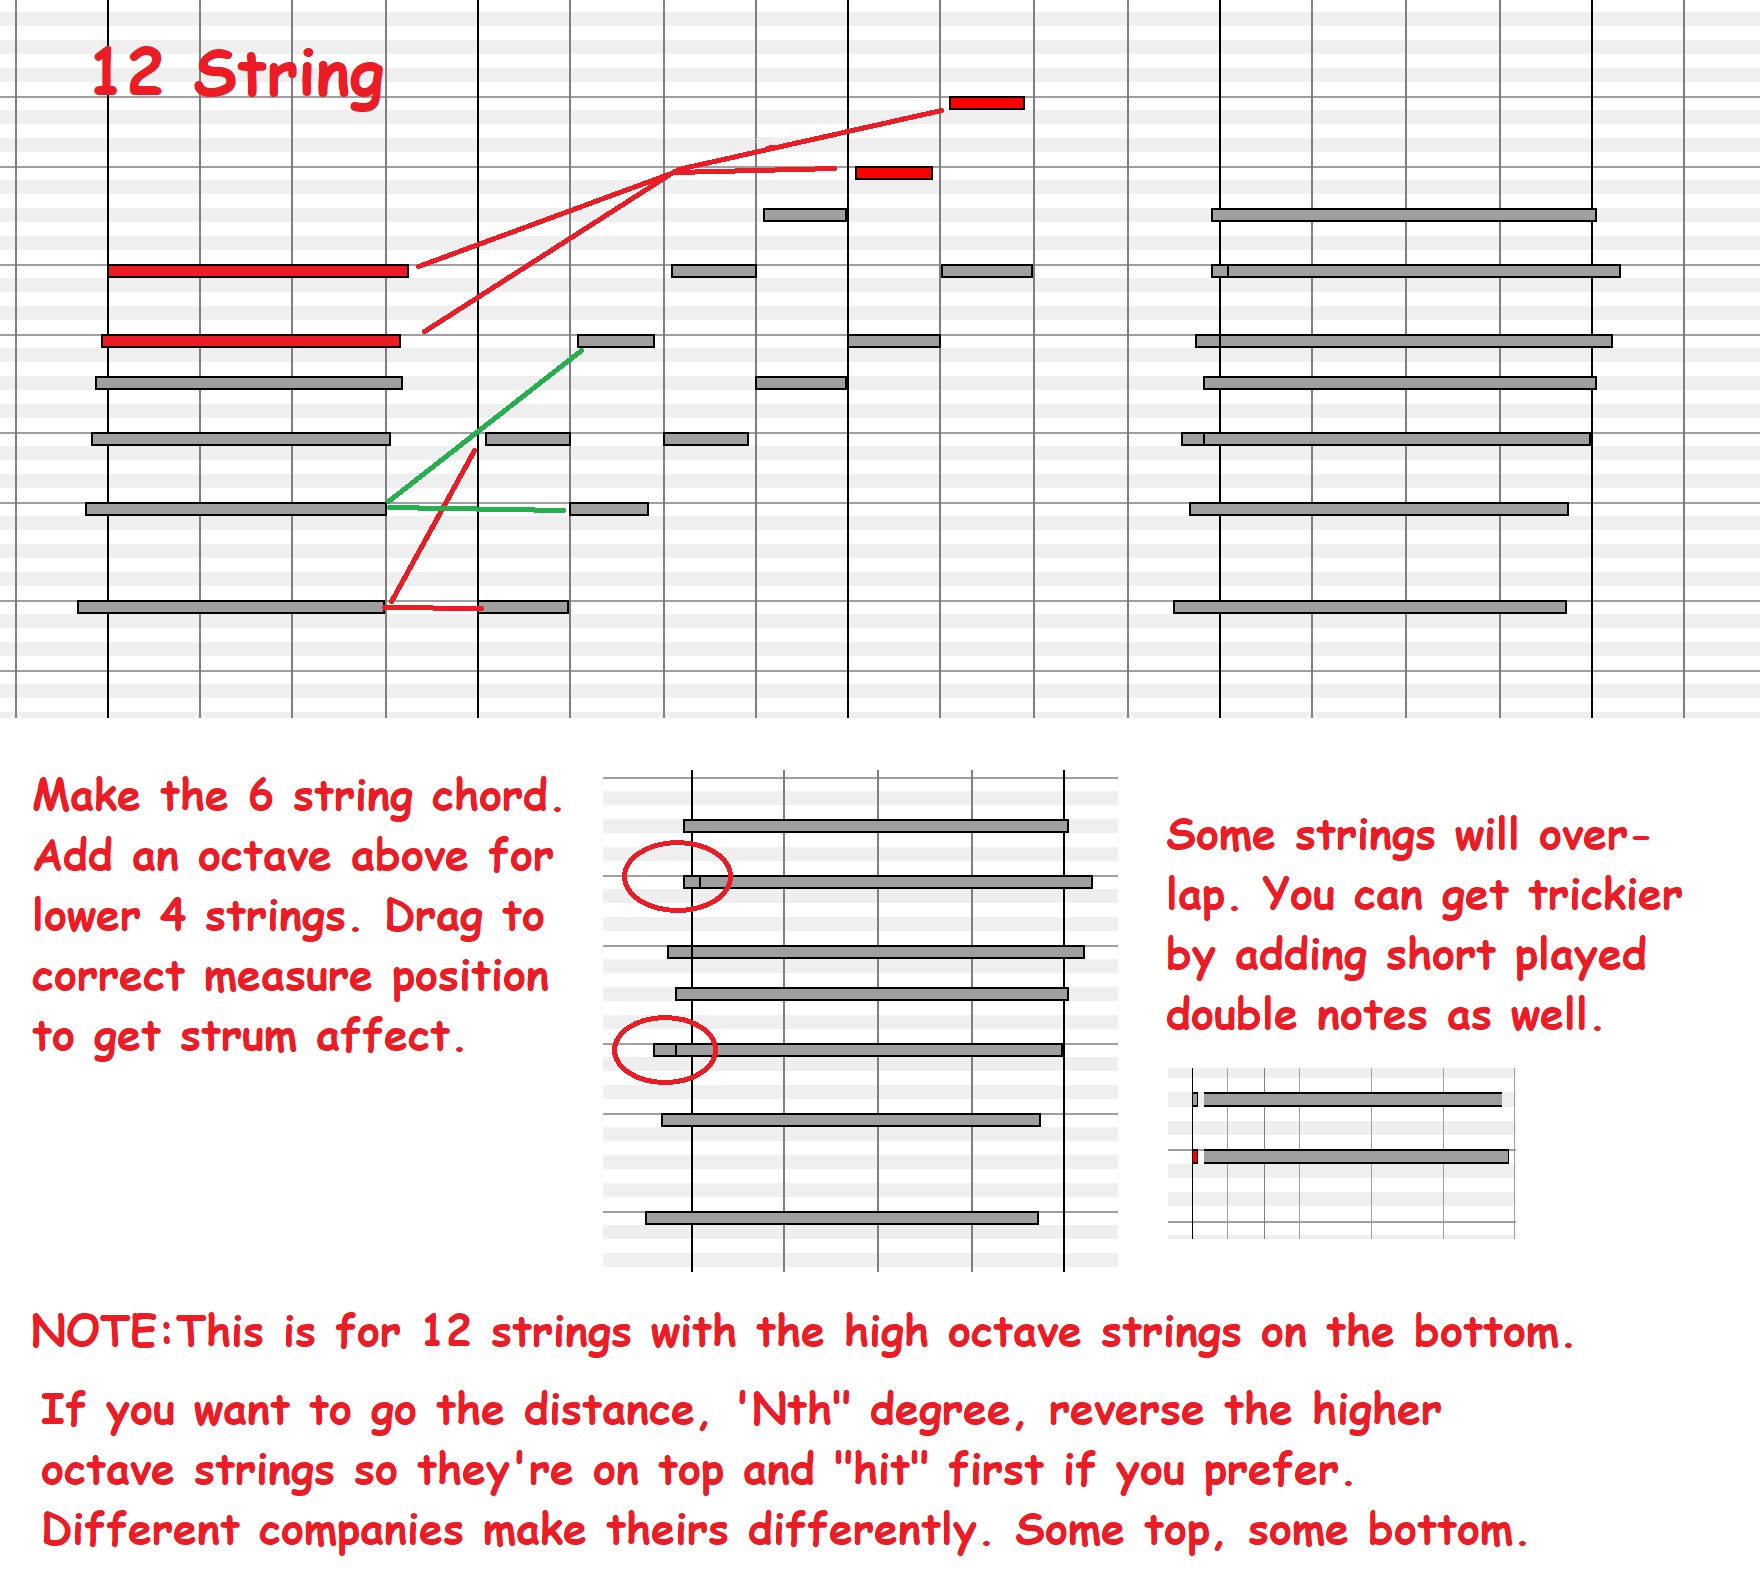
You can use this effect to help get a decent 12-string effect as well. Along with adding in
the higher octave strings on the lower 4 strings. Either placing the higher strings above or
below the regular string, depending on the guitar manufacturer you want to emulate. Not
that it should really matter so much anyway. But, if you want to go the distance, have at it! HA!
OK, let's get back to our EVENTS lesson. To tie the above 'finding the right kick sound' with
EVENTS, here's some more ways to change the sound of your kick, using EVENTS. There are
dozens and dozens of ways to edit your sound with EVENTS. I'll cover the basic 'how to'
here. Then it's up to you to do some trial and errors experimenting.
Here is one thing that does differ a lot between editors. They all have ways to edit your
EVENTS, some pretty easy. Some not as straight forward. You should be seeing why I use PT,
RB and MC so much. And why I use all 3! I'll most likely use one or the other if I'm just making
some minor edits in someone's MIDI. But if I'm making a new backing track, I'll end up using
at least 2 of them, if not all 3. Keep on mind PT and RB are nearly identical. BR has a lot more
audio options. And my backing tracks are all audio in the end.
EVENTS are just numeric instructions. They let the software know all kinds of things. Like will
you use reverb? if so, how much? How loud or quiet, hard or soft . . . how long or short . . . fade
quickly or notes held longer . . . etc. EVERYTHING practical can be controlled with EVENTS.
You set them at the very beginning of your tracks. One reason my tracks NEVER start at the first
measure. My count-ins begin at measure 2. My beginning EVENTS are all starting in measure one.
You also change EVENTS throughout your tracks, from time to time, as needed, when, and IF
needed. Throughout the song you control dynamics by changing the EVENTS. Volume swells,
or volume drops. Panning left to right (if your tracks are stereo). Just as tempo can change
in different parts of a song, so do other dynamics.
There are 127 EVENTS you can use. But for backing tracks, you're going to use only a few! Less
than a dozen. So it's not so bad! LOL But it IS work!
For those of you who use a template, you're going to want to edit that template with what we'll
call our Start Up EVENTS. You will want EVENTS on EVERY USED track! Not just some.
EVENTS are called CCs. Continuous Controllers. These are the ones you'll use more than the rest.
1 Modulation Wheel 7 Volume (Think Master Volume on an amp) 10 Pan left/right 11 Intensity
(Think Channel Volume on an amp) 64 Hold Pedal on/off 91 Reverb 92 Tremolo 95 Phaser
Many of the other CCs are for controlling synths, more piano pedal controls, etc.. Important,
yes! But not so much for backing tracks. If you're a skilled piano player, you'll use the other
piano pedal controls.
You will use many of the others as you get used to using CCs. Especially when you start editing
them throughout the tracks.
So getting back to the KICK! You did a bunch of work getting the sound you wanted. Now you're
going to refine that sound even more!
I need to establish a base line. You'll do this as you develop your ear, and know what works
for you. For now, I'm going to say 100 is our basic 'just right' amount. 127 being 'all the
way up'. All instruments won't use the same base line. But for now, we'll keep it simple.
Kick drum on track 7
Pitch Bend = 0
CC1 Modulation Wheel = 0
CC7 Volume = 100
CC10 Pan = 64 (0 TO 127, SO 64 IS DEAD CENTER)
CC11 Intensity = 100
CC64 Hold Pedal on/off = 0 (0 to 63 = off, 64 to 127 = on)
CC91 Reverb = ZERO! Almost NEVER use reverb on your kick drum
or bass guitar, trombones, tubas, etc.)
CC92 Tremolo = ZERO
95 Phaser = ZERO
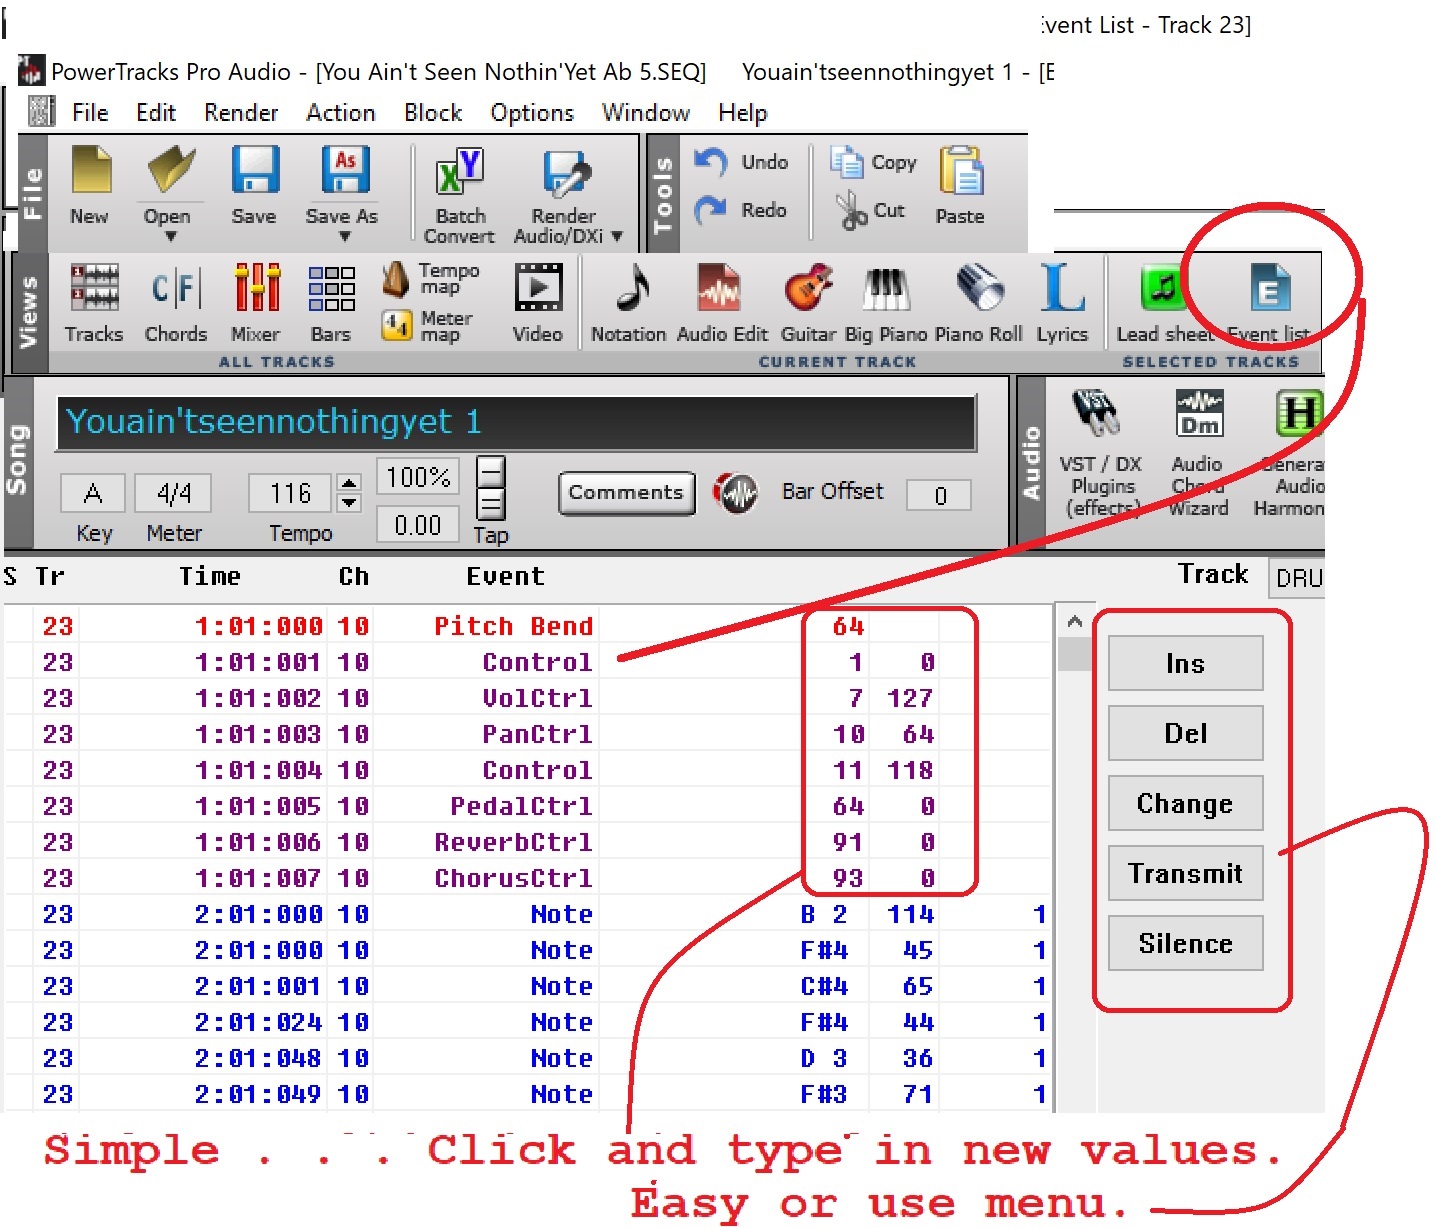
Two common ways EVENTS Lists are edited are as follows . . .
AS uses a method I'm not a fan of. The function works by filling out fields in a pop up.
PT and RB is like a real list. And you add, delete, edit EVENTs very simply . . .
So for the kick, we basically set the volume and how hard we hit it. And made sure
there was no reverb or chorus. Not much shaping going on here! Why not! Well,
remember in the last tutorial I said you edit the 'channel' not the 'tracks'. The EVENTS
above are for track 7. But CHANNEL 10. So these EVENTS are for all drum instruments. Snare,
cymbals, etc.. Even though you put the kick on a separate track, it's still on channel 10.
Kind of a weakness in basic MIDI. But there are a few ways around that issue.
For one, you can use MC because it doesn't use channels. So you can edit each instrument
how ever you like. Each one differently if you want. You can pan each drum how ever you want.
But now you're paying for the extra editing power! About $170 I think at last look.
Another option is to use multiple synths or SoundFonts in your mix. Have some drums use one,
other drums a different synth. So you can edit them differently. But you're still restrained to
how many synths you have. AS is limited to 2 for the free version. I think it's about $40 to add the
option for using more than 2 synths.
There is also a way to use more than one set of channels. I'll cover that another time. It's not really
so hard. Just more steps.
And then there's the way I do it. This is the perfect way to edit your drums so each instrument is
100% independent of the others. But it's a whole new ballgame! GO AUDIO!
I am NOT necessarily suggesting you start rendering all of your MIDI tracks to audio. That opens
a lot of doors. But just to let you know how it works . . .
I split all of my drums into separate tracks. I talked with the guys at AS about providing that function
back in 2018. Not sure if they ever added it, but I don't think they did. Maybe. Not available in MC
either. You have to manually copy your drum track a bunch of times, then delete the drums you don't
want on the track. BUT . . . PT and RB have a 'split MIDI drums to separate tracks' function! Yet another
plus for PT.
Then I go to each drum track and render it to a wav track. I end up with half a dozen or more,
sometimes a lot more (think Santana). Then I can edit each one of the wav tracks using audio
editing tools. Many are built right in PT and RB. Wav tracks are not on any channel. They aren't
MIDI. So I can pan some drums left or right, or somewhere in between! Add reverb to just the
snare. And here's maybe the best part . . . I can dramatically edit the EQ on each track. HUGE
advantage over MIDI. EQ is very powerful.
One example, going back to the kick. Did you ever have a cool bass line, and a sweet drum track,
but when you play the track, the kick is totally lost? I know you have. You can do all the things
we talked about above and get the sound you want for the kick. But if it's buried because the bass
guitar is using the same frequencies as the kick, the kick will disappear!
So now you can use a real EQ, and tweak the kick until it pops right over the bass guitar!
Again, going audio is a big step! And to be honest, it's a HUGE step if you're at the early
stages of learning to edit your backing tracks. And probably not necessary! At least not now.
It means more learning curve, some new gear (not much, but some), a bit more time to make
your tracks at the beginning. Once you learn audio editing it's actually a bit faster to make a
great baking track using audio than to make a nearly as great MIDI.
So far this has been a fairly long tutorial. And all we really talked about, for the most part, is
editing your kick drum! UGGHHH! 7 pages! So how many pages is it going to be for all the other
drums. AND other instruments?!? The good news is, we covered a whole bunch of stuff you need
to know about editing everything while covering the kick drum. Phewww, right!?!
So this is part 1 of a 2 part tutorial about shaping your sound. Part 2 will talk about just about
everything you can think of, except . . . editing your kick drum! HA!
The second half is what you've been waiting for. We're going to start editing our JBG MIDI! And
the tutorial will have audio to go along with it! Each step during the editing process I'll include
audi examples along with pix!
See you in Phase 3, Part 2!
Wayne
Phase 3, Part2
Click to go back to the main Tutorials and Workshops Directory
Tutorials and Workshops Directory
Wayne (Reed) Knazek ~ Email Me Here! ~ My personal Web site

My MidKar site: 43,813 FREE Backing Tracks
MIDI Files, KARS and BIAB files PLUS 23 User Styles. 260+ pages!
Please help keep us online with a small donation!
This site is free for all. The tutorials, workshops. 43,813 MIDI, KAR &
BIAB backing tracks files, 23 BIAB User Styles. A FREE SoundFont,
Timbres of Heaven. Free MIDI players and editor!
The fees for a site this large (Nearly 200 pages with over 50K files)
is pretty high, as you can imagine.
Please consider making a small donation to help keep us online. It
would help so much! Thanks! Wayne
PS: I pay for the site and all hosting, security and domain related
expenses out of pocket. Donations appreciated. Please click the link below.