This is a relatively easy workshop! As in, the "steps" are easy. This page
NEW ADDITION!
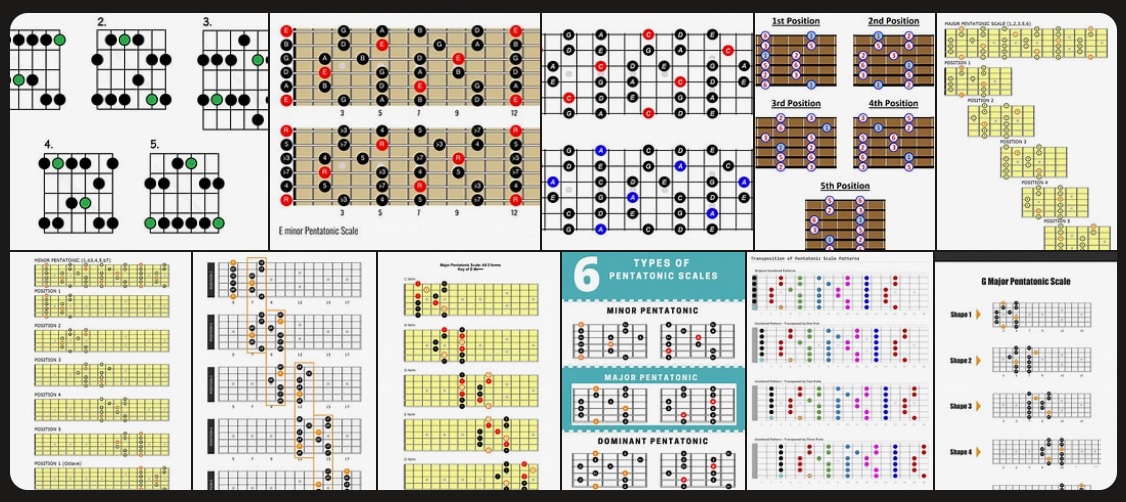
I just posted a brief, quick read tutorial on Pentatonics.
You need a rigid pick for these drills!
OK, on with the show! HERE WE GO!
Starting from Day 1, you will work on EACH of the 5 Audio Drill Tracks.
When you start messing up, STOP the track, and start it again from the
I won't cover much peripheral info in this workshop. Things like
walks you through how the workshop is formatted. IE: The instructions!
But before we get started . . .
It briefly covers what they are, and how you use them over any chord or
chord progression! Click over, read it. It takes all of a few minutes!
Pentatonic Tutorial
1). Go through this entire page ONCE! Do ALL of the exercises ONCE! Just to
get familliar with the format! This is a WORKSHOP! You'll be spending 10, 15,
or more minutes per practice session on this. Right before each regular
practice session. So . . . DEDICATE 30 minutes NOW to your future success!
Once you go through it one time, there is a link to a
NEW Directory page! It will keep each section organized!
You'll also have an option to downloard each part if you'd rather work
from PC files! So commit 30 minutes now! Or come back! It's best to go
through this entire page in one sitting! It PLANTS SEEDS!
2). This isn't a theory based workshop! It's mostly HANDS ON!
I'll post a Pentatonic Theory Tutorial in the near future.
3). Do Not Use a flimsy, flexible PICK!
If you don't have one . . .
GO BUY ONE!
I strongly recommend buying a 1980 pick from V-Picks.com !
V-Picks Home Page
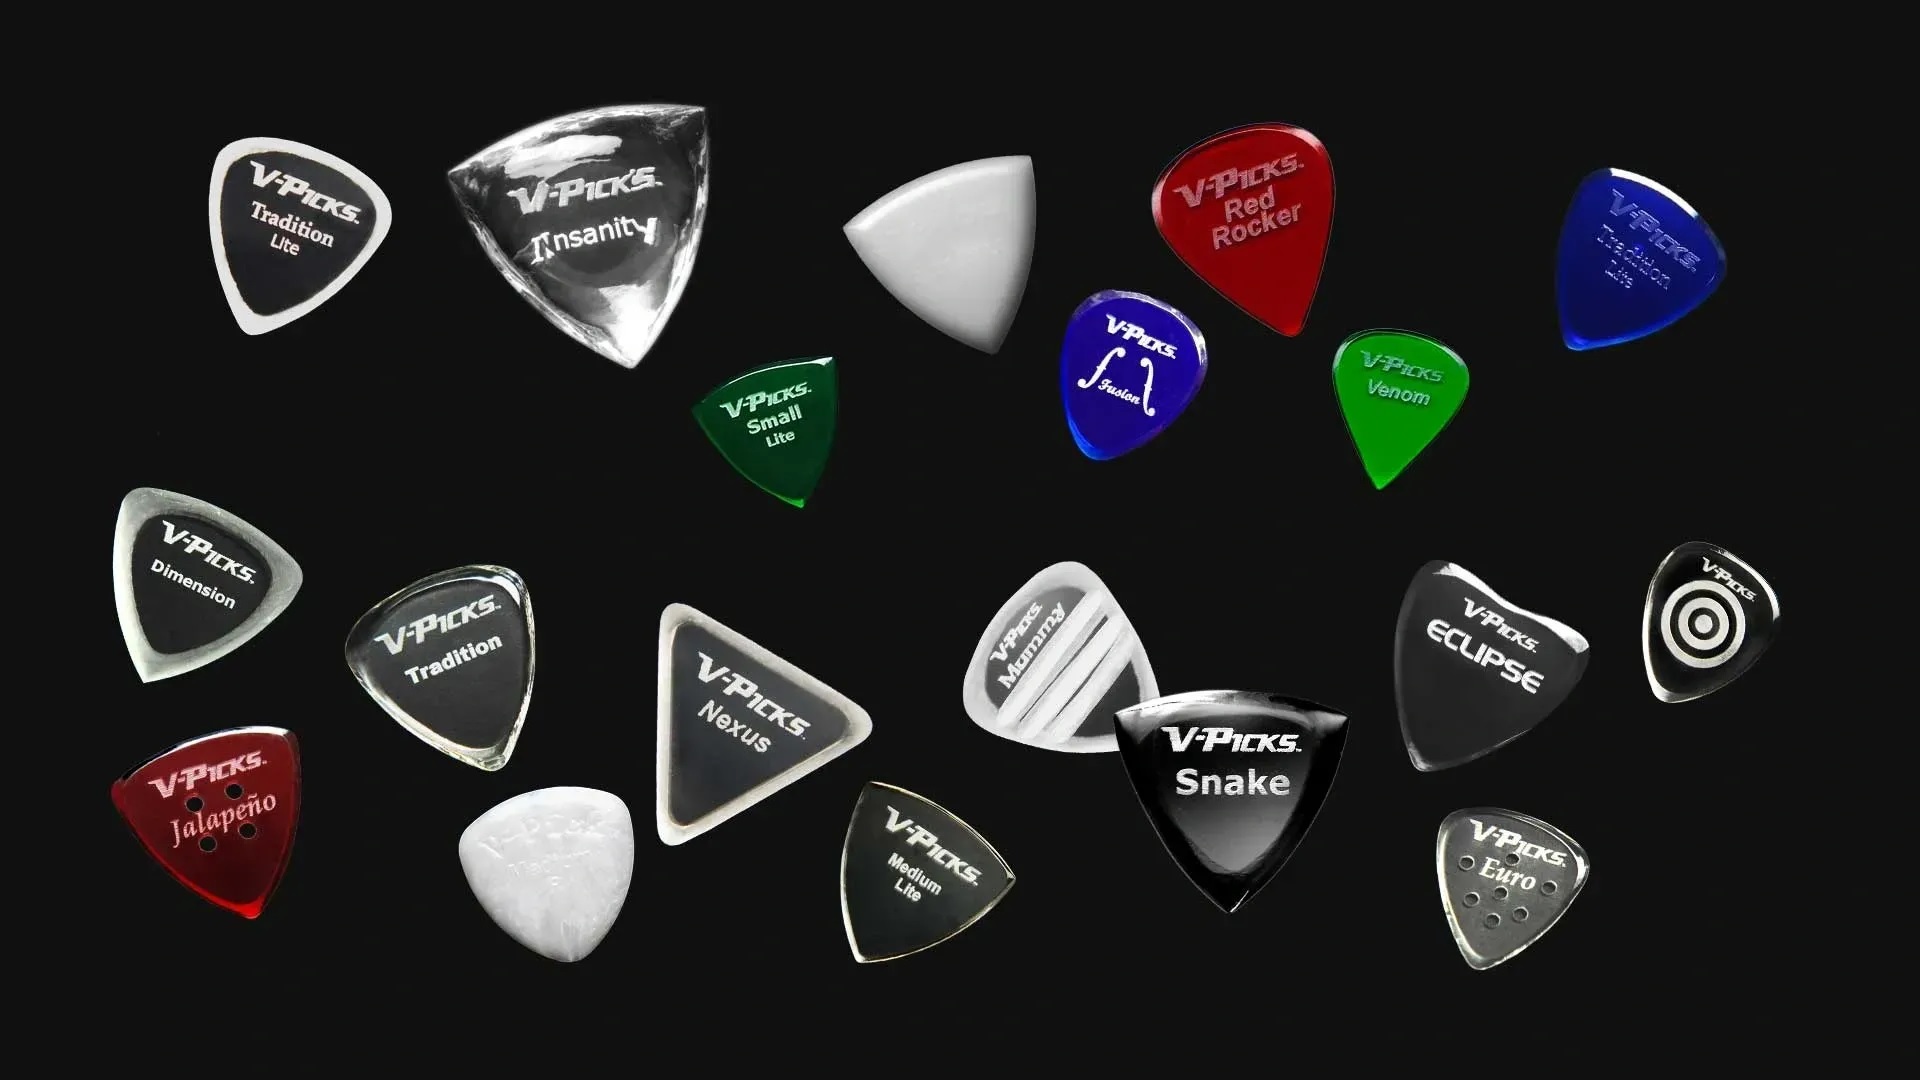
I'm just a customer!
~~~~~~~~~~~~~~~~~~~~~~~~~~~
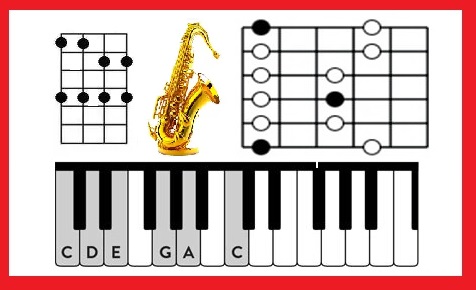
A Pentatonic Scale is simply a scale with 5 notes. Pentatonic literally
means "5 tones", or 5 notes.
In this workshop, we'll focus on the main scales used in Rock, Blues,
Country, and all basic music generes. The Minor Pentatonic Scale. These
same 5 shapes, or positions, are both Major and Minor! It just depends
on what note you start the scale on, and what fret you play it!!
Am penta is A C D E G. C Major is C D E G A!
EX: An A minor Penta scale played on the 5th fret is also a C Major Penta
Scale, if you play from the 2nd note, skipping the 1st A. C D E G A
The reason we play the Penta scales is because we skip the 2 notes in
the major scale that often "clash" with our chord changes. Making it
just about impossible to hit a wrong note!
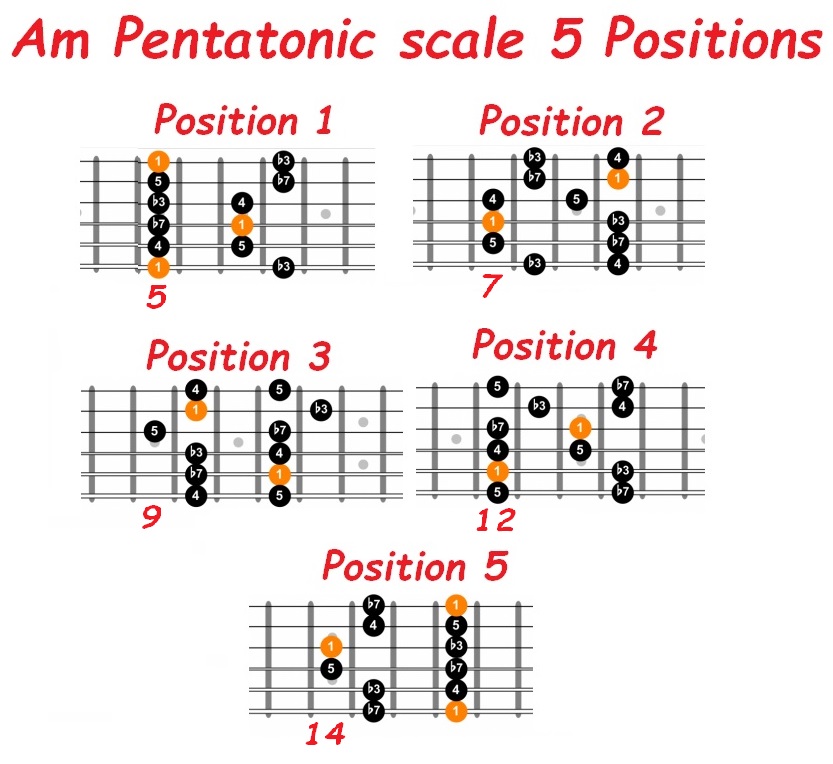
What are the positions? You play the 5 notes, starting with the 1st
note of the scale. In this case, A. A C D E G A. This is 1st position.
Starting on fret 5, 1st finger, A.
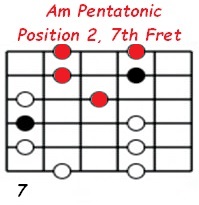
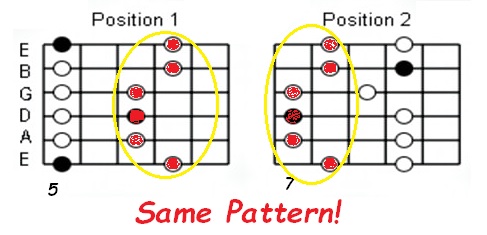
Position 2 plays the same notes, but starts on the 2nd note of the scale.
C, C D E G A C. 3rd position starts on the 3rd note, D, D E G A C D.
Starting on fret 9, 1st finger. The first note is 2nd finger on fret 10, D.
Same for the other 2 positions. You start on the E and G notes.
DON'T PANIC! The charts will make this easy to understand!
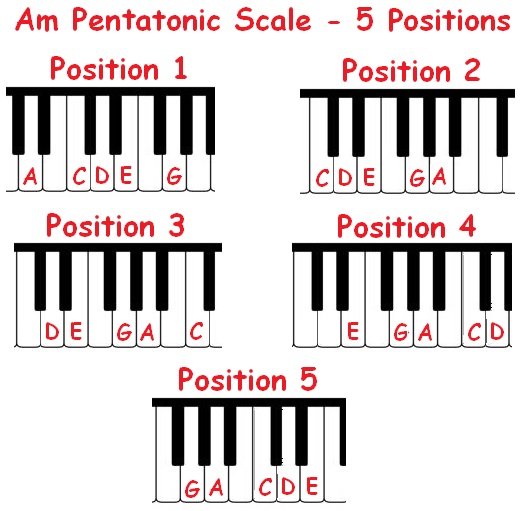
Just play A C D E G from different start points!
If you did, or are now doing the "How To Practice From Day 1" workshop,
you know the basic dozen finger combinations that make it easy to play
and quickly learn ANY scale! If you missed that one . . . here's an idea.
START FROM THE BEGINNING! If you work on the Day 1 workshop,
you will be where you will be in 2 years, but in 90 DAYS!
Link to "What and How to Practice"
~~~~~~~~~~~~~~~~~~~~~~~~~~~~~~~~~~~~~~
For the next 90 days, do this Workshop as your Daily Practice Session
WARM UP! After you finish the following exercises, move on to your
regular practice session. BUT DO THESE FIRST!
You do each of the tracks the same way!
You start (obviously!) with Track 1. Start the track, and play along with it
UNTIL IT GETS TOO FAST for you to play accurately!
DO NOT practice SLOPPY!
beginning! DO THIS 3 TIMES! Then go to Track 2.
It doesn't matter how far you get each day! If you can't get past playing
more than once or twice before messing up, THAT ISN'T A PROBLEM! If you
could, you wouldn't need the workshop! Just go as far as you can. You'll
progress
farther, daily! Each track is a different Pentatonic Position. IE: Track 1 is Position 1.
The objective is to be able to eventually play all 5 tracks, to the end,
without much, if any difficulty! Smoothly, accurately! It's gonna take time!
~~~~~~~~~~~~~~~~~~~~~~~~~~~
proper posture, playing technique, etc. Or much theory around the
Pentatonic subject. Most of that is covered in tutorials. But I
want to cover a bit about fingers!
For all of the scales in this workshop, you use the standard finger
combinations, using fingers 1 2 3 4. You ALWAYS use one finger for
each fret! No "sliding" or skipping the PINKY!
So, in the diagrams, you'll see the notes to play on each string. You're
1st NOTE in the scale. As in, you will have your 1st finger covering the
1st fret of the PATTERN, but might not play the 1st finger on a
specific string.
If you WORKED the Finger Exercise/This Is How You Practice workshop,
you know the finger combinations. These scales will only use "2 finger"
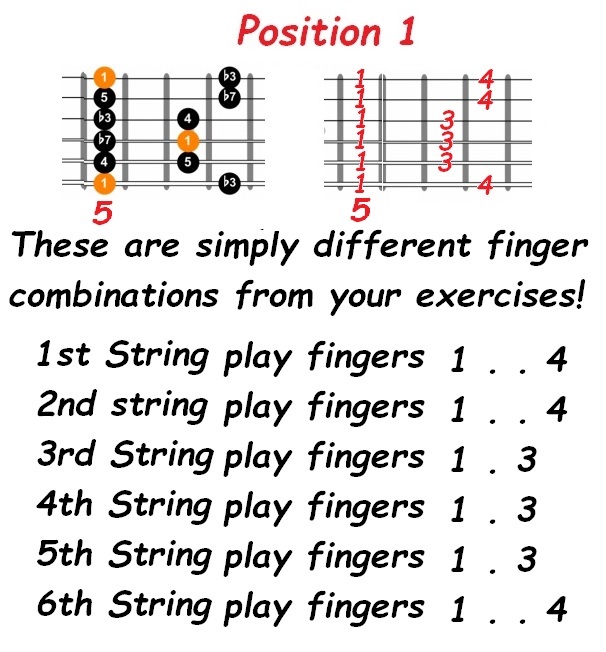
combinations per string. IE: Position 1, bottom/6th string, you play
1 4. Fingers 1 and 4. 1 covering the 1st fret of the pattern, 4 covering
the 4th fret of the pattern.
On any given string, you'll only play TWO fingers. Position 1, 5th string,
for example, uses fingers 1 3. And all strings in Position 1 use the 1st.
But other patterns/positions often do not use finger 1 as the 1st note ! ! !
On any specific string, you might play fingers 2 and 4. You will have
finger 1 as the anchor, or 1st fret of the pattern!
One more note. Ideally, your fingers will press the strings just before
the next forward fret bar! Not in the middle of the fret! Your thumb
needs to be BEHIND the neck! In between fingers 2 and 3!
Track 1: 1 AmP5P Drills POS 1 A 6m3s.MP3
What you're learning is . . . THE PATTERNS! Position 1 is:
Fingers 1 4, 1 3, 1 3, 1 3, 1 4, 1 4.
These are all 2 note per string scales, so 100% Alternate picking!
If you write down just the finger combos/pattern for each (or any)
scale, you don't even need TAB or a chart! Like this for Position 1 . . .
From 6th string UP to 1st . . .
6 1.4
5 1.3
4 1.3
3 1.3
2 1.4
1 1.4
All tracks start like this: There is a "Count In". 1 2 . 1 2 3 4
Then you play half notes, up the scale. You'll hear the scale being
played!
Position 1, 1st finger on fret 5. USE FINGERS 1 2 3 4!
6 A C - 5 D E - 4 G A - 3 C D - 2 E G - 1 A C - 1 A HOLD 1 2 3 4
THEN BACK DOWN . . .
C A G E D C A G E D C A A HOLD 1 2 3 4.
Then, just repeat the scale, this time a bit faster. The count in,
in between each set will be at the faster tempo.

When you mess up, STOP! Start the track again. Do this 3 times.
NOTE: JUST DO IT ONCE OR TWICE NOW! The Part 1 page
skips the above verbiage! You'll go there next!
~~~~~~~~~~~~~~~~~~~~~~~~~~~~~~~~~~~~~~~~~~~~~~
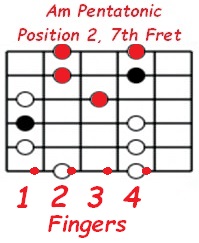
Track 2: 2 AmP5P Drills POS 2 C 6m3s.MP3
Play Position 2 exactly the same way!
THE PATTERNS! Position 2 is:
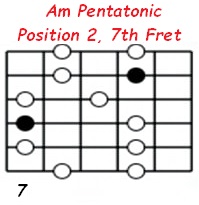
Fingers 2 4, 1 4, 1 4, 1 3, 2 4, 2 4.
If you've been playing lead for any length of time, you will
probably recognize part of this scale as The BB King Box! The
Box is an extension of Position 1. That's where it comes from!
There is a section dedicated to the BB Box! Fun stuff!
NOTE: Each position "over laps" with the previous position!
The notes played on the RIGHT half of Position 1 are the notes
played on the LEFT half of Position 2!
Position 2, 1st finger on fret 7. USE FINGERS 1 2 3 4!
C D E G A C D E G A C D C HOLD 1 2 3 4 THEN BACK DOWN . . .
D C A G E D C A G E D C C HOLD 1 2 3 4.
Then, just repeat the scale, this time a bit faster. The count in,
in between each set will be at the faster tempo.
When you mess up, STOP! Start the track again. Do this 3 times.
(ONCE OR TWICE FOR NOW!)
~~~~~~~~~~~~~~~~~~~~~~~~~~~~~~~~~~~~~~~~~~~~~~
Track 3: 3 AmP5P Drills POS 3 D 6m3s.MP3
Play Position 3 exactly the same way! But there's a half step
SHIFT when you get to the 2nd string!
THE PATTERNS! Position 3 is:
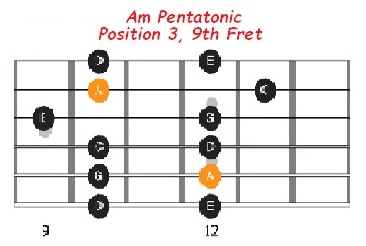
Fingers 2 4, 2 4, 2 4, 1 4, SHIFT UP 1 4, 1 3.
Position 3, 1st finger on fret 9. USE FINGERS 1 2 3 4!
D E G A C D E G A C D E D HOLD 1 2 3 4 THEN BACK DOWN . . .
E D C A G E D C A G E D D HOLD 1 2 3 4.
~~~~~~~~~~~~~~~~~~~~~~~~~~~~~
OK, now you know how the workshop, um, WORKS! The link below will
take you to a page with it all organized for the 6 parts of the workshop:
Part 1: Learn'm! Each scale/position in a separate audio file.
Part 2: Drill'm! All positions together and in different patterns.
Part 3: Play'm with Jam Tracks! Making solos.
Part 4: JAM TRACKS! 49 chart busters to practice with!
Part 5: Setting up the workshop to run offline - on Auto-Pilot!
Part 6: DOWNLOADS! Download ALL files, backing tracks, drill tracks,
and graphics!
You might not like this next suggestion! I suggest you scroll back to
the top, and do this entire intro, read it, and do it all again, one
more time! So it all sinks in!
There isn't nearly as much text/instructions in the actual workshop!
Mostly charts with the DRILL audios. Up to you.
OK, click here to go to the actual workshop! . . .
Pentatonic Master Class Workshop.jpg
Contact me any time! Got a question? Ask me! Or request a workshop topic!
Email me any time! ~/~
Wayne on Facebook
Be sure to bookmark the workshop pages of personal interest.
My corner of the Web will help you physically perform better!
There are workshops here covering many music topics. Many will focus on guitar and
harmonica. But many others will cover topics for ALL musicians who want to improve
their skills. AND improve their backing tracks!
Enjoy! Wayne
The start of becoming better starts by doing the things
you skipped, or started and didn't finish! So start here!
But THIS TIME . . . FINISH IT!!!
~ You need to read this! ~
Theory 101 Overview
This is an easy to follow "soup to nutz" overview of the whole shebang!
Then keep going!
Hope you found this interesting. If you did, please feel welcome
Please help keep us online with a small donation!
How chords are made. How to build a killer chord progression! How to
spice up your Blues progressions! All the things you get frustrated about
because it doesn't make sense! It will, just by reading this tutorial!
~ So . . . do it RIGHT NOW! ~
Do the workshops!
to drop me a line. Email me, or drop me a PM on Facebook!
Email me any time! ~/~
Wayne on Facebook
Check out my Musicians, Performers & Backing Track Support Group
Wayne's Corner Support Group
The MidKar Website has 260 pages! With over 43,736 FREE
bacing tracks! SoundFont, MIDI editors and players and
more! All FREELY distributed!
Please Visit The MidKar Main Portal HOME Page
MidKar Portal Home Page
![]()
This site is free for all. The tutorials, workshops. 43,813 MIDI, KAR &
BIAB backing tracks files, 23 BIAB User Styles. A FREE SoundFont,
Timbres of Heaven. Free MIDI players and editor!
The fees for a site this large (Nearly 200 pages with over 50K files)
is pretty high, as you can imagine.
Please consider making a small donation to help keep us online. It
would help so much! Thanks! Wayne
PS: I pay for the site and all hosting, security and domain related
expenses out of pocket. Donations appreciated. Please click the link below.